An architectural play-model: Part 1


David Neat, architectural model, 2018

I was asked to make a model of gallery rooms newly added to a private house in Hampshire, and have been working on this part-time for the last few months. The focus was on the interiors, since the idea was that the owners could use the model to explore different arrangements of the contents, but it was agreed that the model could also have an aesthetic presence of its own .. as a sculptural object in itself .. so I took the freedom to stylize aspects of the exterior and to avoid fussy detail. After initial talks with the friends who’d commissioned it the model developed its ‘plaything’ nature .. somewhere between dollshouse and construction kit .. as it progressed. From the beginning the plan was that there would be detachable sections, making it possible to peer into parts of rooms, but that these ‘building blocks’ could be quickly and cleanly reassembled again. This suggested a baseboard with cavities into which room sections could be slotted into place .. further adding the qualities of ‘jigsaw’ and ‘puzzle’ to the aspect of play.

We wanted the roof structures to be represented, mainly to illustrate how the interiors are crowned by these light-receiving cones. But I only wanted to ‘outline’ them as it were, and they needed to be detachable. Giving them any suggestion of their external nature would have made them too heavy-looking, so I took advantage of their separateness to make them  ’emblems’ in yellow Palight.

David Neat, architectural model, 2018

David Neat, architectural model, 2018

David Neat, architectural model, 2018


Working with Palight and Palfoam

Once again I wanted to use my favourite foamed PVC for most of the build, because it is one of the most manageable and versatile materials I know! Using this would also mean that the individual ‘room blocks’ would not become too heavy while still being structurally very solid. At the chosen scale of 1:25 the main walls came to roughly 15mm thick in the model, while the interior walls could be represented with 5mm. I had quite a large stock of 5mm, but I chose to build each section of thick wall as a ‘sandwich’ i.e. solid 5mm PVC both sides, with a 5mm thick framework in between. This was partly to reduce the weight ( and therefore the stress on the boxes ) a little more, but also because I wanted to build in a continuous groove along the tops of the walls to slot the ceilings into. In retrospect I wouldn’t do it this way again if I could help it .. it was an awful amount of cutting, sanding, aligning and gluing!

David Neat, architectural model 2018, detail of foamed PVC walls

Here in the UK Palram’s ‘Palight’ brand foamed PVC is available in white or a small selection of colours, and comes in a few different thicknesses. But of the white only the 1mm thickness is actually Palight. In the thicknesses from 2mm to 10mm ( there used to be thicker, but no longer it seems) the material is Palfoam. This is important to know, and to check when ordering, because Palfoam is softer. This makes it even easier to cut ( with a scalpel for example, as I do, and especially if one cuts along the extrusion grain i.e. along the less bendy direction ) and it glues together even stronger because the cut edges are more porous. But the surface of Palfoam is much more susceptible to scratching, so something needs to be done about it if it’s being used for a model that’s going to be handled.

David Neat, architectural model 2018, white wall texture samples

I knew that I was going to clad the outsides anyway with whatever I came up with for the brickwork effect, so my first task was to find a covering which would be suitable for the interior walls, which in reality were just white-painted plasterboard. Apart from the practical durability aspect I wasn’t happy with the idea of just white PVC walls anyway .. it’s the most uninteresting, lifeless form of white! One possibility was cladding the interior with Daler Rowney ‘Georgian’ oil painting paper ( on the left above ) which is quite a tough 250gsm, primer-coated and ‘linen’ textured paper. This is available as pads or sheets. The other idea was evenly stippling Polycell’s Fine Surface Polyfilla directly onto the PVC ( shown on the right ). I’ve textured PVC this way before  so I know that it stays put and resists scratching better than the plastic alone. It’s tricky at times to maintain an even quality of stipple, and the oil painting paper was the easier and quicker of the two to do, but I was worried that the paper could scuffing at the edges after repeated handling. Fine Surface Polyfilla is also a more sympathetic, slightly warmer white, so I chose this for the wall treatment.

David Neat, architectural model 2018, detail of stippled texture on walls


Simulating polished concrete

The most important aspect of the interior, the part which needed to look ‘convincing’ above all else, was the polished concrete floor. Especially so, since floors assume greater significance in models than in real life, because we’re mostly looking straight down on them. That usually can’t be helped, but it’s one of the reasons why we chose to make the model in removable parts, making it possible to get more of the ground level perspective.

David Neat model-maker, architectural model 2018, polished concrete floor

David Neat model-maker, architectural model 2018, polished concrete floor

I was originally going  to go with a method I’d tried before, using matt photo prints of actual concrete and achieving the polished look by spraymounting clear acetate on top. I’ve used this technique for very convincing marble or polished wood, easy to play around with because the parts can be ‘tweaked’ separately instead of having to achieve it all-at-once, and satisfying to look at because the surface effects ‘come from within’ rather than lying opaquely on top. Incidentally, it’s interesting to observe from the last three photos how .. even in simulations! .. the particular warm greenish-grey of concrete can alter quite a bit dependent on the light. I’ve noticed many times in real life how much concrete can change its mood under different lighting.

David Neat model-maker, recycled paper

As I was saying, I’d planned to create the concrete with photos but by chance I happened to have a cheap, recycled paper that worked even better as a basis. These (above) were file dividers found in a £shop which I’d kept because their back surface was interesting. The grey ones were a good basis in terms of colour and mottling, a suitable warm greenish-grey, though a little too dark and too even. But I found that if I use a sanding sponge on the paper  I could make it lighter, while giving it a bit of animation.

David neat model-maker, simulating cocrete with recycled paper

David Neat model-maker, concrete effect samples

Embossing the back first with a serrated modelling tool created other distinctive patterns in the paper when sanded. I didn’t want this kind of patterning in this case, but it’s an interesting effect.

David Neat model-maker, polished concrete simulation using recycled paper and acetate

I had to cut the floor pieces out of 2mm Palfoam first, clad these in the paper ( spraymounting down using 3M’s Craft Mount, the strongest ), modify the paper surface by sanding, vacuum the surface to remove any dust .. then I could apply the acetate. This is straightforward ‘transparency film’ designed for printing on, sometimes also called ‘OHP film’ ( for overhead projection ). Hence it’s surface feels slightly rough on one side, because there are micro-deposits of clear priming material to help the ink to fix. It is this side of the acetate that needs to be spraymounted, then laid and firmly rubbed down over the paper. Now the glossy side of the acetate is on top. This is usually too glossy for a polished concrete surface ( though it depends what look you’re going for) so I take some of the gloss away by rubbing either with a kitchen scourer or very fine sanding sponge ( the kind painter/decorators use for matting paintwork ). This will deepen but also slightly lighten the effect.

David Neat model-maker, samples for a polished concrete floor

I felt in the end that my polished concrete was still a little too dark and not ‘beige’ enough, so I gave all the pieces a light and mottled dusting with Belton Molotow ‘Stone grey light’ spray paint. Above .. to the left is an example of the photoprint method (which in this case was far too busy and specific); in the middle is the recycled paper/acetate version; and on the right the final adjustment adding a dusting of spraypaint.

In the next part I will be talking about the baseboard, describing my methods for staining woodwork, and a ‘generic’ or stylized treatment for the brickwork.


Respect for the pixel


While working on the studies featured in my recent post Digital painting I developed, for the first time, a strong attraction towards pixels! Up to then I’d always considered them blemishes to be blended over, or even when I’d descend down there to work amongst them, as building blocks which are meant to disappear within the whole when seen from afar. But with those studies and the others I’ve included here I started to value the distinctive ‘zing’ they could give, and on another level just as much .. their truth to the medium! They are the ‘atoms’ of digital work, and it seems right to make use of their distinctiveness where appropriate rather than always trying to mimic the appearance of those more traditional forms of painting or drawing that have come before.


David Neat, digital study, created with PaintShop Pro and Procreate for iPad, 2017

Small Artefacts No.1

David Neat, digital studies, created with PaintShop Pro and Procreate for iPad, 2018

Jelly Bears

David Neat, digital study, created with PaintShop Pro and Procreate for iPad, 2017

Small Artefacts No.4


How pixels help to achieve abstraction

Abstraction in art is the departure from the representative dominance of forms and images so that, in its purest form, we can start to appreciate them just for themselves rather than judging them by their qualities of ‘likeness’ or association with familiars in the real world. Abstraction should not be measured according to how less ‘real’ something looks, but rather how more ‘real’ the physical stuff of the work becomes. Music is an example of an art form where this disassociation can be achieved quite comfortably .. but we never think of music as ‘not real’? It is its own real. There will always .. always! .. be association of some kind, especially in visual art, so the purest abstraction possible is not where association does not or cannot occur, rather where it is not needed for a satisfying experience, where it can be put aside. Abstraction can’t be an ‘either is or isn’t’, or a ‘black or white’, or an ‘on or off’ thing .. there are an infinite number of shades in between!

The pixel is fitting, both as medium and symbol, if we are thinking in terms of a departure from visible reality .. whether we’re aiming for the disembodied or disassociated, or towards the material ‘stuff’ which some early abstractionists referred to as more concrete. Pixels themselves don’t possess an inherent size .. the size we see them depends on how we view them! They are outside the realms of size or scale. Do they even have an inherent existence? Where are they when the lights are out?

When they become more visible they break the illusion of representation, they start referring more to medium and surface than anything else they might be representing. As one slowly zooms in to an image the pixels lose their connection to the whole, they become things in their own right.

A single pixel is like a tiny Malevich! Kasimir Malevich was the Russian painter who first proposed that a square canvas painted either black or white could be a valid work of art .. an artistic statement in its own right. Pixels are only one step up in complexity from simple black or white. 


David Neat, digital studies using PaintShop Pro and Procreate for iPad, 2018

Swamp Terrain for Toy Soldiers No.1

David Neat, digital study, created with PaintShop Pro and Procreate for iPad, 2018

SkyCluster No.1

David Neat, digital study, created with PaintShop Pro and Procreate for iPad, 2018

Swamp Terrain for Toy Soldiers No.3


What the word ‘pixel’ conjures

The word is light and bright, mainly because of its centre composed of the vowels ‘i’ and ‘e’ with an ‘x’ in between for extra ‘xing’! There is also a sharpness, suggesting it could puncture the skin but not in a serious way, because nearby associative words are ‘pick’ or ‘prick’. It has some likenesses with the word ‘crystal’, which may be significant considering the morphological similarity of the two ( ‘morphology’ is the study of the form of things and the why). But the closest relationship .. and the reason why the word conjures the quaintly magical or ethereal .. is with ‘pixie’, which most people think of as a childlike and very small fantasy being. Despite its connection to ancient folklore ‘pixel’ is also quite a modern-sounding word, akin to a detergent brand name.

The word ‘pixel’ derives from ‘picture element’ describing the smallest controllable element in a digital image. In computing, an image composed of pixels is known as a bitmapped image or a raster image. The number of pixels per inch ‘ppi’ denotes the resolution of the image and determines the size it will be rendered by default on the computer screen ( note that this may have little to do with the ‘dpi’ dots per inch print capability of a printer). An individual pixel can only be either square or rectangular, and it can only have a single ‘colour’ with no shading. The number of colours an individual pixel can become depends on its ‘bpp’ bits per pixel on a scale from 1 (pixel is either on or off, image is monochrome) to 24 (giving over 16million colour possibilities).


David Neat, digital study, created with PaintShop Pro and Procreate for iPad, 2018

Bathroom Glass No.1

David Neat, digital study, created with PaintShop Pro and Procreate for iPad, 2018

Mirkwood No.1

David Neat, digital study, created with PaintShop Pro and Procreate for iPad, 2018

Bathroom Glass No.2


So pixels are not always square?

No not always, under certain circumstances they change. I found this out when I wanted to resize my ‘pixel studies’ which were of course by nature small (i.e. many of them around 240 x 180 pixels) to my usual preferred image size 1280 x 960. I should have guessed that it wouldn’t be a straightforward ‘resize’ click in PaintShop Pro or Photoshop, but seeing the unexpected results was a better learning experience. For example here is the enlargement I wanted of a very small portion using, in the end, PaintShop Pro’s option Pixel Resize. It stands to reason, in retrospect, that the enlargement size (in this case to 600 x 450) would have to be divisible by the original size (20 x 15) for the pixels to remain as they were.

Enlargement of image using PaintShop Pro 'Pixel Resize' option, David Neat 2018

Below on the other hand is the same 20 x 15 portion which I’ve first enlarged to 23 x 17 .. so not divisible .. just to make the point (of course I then had to enlarge the result again using ‘Pixel Resize’ just so that it would appear here at the same size but I checked that it hadn’t altered the effect).

Indivisible enlargement using PaintShop Pro 'Pixel Resize' showing pixel distortion

Now there are 4 variations .. large squares, small squares, flat and upright rectangles! The pixels had to do something to compensate for the indivisible enlargement, but why they chose this way I’ve little idea! The results are much more dynamic though!

Just out of interest here is the same image portion enlarged using two of the more standard ‘smoothing’ options i.e. the ones I didn’t want .. the first Bicubic and the next Bilinear.


Enlargement using PaintShop Pro 'Bicubic' option, David Neat 2018


Enlargement using PaintShop Pro 'Bilinear' option, David Neat 2018


An interesting ‘meander’ can be followed from the word. The word-form itself is known as a portmanteau where two separate words are compressed or ‘packed away’ as one. Lewis Carroll is credited for coining the first use of the word in this way, in his book Through the Looking-Glass and it is something he practiced constantly. The word pixelation refers to the usually unwanted effect of pixels becoming too visible or creating distortions, but it is often confused with pixilation which is actually something separate, namely a form of jerky stop-motion animation where the number of frames describing a movement is purposely reduced. Here the source is not ‘pixel’ at all but ‘pixie’ as it’s meant to convey a sense of ‘possession by spirits’. In that respect ‘pixilation’ whatever the spelling is quite apt to describe the sometimes alarming transformations of newsreader’s faces when there are faults in digital TV transmission .. the images do sometimes look ‘possessed’. But there can also be moments when they appear agreeably evocative or even beautiful! The unwanted visible distortions which occur in digital images are known as artifacts (in this case usually using the American spelling).

Here are two examples of the many images to be found online labelled glitch art ..

example of 'glitch art'

Example of 'glitch art'

The significance of the word ‘artefact’

It was a coincidence that I should start acknowledging visible pixels while working on studies inspired by my Thames Foreshore searching .. but then came this significant word link! The word artefact has surfaced more than once in my pastimes over the years. Anyone serious about identifying their ‘historical’ finds on the Thames Foreshore will know the Portable Antiquities Scheme website, which catalogues finds of particular archaeological relevance. Most of these are referred to as ‘artefacts’, the archaeological definition being ‘an object made by a human being, typically one of cultural or historical interest’. One of my teenager ‘phases’ was studying things under the microscope, although now I wouldn’t be able to call it ‘studying’ more like just obsessively looking at. But I owe much of my artistic output to these hours spent! In microscopy the word ‘artefact’ refers to anything seen that is not supposed to be there but which occurs as a result of human intervention, such as a foreign particle or a distortion arising from slide preparation. The broader scientific definition is ‘something observed in a scientific investigation or experiment that is not naturally present but occurs as a result of the preparative or investigative procedure’. I remember wondering as a child whether this could also be applied .. to ghosts! But now I have been gifted the third meaning, which doesn’t appear so much in the standard dictionaries because the American spelling is commonly used. Like I’ve mentioned, this  refers to ‘anomalies during visual representation of digital graphics or imagery’ according to Wikipedia. It obviously originates from the broader scientific term, but I very much like the implication that these anomalies could also be appreciated as meaningful objects in their own right!

I’ve put more of these digital studies under Digital work 2017-18 in the Gallery section above, and I hope to add more as I complete them.

‘ Yogiji ‘ on YouTube

The word really needs to be spread about the beautiful and unique work of a friend of mine Marc Steinmetz who creates short, animated pieces where his character Yogiji .. an Indian guru graffiti’d onto a backstreet wall .. gives us his simple wisdom on the most fundamental things in life. You can find him here

https://www.youtube.com/lifewithyogiji

Marc Steinmetz 'Yogiji' still from 'The Pursuit of Happiness'

These pieces are charming (in the fullest sense of the word) in their simplicity and directness, and they are faultlessly created! There’s a very considered balance of humour and seriousness .. with great little touches such as Yogiji talking about the wall ‘I was drawn to it’ or his Third Eye turban disapparating after him. It helps to be relaxed and receptive when seeing these, but I’m convinced that if you accept them as they are, give them time and heed the words .. you’ll not only be entertained and moved, but you’re unlikely to forget Yogiji or what he has to say! One of the remarkable things is that Marc does everything himself; the writing, the graphics, the animation .. even the voice!

Marc Steinmetz 'Life .. with Yogiji' Part1

I would recommend that the best way of experiencing the pieces is to go to the ‘Videos’ page after following the link and look at the short ‘Teaser’ first, which introduces Yogiji and establishes the style. Then look at ‘Part 1’, ‘Part 2’, ‘Yogiji and Mole Man’ and ‘Yogiji Sounds the Alarm’ in that order. All are voiced in English but Marc has included the option of English subtitles if you find the accent a bit difficult, or subtitles in his native German.

Marc Steinmetz, still from 'Yogiji and Mole Man'

Marc Steinmetz, still from 'Yogiji Sounds the Alarm'

I’m not the kind of person who has ever taken to doctrines or life-coaching messages .. but Yogiji is someone I could very happily follow! As Marc writes for Yogiji  ‘Alas – You were never given a handbook for this life. This could be it.’


Digital abstracts


Digital abstract, 001, iPad finger painting, 2017

001, 2017


Digital abstract, 002, iPad finger painting, 2017

                                                                002, 2017


Digital abstract, 003, iPad finger painting, 2017

003, 2017


Digital abstract, 004, iPad finger painting, 2007

004, 2017


Digital abstract, 007, iPad finger painting, 2017

007, 2017


Digital abstract, 012, iPad finger painting, 2017

012, 2017


Digital abstract, 017, iPad finger painting, 2017

017, 2017


Digital abstract, 022, iPad finger painting, 2017

022, 2017


Background

I created these painting studies recently using PaintShop Pro and the Procreate painting software for iPad. The forms developed from a combination of two related sources .. impressions received while searching the Thames foreshore, and my collection of used painting palettes.

I feel I might be making some progress in getting more comfortable with working digitally, making the digital manipulation of images actually work for me .. to give me what my mind’s eye wanted .. rather than generating enticing variations which, however interesting, move in other unforeseen and unprepared directions! In traditional image making .. I mean physical painting or drawing, applying real substances onto a physical surface .. there are many limitations in comparison. With continual practise one can extend the range gradually but also become comfortable in working within these limitations, even turning them to advantage. The way one works within limitations defines one’s self .. one’s hand-print, one’s style, one’s visual aesthetic .. with consistency it almost guarantees that what one is doing will be different from another’s. Paradoxically, the infinite range provided by digital image making has led, it seems to me, to a lot of people’s work looking very much the same!

As for the Thames foreshore, I think I’ve written elsewhere that much of the experience is about tuning in to the special ‘otherness’ amongst all the sameness, or looking for the natural or man-made signs of ‘life’ amongst  the stones. But the interesting thing is that while doing that I think I’ve acquired a heightened sympathy for it ALL .. the whole range of same, similar, other or distinctive .. because nothing is identical, and everything however simple has a character of its own! In particular, there are the flints with their strong contrasts of dark and light, and their lifeform-like suggestiveness. I have a theory that it was stones such as these, the very same ones around at the dawn of humankind, which assisted the first inklings of the idea that we could both imitate other things and create shapes of our own.  

The other aspect of my Thames foreshore experience which seems to be soaking into my work more and more is .. trusting the ready-made, accepting the found object or, in other words, having faith in serendipity .. and this leads in to my second source of inspiration. For some years now I’ve been collecting up the painting palettes used in my courses, letting them dry and scanning them before soaking and scraping them clean. Have you ever stood in front of a ‘non-representational’ painting and been almost literally struck by an overwhelming feeling of ‘rightness’, a feeling .. that the balance is so sensibly poised between harmony and conflict, that the colours are so carefully considered, or that it can suggest a number of ideas but doesn’t need to be any of them? The thing is, on a number of occasions I’ve been hit by a very similar feeling while looking at a used painting palette! Is it possible that a few minutes worth of unfocused paint mixing can inspire the same feelings as weeks of painstaking work? Why not? Isn’t a painting palette a perfect example of form and colour for it’s own sake .. because it can’t be anything else? Isn’t it on the one hand pure and untainted by thought and on the other an honest embodiment of natural forces? When a painter composes an evocative abstraction, i.e. one which elicits agreement on an emotional rather than an intellectual level, aren’t they just painstakingly recreating in their own terms those same instances of rhythm and interruption, sameness and otherness, the individual and the whole, determinism and randomness .. the same that occur in a littered street, a stony foreshore or a painting palette?

While working on these studies I have become very interested again in the questions surrounding abstraction and in particular its relationship with music. This relationship is not about painting that strives to be ‘like’ music, to imitate it, certainly not painting that seeks to evoke musical or auditory sensations. It’s painting that attempts to parallel the way music is experienced.

Why is this so terribly hard? The urge to create paintings that could be experienced like music was introduced into the Fine Art forum about 100 years ago, but that means it’s still a fairly recent notion in the timespan of cultural history. Many recently past or contemporary artists may have evidenced how it could be achieved but that remains only one side of the deal that needs to be struck between creators and public perceptions. It may just be impossible; it may even go against the way we perceive things?

For me the fundamental is ‘Can we appreciate something without feeling the need to recognize what it is, where it comes from or what is meant by it?’ Yes, that’s possible with music! Of course if music appeals to us we become curious about where it comes from, and we may begin to formulate other questions, but those and other thoughts hardly affect its appeal while listening to it .. and I’m sure that most people would agree that the question ‘what is meant by it’ is unlikely to be in their minds while enjoying it? It does its job without the need for meaning! To put it another way, music can work on us without the need to reference anything other than itself.

Why can’t we do that with painting? For the moment I’m fairly convinced that we can’t .. but I don’t know why yet. Is it simply because vision is our primary means of reading, interpreting or in other words ‘making sense’ of our world, so we just can’t let go of that basic directive when it comes to processing anything visual? Or is it linked to the very different way we receive the two i.e. music can only ever be one note at a time, as it were, whereas a painting is commonly taken in all at once, then re-examined in detail? So the brain has to process the input in a different way? In a sense, music is never there, it can’t be ‘frozen’, our perception of it is a combination of the memory of what has been and the anticipation of what is to come. Maybe it’s just this disembodiment which is the key to understanding why music can work on us so ‘abstractly’ whereas painting cannot?  


1:10 scale furniture models


David Neat, 1:10 scale furniture models in photoshoot set, July 2017

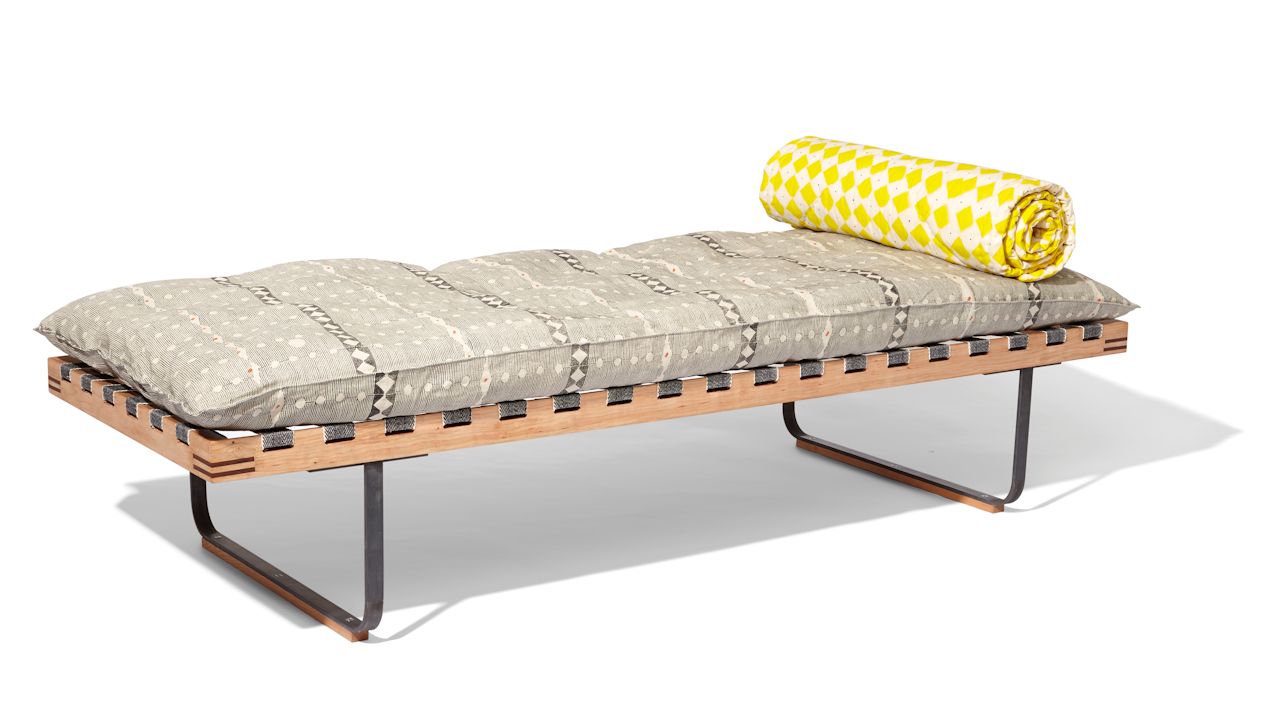
I was recently asked by The New Craftsmen gallery in London to make a series of 1:10 scale models of a new furniture collection they were producing, conceived by the stylist Sue Skeen. The accurate models were meant to serve as a ‘portable collection’ to help show the range to customers and as publicity objects before the actual pieces were ready. The models were used in a photoshoot for World of Interiors magazine and were to be presented during the London Design Festival.

The image above is one from the photoshoot, for which I was asked to make a large model ‘set’ consisting of three distinct rooms with very bold, oversized decoration but including some realistic accessories such as doors, light switches and ‘retro’ radiators. These included the re-creation of a vintage fireplace as direct homage to the artist/designer Peggy Arnold whose work was one of the inspirations for the collection.

David Neat, 1:10 scale funiture models in photoshoot set

What had to be sorted out first was a reasonable scale in which to show the pieces to best advantage while still keeping them easily portable. At first 1:6 scale seemed reasonable, the size that Vitra use for their chair model collection .. but although that might work well for chairs, some of the new furniture pieces were over 2 metres long .. too bulky at 1:6 to carry many of them around, so we had to go for 1:10 scale.

David Neat, 1:10 scale model of 'Trunk' table with oak top, Inglis Hall and Sue Skeen

One of the next most interesting challenges was deciding how the range of different surfaces would be represented, particularly in terms of the scale. With surfaces it’s acceptable to play with scale up to a point .. in fact many surfaces wouldn’t ‘read’ well enough at a small scale so they need some exaggeration. A natural way of doing that for wooden subjects is just to use the actual wood. For example the table above has an oak top so I’ve used good quality oak veneer laminated onto a Pvc base. Oak veneer is too brittle for wrapping round the curved edge so here I used ash veneer instead. For this collection I had to do quite a lot of careful veneering to give the effect of solid tops or legs, because woods such as oak, ash, sycamore or Douglas fir are not available in ‘model friendly’ thicknesses apart from veneer. 

David Neat, 1:10 scale model, 'Trunk' table with oak top, Inglis Hall and Sue Skeen

David Neat, 1:10 scale models of 'Stick' tables, Inglis Hall and Sue Skeen

Likewise, the specific Formica pattern intended for these tables would have appeared too nondescript at a dutiful 1:10. On the other hand though, using the actual Formica wasn’t an option either .. impossible to work with, and in any case too bold at 1:1 .. so in the end I made my own graphic version of the pattern and printed it at a size I felt was right. I sealed this within acetate ( see later for technique ) which I rubbed with fine abrasive cloth to give the right ‘satin’ surface.  

David Neat, 1:10 models of 'Stick' tables, Inglis Hall and Sue Skeen

Representing a rushwork seat turned out to be simpler than I’d thought. I found that I could get quite a good suggestion by embossing/carving into 5mm foamed Pvc .. the material I turn to for solving just about everything! Once patterned I undercoated in a dark, warm grey acrylic and dry-brushed the lighter rush colours over.

David Neat, 1:10 scale model of bench with rushwork seat, designed by Sue Skeen and The New Craftsmen

David Neat, detail of 1:10 scale model, bench with rushwork seat. Designed by Sue Skeen and The New Craftsmen

For both the marble and the terrazzo tables below I was able to utilize methods I’d tried for the first time in an earlier job this year for The New Craftsmen and Christies. The marble effect here is a photo image printed on inkjet transparency film (also known as OHP film or ‘printable acetate’). The marble intended for the real table was a specific type called ‘Bianca Eclipsia’ and the supplier’s website had a number of usable images, and in this case it made sense to adjust one to the right 1:10 scale. The makers of transparency film recommend waiting 10mins for the ink to dry but in practice I’ve found that it takes much longer, like a few hours, before the ink is properly smudge-secure.

The marble top was to be 30mm thick in reality so I’d cut and shaped a piece of 3mm Palfoam (foamed PVC). After the image had dryed I lightly spraymounted it on the inked side (using the stronger 3M DisplayMount), pasted it firmly on the Palfoam, and carefully trimmed round the edge. It’s difficult to trim the acetate exactly around curves, even with a new scalpel blade, so I usually cut as close as I can and finish off by sanding with P120 sandpaper or finer. Sanding has to be done just in the downward direction (i.e. downward from the top surface) otherwise the acetate film will lift at the edges. With the acetate attached ‘smooth side’ up the image is now perfectly sealed within. That’s all fine now, if you want a glossy, highly polished surface, but most marble has a more tastefully subdued one .. as if frosted. This can be achieved by sanding the acetate either with fine ‘wet and dry’ paper’, decorators’ sanding pad or something else finely abrasive like the rough layer on a kitchen sponge. Now it feels even more that the marble pattern is coming from within the surface .. rather than lying dead on top like paintwork!

If evenly sprayed the acetate will remain secure on the surface, especially if there are no protruding edges left to catch. If in doubt, both the image and the base can be lightly sprayed at the same time for extra adhesion. I realized though that this method wouldn’t work for surfacing the edge .. a 3mm strip of acetate would never hold! I’d done some experiments before where I’d printed images on regular matte coated inkjet paper, sticking them ink side down on PVC, and washing/rubbing the paper part away. I found that the image was left almost completely on the PVC .. preserved in the chalky coating which had remained firmly stuck to it. So I filled in the marble pattern around the edge of the top that way .. printing more of the same on matte coated paper; cutting thin strips of it; pasting those ink side down along the edge; trimming the excess; soaking/rubbing off the paper.

Transferring images 'ink side down' comparing white and black bases

Above is one of the first tests I made of this method, comparing the effect (using a photo of treetops) of transferring onto white and black. What remains of the image after all the paper has been removed is semi-transparent .. but I was surprised at how much of the detail and colour still came out against black. Especially if a strong glue is used e.g. 3M DisplayMount or PhotoMount, the image is very secure .. hardly possible to scratch it off even!

Going back to the inkjet transparency film for a moment .. I had used the one sold at Ryman’s, A4 size and 100microns thick (which I think they all are). Ryman’s seems to be changing their products now, so I’ve put a link here to the same material from PhotoPaperDirect. Wherever they’re from these sheets cost between 50p – £1 each.

PPD Inkjet Transparencies Overhead Projector Film (OHP Film) A4 PPD-34

David Neat, 1:10 scale model, marble table, designed by Sue Skeen and The New Craftsmen

David Neat, 1:10 scale model of marble table, designed by Sue Skeen and The New Craftsmen

I went into such detail describing the ‘print transfer’ method I used on the marble table edge .. because I then used it to create this ‘terrazzo’ table model below. Like all the table-tops here and many of the other elements, the basic form was made out of Palfoam ( or Palight if it needed to be a bit tougher). The ‘look’ of the table-top and the choice of marbles and granites were fairly well defined by the client, though an actual table was yet to be made at that time. I colour-printed a range of images; chose the best areas and drew the shapes on the unprinted side; pasted each piece in place printed side down; soaked and rubbed off the paper. It’s important to remember that this is likely to work best on a white base and I should note that sometimes definition and colour may be a little subdued because we’re seeing the backside of the ink, as it were, soaked into a minutely thin chalky layer.

After the surface was cleaned up and dried I emphasized the edges of each shape with a slight, embossed line. In the real table these would probably be completely flush, so this is another of those little ‘enhancements’ to realism, and to clarify that it’s more than just a printout.

David Neat, 1:10 scale model, 'terrazzo' table, designed by Sue Skeen and The New Craftsmen

David Neat, 1:10 scale model, 'terrazzo' table, designed by Sue Skeen and The New Craftsmen

My process of veneering

The best sources I found for a wide range of wood veneers were Vale Veneers woodveneeruk.co.uk and Wood Veneer Hub thewoodveneerhub.co.uk. Vale Veneers had the smaller range but a handful of common woods in particularly ‘flexible’ paper-backed form, c. 0.6mm thick. This was the type I was hoping for because it generally lies flatter and can be stuck down evenly without using a lot of pressure. I had imagined paper-backed veneer might be pricey but the cost from Vale Veneers was generally about £3.50 per sq foot. Originally the remit from The New Craftsmen included pieces in the less common sycamore and Douglas fir but these were available from The Wood Veneer Hub for a similar price though not paper-backed.

I made the basis (that is, the underlying material of each piece) of this oak ‘settle’ from Palight foamed Pvc. Each piece would then be clad on both sides with 0.6mm oak veneer. The visible edges would also have to be clad and this slight dimensional difference had to be foreseen and compensated for when cutting out the Palight pieces .. there’s a lot of searching, logical thought going into this but that’s what I most enjoy, even though I might not be the best at it sometimes! Oak is not very pliable even in veneer form so for covering the curving edges I had to use ash veneer .. the difference in tone should not be so noticeable at this size and if it is it can always be tinted to match. The same applied to the birch dowel used for the legs.

David Neat, 1:10 scale model of oak settle, designed by Sue Skeen for The New Craftsmen

The correct order for cladding is .. edges first, and then faces because they’re more visible. It means that any join-lines will be on the edges where they blend in better with the other edge lines. In the event of visible gaps these are much easier to fill and disguise if they occur on the edges. For the edges I cut long strips wider than needed and, surprisingly, in the direction of the grain .. normally this direction is the least flexible but I found that ash veneer could do it and when I’ve tried thin strips against the grain they just didn’t look right. After I’d pulled, glued and pressed the edge strips in place I needed to trim them near with the scalpel and finish off with a sanding plate (i.e. a thin piece of wood or plastic with P120 sandpaper attached). I did the same with the face cladding later.

I used superglue throughout. Both on the edges (applying to the plastic, moving along bit by bit) and on the faces (applying a rapid network of thin-ish lines to the plastic, especially the outline, and pressing all at once).

David Neat, 1:10 scale model of oak settle, designed by Sue Skeen for The New Craftsmen

All the tables were designed with ‘quadrant’ profile legs .. two sides of a square on the inside and a 1/4 circle curve on the outside. This was a very pleasing shape with also a lot of variety to it when seen from different angles. Most of the tables had painted legs and frame, so I shaped a prototype leg, made a few moulds and cast them in resin. However, the table below was to be solid Douglas fir, top and legs, so I had to mould and cast a thinner versions and veneer them .. hoping that I could get the veneer to stay with the curve. As it happens this worked fine mainly thanks to the effectiveness and speed of thin superglue in sticking wood veneer to PU resin, especially since the Oregon pine (the only available version of Douglas fir) fought a bit against bending.

David Neat, 1:10 scale model of Douglas fir (Oregon pine) table, designed by Sue Skeen for The New Craftsmen

Protecting model wood

Much as one might like to in order to preserve its naturalness, there’s no way that a wooden model can be left untreated if it’s going to be handled. It absorbs natural  grease and dirt from the fingers, this is turn attracts and fixes dust, and in no time the wood appears grubby. But the wrong choice of treatment can be just as demoralising!

David Neat - tests for best clear, matte wood varnish or sealant - June 2017

I wanted a coating that would hardly change the appearance of the untreated wood, certainly not make it visibly darker. Also, I couldn’t afford that the treatment would have any permanent warping effect on the veneer as some of the elements were quite thin .. and this can often happen when a water-based medium is used.

I did a number of tests with different clear ‘varnishes’ including oil; spirit-based matte and water-based matte.  In the end there were two very different mediums that did exactly what I’d hoped for .. RustOleum Clear Sealer which is water-based and OsmoColor Dekorwachs which has a wax/oil base (this is the German version from more than 20 years back when I was living there. Names and packaging  may have changed but Osmo products have remained essentially the same).

David Neat, 1:10 scale model of ash bench, designed by Sue Skeen for The New Craftsmen

David Neat, 1:10 scale model of ash bench, designed by Sue Skeen for The New Craftsmen

I painted the RustOleum wood sealer as thinly as possible and undiluted on sample wood swatches. There was a little curving but within a couple of hours these were perfectly flat again. Also, after drying I couldn’t even tell which pieces of sample veneer I’d painted! I knew there wouldn’t be a warping issue with the Osmo wax/oil, but I’d expected significant darkening. The next day after proper drying the change in tone of the wood was only very slight! Because wax/oil penetrates into the wood more than water-based sealer and different woods will react to this in different ways, there could be more darkening with some of them. A solution to this is to add a very little amount of white, preferably using the ‘transparent white’ version of the same medium if there happens to be one.

David Neat, wood treatments compared - RustOleum clear sealer and Osmo wax

Using gloss paints in models

I was never a fan of using the ‘older style’ .. i.e. spirit or oil-based .. gloss paints in models because there were always problems! Here’s the shortlist: – unless the surface to be painted is immaculate, every imperfection becomes very noticeable; unless this surface is evenly primed or suitable for the paint the ‘gloss’ that results after drying can turn out patchy; gloss paints used to be notoriously unstable, needing religiously thorough mixing beforehand and sometimes failing to dry properly even then; during a lengthy drying process the surface is bound to catch some dust particles whatever the precautions.

On a more important level than all that hassle, there was my emerging notion that ‘gloss’ just doesn’t translate in scale anyway! That something a bit more subtle and light-friendly .. like ‘satin’ .. conveys ‘glossiness’ better in the smaller scale?

However, part of my brief was to use the gloss paints that would eventually be used on the real items .. a good idea, yes, but only in terms of colour matching as it turned out. The new breed of acrylic water-based gloss paints may be progressive in some important ways .. but they’re certainly not for painting models! They .. at least, the ones I was given .. are thick, not opaque enough, non-levelling and they congeal so fast when brushed on that it’s difficult to even out the paint layer .. even on small areas! In spite of firming up far too quickly, they also seem to take a long time to ‘dry’ fully! I found this out when I took a handful of painted swatches to a meeting .. they had stuck together, a full week after painting them! I managed to make the surfaces look reasonably clean and streak-free in the end .. but it took a lot of effort. I made each item of painted furniture in Palfoam Pvc which I ‘grained’ very slightly by drawing P120 sandpaper in straight lines across (to suggest painted wood). I had to prime the Pvc first and because the gloss paints had too much transparency I used Humbrol enamels as an undercoat, mixing as near as I could get to the final colour. The adhesion between Pvc/enamel and enamel/acrylic was first-rate!

David Neat, 1:10 scale model of painted settle, designed by Sue Skeen for The New Craftsmen

I had to make two versions of the ‘Peggy’ chair, as it was called .. one plain ash and the other gloss grey. As with the settles the legs are dowel but needed to be 4mm diameter and this doesn’t normally exist! Luckily there was just one online source that did have this size but in ramin wood.

David Neat, 1:10 scale models of 'Peggy' chairs, designed by Sue Skeen for The New Craftsmen

Lastly I wanted to include here a picture of the ‘Peggy Arnold’ fireplace on its own. I was fond of the way this looked! I used an original Peggy Arnold pattern, printed on gloss photo paper in grey tones, for the tiling. The last promising discovery was that Marabu GlasArt glass paints make excellent wood varnishes! Here I have used the ‘Brown’ as it came (they can be thinned with white spirit). One coat brushed then evened out with a tissue will create a good matte cover, but after this first coat has dried for a day a second will give a nice, even silk/gloss.

David Neat, 1:10 scale model of 'Peggy Arnold' fireplace


An essential model-making tool

David Neat, essential model-making tools, solid metal guide blocks

I’ve always made a point of recommending these! I don’t know how I would get things done these days without solid, right-angled steel blocks .. to use as guides for construction, for gluing against or weighting down. I’ve noticed though that my enthusiasm has varied between ‘absolutely essential’ to ‘very useful’. The reason for my occasional reticence is that up to now I haven’t been able to recommend a reliable source .. but now I can! I’ve just received these .. seven in all .. which I ordered from  https://www.metalmaniauk.com/ because I’ve always wanted to use them on my courses.

In the past I had assumed that the custom cutting charge would be too high but these seven cost me all inclusive £33.10. I chose the ‘Bright Flat Mild Steel’ which has the essential square ‘sharp’ edges; and the bar type ‘1 x 3/4’ inches, which I felt was the smallest limit before the blocks lose the necessary weight; and I decided that a 15cm length would be fine for most tasks. Here is the specific link to the product

https://www.metalmaniauk.com/Steel/Bright-Flat-Bar/Bright-flat-mild-steel-bar-1-x-34.aspx

MetalMania do not have a minimum order so one could buy just one of course. This would cost £3.80 for 15cm, but postage within the UK seems to be fixed at £6.50 up to a few kilos so it would make more sense buying two or three.

A recap on why they’re so useful

I’ve written about them many times both here and in my book. The most useful application is when gluing two pieces on edge, applying glue to one and then positioning the two pieces together against the metal block so that one can be sure of getting a clean and straight edge.

David Neat, Using metal blocks to aid construction

It is especially important having this firm ‘stop’ when using superglue because it has to be right first time and .. more importantly .. it doesn’t matter if superglue squeezes out onto the metal because it won’t stick to it strongly. The piece just needs to be ‘popped’ off. You have to remember to scape the metal surface clean with a scalpel occasionally because it can build up. If you have two blocks, as below, you can construct perfect corners!

David Neat, Using metal blocks to aid construction

Blocks of any kind with enough length are also invaluable when trying to layer thin strips on top of each other i.e. for these decorative mouldings.

David Neat, Using metal blocks to aid construction

They can also be useful for holding elements in place while gluing, as below where I’ve taped a curving piece of styrene between them to hold it in that position while I brush plastic solvent into the join. The same can be done with thin superglue.

David Neat, Using metal blocks to aid construction


Finally, and by the way .. I feel it’s worth noting that dealing with MetalMania was a smooth experience with a couple of pleasant curiosities! In the first place their website is different from what I’m used to when trying to get hold of heavy-duty industrial materials .. bright, friendly and simple to understand. Delivery was trackable and came within 4 days using Parcel2Go .. not the usual kind of breathless courier at the door but three teenage girls! I didn’t find out why because they didn’t seem to want to be quizzed about it. On the MetalMania website they state under the heading ‘Animal Policy’ that ‘It is this companies policy NOT to supply any organisation or individual involved in animal experimentation of any kind’. Currently on the website is also a condolence message for those affected by the attacks in Spain which is accompanied by this photo. I don’t know what to make of it .. but it’s really got me thinking!

condolence message


Guide to Thames Foreshore locations

I’ve started to hunt on the Thames Foreshore again, the first chance I’ve had since the beginning of the year. But before I get too wrapped up in the promising present, I wanted to put some of the work I did in January to rest. I say ‘work’ because I worked hard to justify the time I was spending and to put my obsession to good use. The only solution for self-indulgence is to share it! So I developed the idea that I could create my own artificed version of my Thames Foreshore experience .. a collection of small cast and painted forms which could pile together like a diverse, colourful and symbolic shingle, and which could be .. perhaps quite literally .. sold by the ounce! For the moment I’m calling this rather prosaically my Thames Foreshore Collection.

So in the folder Thames Foreshore above, which I added last year but has remained practically empty, I’ve added my project log. I had also got somewhat sidetracked into feeling that an organised account of each foreshore location I visited would be worthwhile. So I’ve also put the beginnings of those there. As always this was as much for myself as anyone else, because I needed first of all to decipher and pinpoint where the access points actually were from the outdated guidance; to remind myself of notable hazards; to remind myself of any aspects of local history which could be relevant to what might be found below, and lastly to record the things I’d not only found but experienced there.

I’ve started each location write-up by marking the precise access point on Google maps, together with photos of the steps and immediate foreshore terrain. After a short listing of any ‘Hazards’ there’s a summary of local history where I’ve included sections of a very detailed Ordnance Survey map from the 1860s as an indication of the past life of the area. For example, here is the Google map entry showing the location of Horn Stairs in Rotherhithe; followed by a section from the 1860s OS map detailing the Royal Victoria Victualling Yard as was, in the Deptford/Surrey Quays area, and a photo of the entry gate to the steps at Greenwich Power Station.

David Neat, Thames Foreshore, location of Horn Stairs (Google Maps), Thames Foreshore, Surrey Docks

Thames Forshore, Upper Watergate upstream 3, Thames Foreshore, Deptford

David Neat, Thames foreshore access at Greenwich Power Station

Where I’ve found interesting images to illustrate the history I’ve included them, such as this rendition of the royal Palace of Placentia in Greenwich, formerly on the site which became the Royal Naval College, now University of Greenwich.

Palace of Placentia Greenwich in 1560

Then for each location there are the ‘Opportunities’ afforded, and I’ve started to illustrate some of these with the things I’ve been able to find so far. I’ve put up what I can for the moment, but there’s a lot more waiting to be added.

David Neat, Thames Foreshore, early 18th century clay pipe

Such as .. a portion of 18th century clay pipe found at Enderby’s Wharf on the Greenwich Peninsula, and the shingle bank underneath Morden Wharf nearby.

David Neat, Thames Foreshore, shingle at Morden Wharf

David Neat, Thames Foreshore, frost on shingle Greenwich beach December 2016

Winter frost on the beach at Greenwich and an unusually large piece of pottery dug out of the mud there.

David Neat, large potsherd, Thames foreshore Greenwich, unidentified pottery sherd on-site record as found

David Neat, Thames Foreshore, large piece of coral (ship's ballast), Thames Foreshore, Rotherhithe

Coral, weathered bricks and flints, and buried ship timbers at Rotherhithe; lastly the remains of a present-day offering to the river at Surrey Quays.

brick and flint forms, Thames Foreshore, Rotherhithe

David Neat, buried ship's timber, Thames Foreshore, Rotherhithe

David Neat, river offering, Thames Foreshore, Deptford


nature studies

Earlier this month I spent a very inspiring long-weekend with friends by a secluded lake in Cambridgeshire. We rented a lodge which had been built on the side of a former gravel pit lake just outside the village of Maxey. Although I’m aware of how quickly nature can re-assert itself .. I wasn’t prepared for a landscape which it had so thoroughly and almost convincingly taken back!

I much prefer woodland which is long-established and undisciplined, where the trees over time have become almost as much horizontal as vertical, where the decay and regrowth of generations can be felt on the nose. So I was surprised that the thin woods which fringed the lake could give me so much of this impression, even though they can’t have existed there since much before the 1970s when gravel extraction finished. It rekindled my interest in an idea begun last year, NatureMake, an organic construction toy for those who always got more from whatever was at the bottom of the garden .. as far removed from Lego as one can go.

David Neat, studies for 'NatureMake', Cambridgeshire woodland July 2017


David Neat, studies for 'NatureMake', Cambridgeshire woodland July 2017


David Neat, studies for 'NatureMake', Cambridgeshire woodland July 2017


David Neat, studies for 'NatureMake', Cambridgeshire woodland July 2017


David Neat, studies for 'NatureMake', Cambridgeshire woodland July 2017


David Neat, studies for 'NatureMake', Cambridgeshire woodland July 2017

But there was also something not quite right about the woodland .. as if the race to reclaim the ground came at a cost, or to emphasize that the show could only be skin deep for now. Everywhere trees were either keeling over or splitting like balsa, either they couldn’t root deeply enough or the ground was still too loose to support them. The fir trees were leaving skeletons behind as nature ate back the softer parts first.

David Neat, studies for 'NatureMake', Cambridgeshire woodland July 2017


David Neat, studies for 'NatureMake', Cambridgeshire woodland July 2017


David Neat, studies for 'NatureMake', Cambridgeshire woodland July 2017


David Neat, studies for 'NatureMake', Cambridgeshire woodland July 2017

The young lake itself was film genre Placid .. unusually motionless for much of the time, but quick to ripple with goosebumps at the slightest touch of any wind. I was expecting veils of mist in the mornings, but these weren’t needed for enhancement .. the light remained soft enough throughout. The way it isolated plantlife at the water’s edge, caught between still water and reflected sky, made me think of Japanese ink painting.

David Neat, lakeland in Cambridgeshire July 2017


David Neat, lakeland in Cambridgeshire July 2017


David Neat, lakeland in Cambridgeshire July 2017


David Neat, lakeland in Cambridgeshire July 2017


David Neat, lakeland in Cambridgeshire July 2017


David Neat, lakeland in Cambridgeshire July 2017


‘Contemporary Living’ at Christie’s South Kensington – Part 2

Miniature exhibits from the interactive model for 'Contemporary Living' at Christie's, made by David Neat 2017

If you want to see Part 1 of this series just scroll down to the previous entry, which will also give fuller information on the context. This was a commission from the London gallery The New Craftsmen for an ‘interactive model/installation’ exhibited at Christie’s during ‘Contemporary Living: Art, Craft and Design’ April 1-4 2017. The exhibition brought together work from Christie’s, The New Craftsmen and the South African gallery Southern Guild. All in all I had to make more than forty model versions of the exhibits complete with decorated plinths, which anyone could then move around to ‘curate’ their own exhibition within the space.

Here I am presenting a selection of my model versions accompanied by the publicity photos I was working from and a little information about each artist/designer. I have also included some notes on the materials or the techniques I’ve used to simulate the objects.

Porky Hefer

Models of Porky Hefer 'Fallen Bird's Nest' and Charles Haupt 'Num Num Branch', Southern Guild, made by David Neat

South African artist Porky Hefer’s Fallen Bird’s Nest is in reality woven ‘kooboo’ cane with a leather cushion. If I’d been able to allocate more than just a couple of days to this interesting piece I would have attempted weaving very thin, soft wire or even tried a 3D printing ‘pen’. But I had to settle for making a basic wire armature, then modelling both canework and cushion in Super Sculpey, painted with acrylics.

Porky Hefer 'Fallen Bird's Nest', model by David Neat


Porky Hefer 'Fallen Bird's Nest', kooboo cane and leather, courtesy of Southern Guild

Above the original Fallen Bird’s Nest, kooboo cane and leather, courtesy of Southern Guild.

Charles Haupt

Charles Haupt 'Num Num tables', models by David Neat

Charles Haupt works in bronze, with his own art foundry called Bronze Age in Cape Town. His speciality is making cast bronze components which can be configured in various ways as table supports or stands. For these he takes his inspiration from the regular thorns of the native South African Num Num shrub. For me these pieces were the most challenging to represent, partly in keeping them as thin but smooth as possible and also because, in the case of the tables, the structures have to be very finely tuned to meet both the ‘floor’ and the level tabletop.

Featuring Charles Haupt 'Num Num' coffee table, courtesy Southern Guild

Luckily I could snip out the basic shapes in pre-welded wire mesh, then model a thin, smoothed layer of Milliput to achieve the distinctive appearance. This needed a lot of delicate sanding before basecoating in dark matte acrylic, then dry-brushing Treasure Gold wax-gilt finish. The thin acrylic table tops had to be secured to the supports with the merest dots of superglue.

Charles Haupt 'Num Num Branch', model by David Neat

Previously the original Num Num Coffee Table in cast bronze and glass, and below the Num Num Branch in polished bronze. Photos courtesy of Southern Guild

Charles Haupt 'Num Num Branch', polished bronze, courtesy of Southern Guild


Miniature exhibits from Christie's 'Contemporary Living', interactive model made by David Neat

The ensemble above features some of the smaller works presented by The New Craftsmen from Nic Webb, Edmond Byrne and Leah Jensen. In the model I represented smaller works such as these in a slightly larger scale to reinforce their presence alongside the larger pieces.

Edmond Byrne

Edmond Byrne 'Glass Bowl with kaolin patina in amber', model by David Neat

Edmond Byrne is an Irish glass-blower whose technique involves blowing into hand-made moulds. Byrne lines these moulds with various materials such as clay or fabric which impart rough, matte effects on the cooled glass surface, in contrast to the sleek and glossy interior.

The easiest way I could achieve this in the model was by doing a similar thing .. by modelling a shape then making a mould from it. I then coloured some clear, viscous epoxy resin (Poundland epoxy adhesive) with a smudge of oil paint and spread it into the mould. To enhance the dusty patina on the outside I removed the cast while still a little tacky and brushed talc into the surface.

bowl making process

Below the original Large textured glass bowl with kaolin patina in amber. Photo courtesy of The New Craftsmen.

Edmond Byrne 'Glass Bowl in amber', courtesy of The New Craftsmen

Nic Webb

Nic Webb 'Moon Jar', model by David Neat

There were two very beautiful pieces by Nic Webb .. the sycamore Moon Jar represented above and the boxwood Lost Vessel below. Webb had given the sycamore a rich, dark finish which, as it turned out, I could suggest fairly well in slow-baked Super Sculpey with a few coats of brown shoe polish. Apart from the scorched interior the boxwood Lost Vessel was much paler so I had to use paint .. and never really got it! I realise now that I might have done better if I’d used a mix of translucent, cream and light brown Sculpey without needing to paint.

Nic Webb 'Lost Vessel', model by David Neat

Below the original Lost Vessel and Moon Jar courtesy of The New Craftsmen. The colours in this quick reference photo are not accurate.

Nic Webb 'Lost Vessel' and 'Moon Jar', boxwood and sycamore, courtesy of The New Craftsmen

Stanislaw Trzebinski

Stanislaw Trzebinski 'Mesa Ya Mwamba' model by David Neat

The young South African designer Stanislaw Trzebinski takes inspiration from marine forms, especially the ‘sea changes’ effected by aquatic organisms. Apparently he envisioned his sturdy tables as if underwater .. floating and transforming. As wood he uses muninga (also known as kiaat in Afrikaans) which is warm with a distinct, lively appearance. I wanted to trial a different technique for simulating this and needed it highly polished.

I was pleased with the results obtained surfacing the plinths with patterned acetate so I tried the same with the table surfaces .. finding a suitable image; adjusting the scale and printing on inkjet compatible film, which was then spraymounted onto the Pvc table top, ink-side down (once it had dried on the film, which can take a while!).

Stanislaw Trzebinski 'Mesa Ya Mwamba' model by David Neat, detail showing surface

One of the virtues of this method is that the pattern feels ‘within’ the surface (rather than sitting on top, like paint). Inkjet ink is transparent, so layers can be superimposed for richer, darker effects. Lastly, the top surface of the acetate is a perfect ‘mirror’ gloss, if this is the aim, but it can also be subdued as I’ve done here by rubbing with scouring sponge or superfine sanding pad (available from specialist decorator’s shops such as Leyland). When cladding a surface in this way it’s always better to cut the image slightly larger; spraymount onto the image; press and rub onto the host surface; turn over, and trim the edges with a fine scalpel. I’ve used 3M Display Mount for a strong bond.

I used strong, thin glassfibre rod for the legs (because it bonds well to the Pvc top) then modelled the details in Milliput. Below is the actual table, entitled Meza ya mwamba, cast bronze and kiaat, courtesy of Southern Guild.

Stanislaw Trzebinski 'Meza ya mwamba' table, model by David Neat

David Krynauw

David Krynauw 'Jeppestown Waiting Bench', model by David Neat

The Johannesburg designer David Krynauw chose panga panga wood (related to wenge) for this version of his Jeppestown Waiting Bench. In it he’s paid homage to the traditional riempie furniture method (using worked leather thonging for seats or backs).

I cut the basic framework out of 2mm Palight, then there was a deal of edge smoothing. Of course I had to take a shortcut with the criss-cross thonging (which in reality is surprisingly thin), substituting pieces of plastic embroidery mesh. Below is the real Jeppestown Waiting Bench, panga panga and leather, courtesy of Southern Guild.

David Krynauw 'Jeppestown Waiting Bench', Southern Guild

Meyer von Wielligh

Meyer von Weilligh 'Leaf Sideboard', model by David Neat

‘Meyer von Wielligh’ is the duo Norman Meyer and Abrie von Wielligh. They have created a number of versions of their Leaf Sideboard .. this one using ash wood and steel, the leaf patterns inspired by leaves scattered on the floor of Knysna Forest, in the Garden Route area of South Africa.

For me, once again Palight foamed Pvc came to the rescue, because it can be easily embossed .. sparing me the chore of inlaying real wood veneer which wouldn’t have done the job at that scale anyway.

Meyer von Weilligh 'Leaf Sideboard' detail, model by David Neat

Below is the photo reference for Leaf Sideboard, solid ash and steel, courtesy of Southern Guild.

Meyer von Wielligh 'Leaf Sideboard, ash wood and steel, courtesy of Southern Guild

William Waterhouse and Louisa Loakes

William Waterhouse/Louisa Loakes 'Cherry Day bed', model by David Neat

For their Cherry Day bed collaboration William Waterhouse made the structure and textile designer Louisa Loakes hand-printed the mattress and head-roll. They both work in London, William specialising in furniture and installation pieces often employing movement and mechanisation. I found it easiest and ‘neatest’ to model mattress and roll in Sculpey, then paint with acrylics. The written dimensions suffered in transit, so my version ended up a little short!

William Waterhouse & Louisa Loakes 'Cherry Day bed', cherry wood and steel, hand-printed fabric. Courtesy of The New Craftsmen

One of William’s kinetic installation pieces was included in the exhibition; the Beaufort (Air Powered Machine) .. a mesmerising chandelier-like structure fed from an unseen air pump. Since I couldn’t hang anything in the model, mine had to rest as if ‘off duty’ on a plinth.

William Waterhouse 'Beaufort (Air Powered Machine)', model by David Neat

Photos of the original Cherry Day bed, cherry wood and steel with hand-printed textiles and Beaufort (Air Powered Machine) in brass and air, courtesy of The New Craftsmen.

William Waterhouse 'Beaufort (Air Powered Machine)', brass and pumped air, courtesy of The New Craftsmen

Heino Schmitt

Heino Schmitt 'Be Seated', model by David Neat

Heino Schmitt’s bench which he entitled Be Seated utilizes an unusually large piece of olive wood which he found on a river bed. Some of the original nature of the wood has been retained at the edges but combined with decidedly man-made elements in brass and steel. Once again I grained and painted Palight for the seat. Photo below courtesy of Southern Guild.

Heino Schmitt 'Be Seated', olive wood, brass and steel. Courtesy of Southern Guild

Trevor Potter

Trevor Potter 'Weaver Nest Lamp', model by David Neat

Trevor Potter’s Weaver Nest Lamp represents a fascination with a weaver bird colony near to his home. Like a number of the other South African designers he favours bronze, because of the freedom it gives to model in an amenable material such as wax before making inflexible in metal. A quote from him about the work is worth giving in full:

‘Nest-building exemplifies a drive to create and it is in this instinct, shared by all life, that consciousness shows its face and expression can be noticed’

My simple expression of it just involved Pvc, wire and Sculpey. Below is the original, bronze and glass, courtesy of Southern Guild.

Trevor Potter 'Weaver Nest Lamp', bronze and glass, courtesy of Southern Guild