
Like the other organised ‘Pages’ on this site, this collection is ongoing and meant to be added to as I have more examples. Although entitled ‘furniture’ it also includes related things such as a standard panelled door and a chandelier design. All the designs are either adapted from specific examples or generalised according to common measurements or features I’ve researched over the years and I’ve developed them mainly for use as teaching exercises.
By default I draw by hand at 1:10 scale with a 0.3mm pencil and scan at 300dpi resolution, so most of the drawings will print by default at that scale. In a few cases which involve less detail I have drawn at 1:25 scale and this is always indicated in both the text and the image title. I usually don’t put dimensions on the drawings but I have referred to key measurements in the text so that the accuracy of the printout can be checked. If you need to reduce a drawing made for 1:10 printout by quite a lot .. to 1:25 scale for example .. you will need to check whether the lines will show up clearly enough. They have done, just about, when I’ve tested them.
Scale conversion
Converting scales is simpler than many people imagine! For example, most people with even a little understanding of scale would not have a problem recognising that converting a 1:10 drawing to 1:20 means making it half the size ..or in other words 50%. Another way of arriving at this conclusion would be to divide the ‘10’ by the ‘20’ which gives ‘0.5’ then multiplying by 100 to give ‘50’ as a percentage. So it is exactly the same for 1:10 to 1:25 .. divide the ‘10’ by the ‘25’ which gives ‘0.4’ then multiply by 100 to give 40%. If instead of reducing you want to enlarge it’s also exactly the same calculation. For example enlarging 1:25 to 1:10 .. divide the ‘25’ by the ‘10’ which gives ‘2.5’ then multiply that by 100 which gives 250%. It’s that simple!
Materials
For 1:10 scale work I’ve found that 2mm Palight/Palfoam is the best basis material, building up a double layer where required i.e. for leg thicknesses. I have a practised method of doing this, including ‘graining’ the Pvc to look like wood. For more on the surface treatment see the page ‘Palight’ brand foamed Pvc in the Materials section under ‘constructing’. I’m planning to detail the construction methods for 1:10 furniture in a future post.
At 1:25 scale 1mm Palight is also ideal but at this scale there’s also the option of working with stencil card, especially doubled thicknesses. For more on this see Working with stencil card also in the above section.
Where the drawings are intended to be cut out and temporarily spraymounted for cutting through I’ve used the standard repositionable Spraymount from 3M. It only needs very little, just 2-3 very quick passes at c. 10cm distance .. just enough to hold it firmly while cutting through but not so much that the drawing shifts at all or is difficult to peel off. Apropos this, after mounting the pieces should really be cut and paper removed straight away because the glue only stays properly repositionable for a couple of hours.
I recommend thin superglue for gluing, essential for Palight but also advisable for stencil card. Pva glue will take to stencil card but the bond is not that strong. It’s very worthwhile to note that when working with superglue breathing heavily on the parts to be glued (to introduce moisture) can make a big difference ..seriously!.. especially if the superglue appears not to want to set. It also follows that if the superglue is giving you even a slight fraction of a chance to reposition .. you should hold your breath!
Whether 1:10 or 1:25, and whether using Palight or stencil card my advice is to carefully bend chair-back .. and also back legs if preferred .. once all has been glued together. It will weaken the structure but the bends will stay. If you’re very good at applying minute amounts of superglue you can even ‘cement’ the bent joints a little from the outside, breathing heavily on them and letting them set.
Basic chair 1:10
Image size 2241 x 1533
This is not a copy of a particular chair but a general ‘design’ I’ve made according to common dimensions and features researched for this type of basic wooden chair, perhaps closest to a typical kitchen chair.
The seat height is 47cm which is a little higher than the absolute average of 45cm but more typical for this kind often used as dining chairs. The seat size is more generous than an average dining chair though, measuring 42cm across roughly in the centre by 40cm deep. Compare this for example with the classic Thonet Bentwood café chair type which has a seat diameter of c. 38cm. The overall height of my chair is also a little more than it would average, at 96cm from the ground. Compare this again with the Thonet which is commonly c. 87cm high.

The three pieces drawn .. chair back including legs, seat, and front legs including frame .. are meant to be spraymounted onto Pvc and cut out. I’ve included a side view just to indicate the incline of the chair back and the position of the seat in relation to the back legs etc, which is also indicated on the seat outline. The chair back inclines 5cm (measured at the top) out of the vertical .. this accords with the recognised average 5 degrees for the slant of chair backs. I’ve also included the side view to make it clear that the front leg portion should be stuck underneath the seat just a touch behind the front edge. This is common and generally looks better.
I’ve kept the cross-supports for the legs as simple as they could be for this making-method but these of course could be changed. It may be more common for the front to be free, with similar struts at the sides instead.
Rococo armchair 1:10
Image size 2263 x 1638
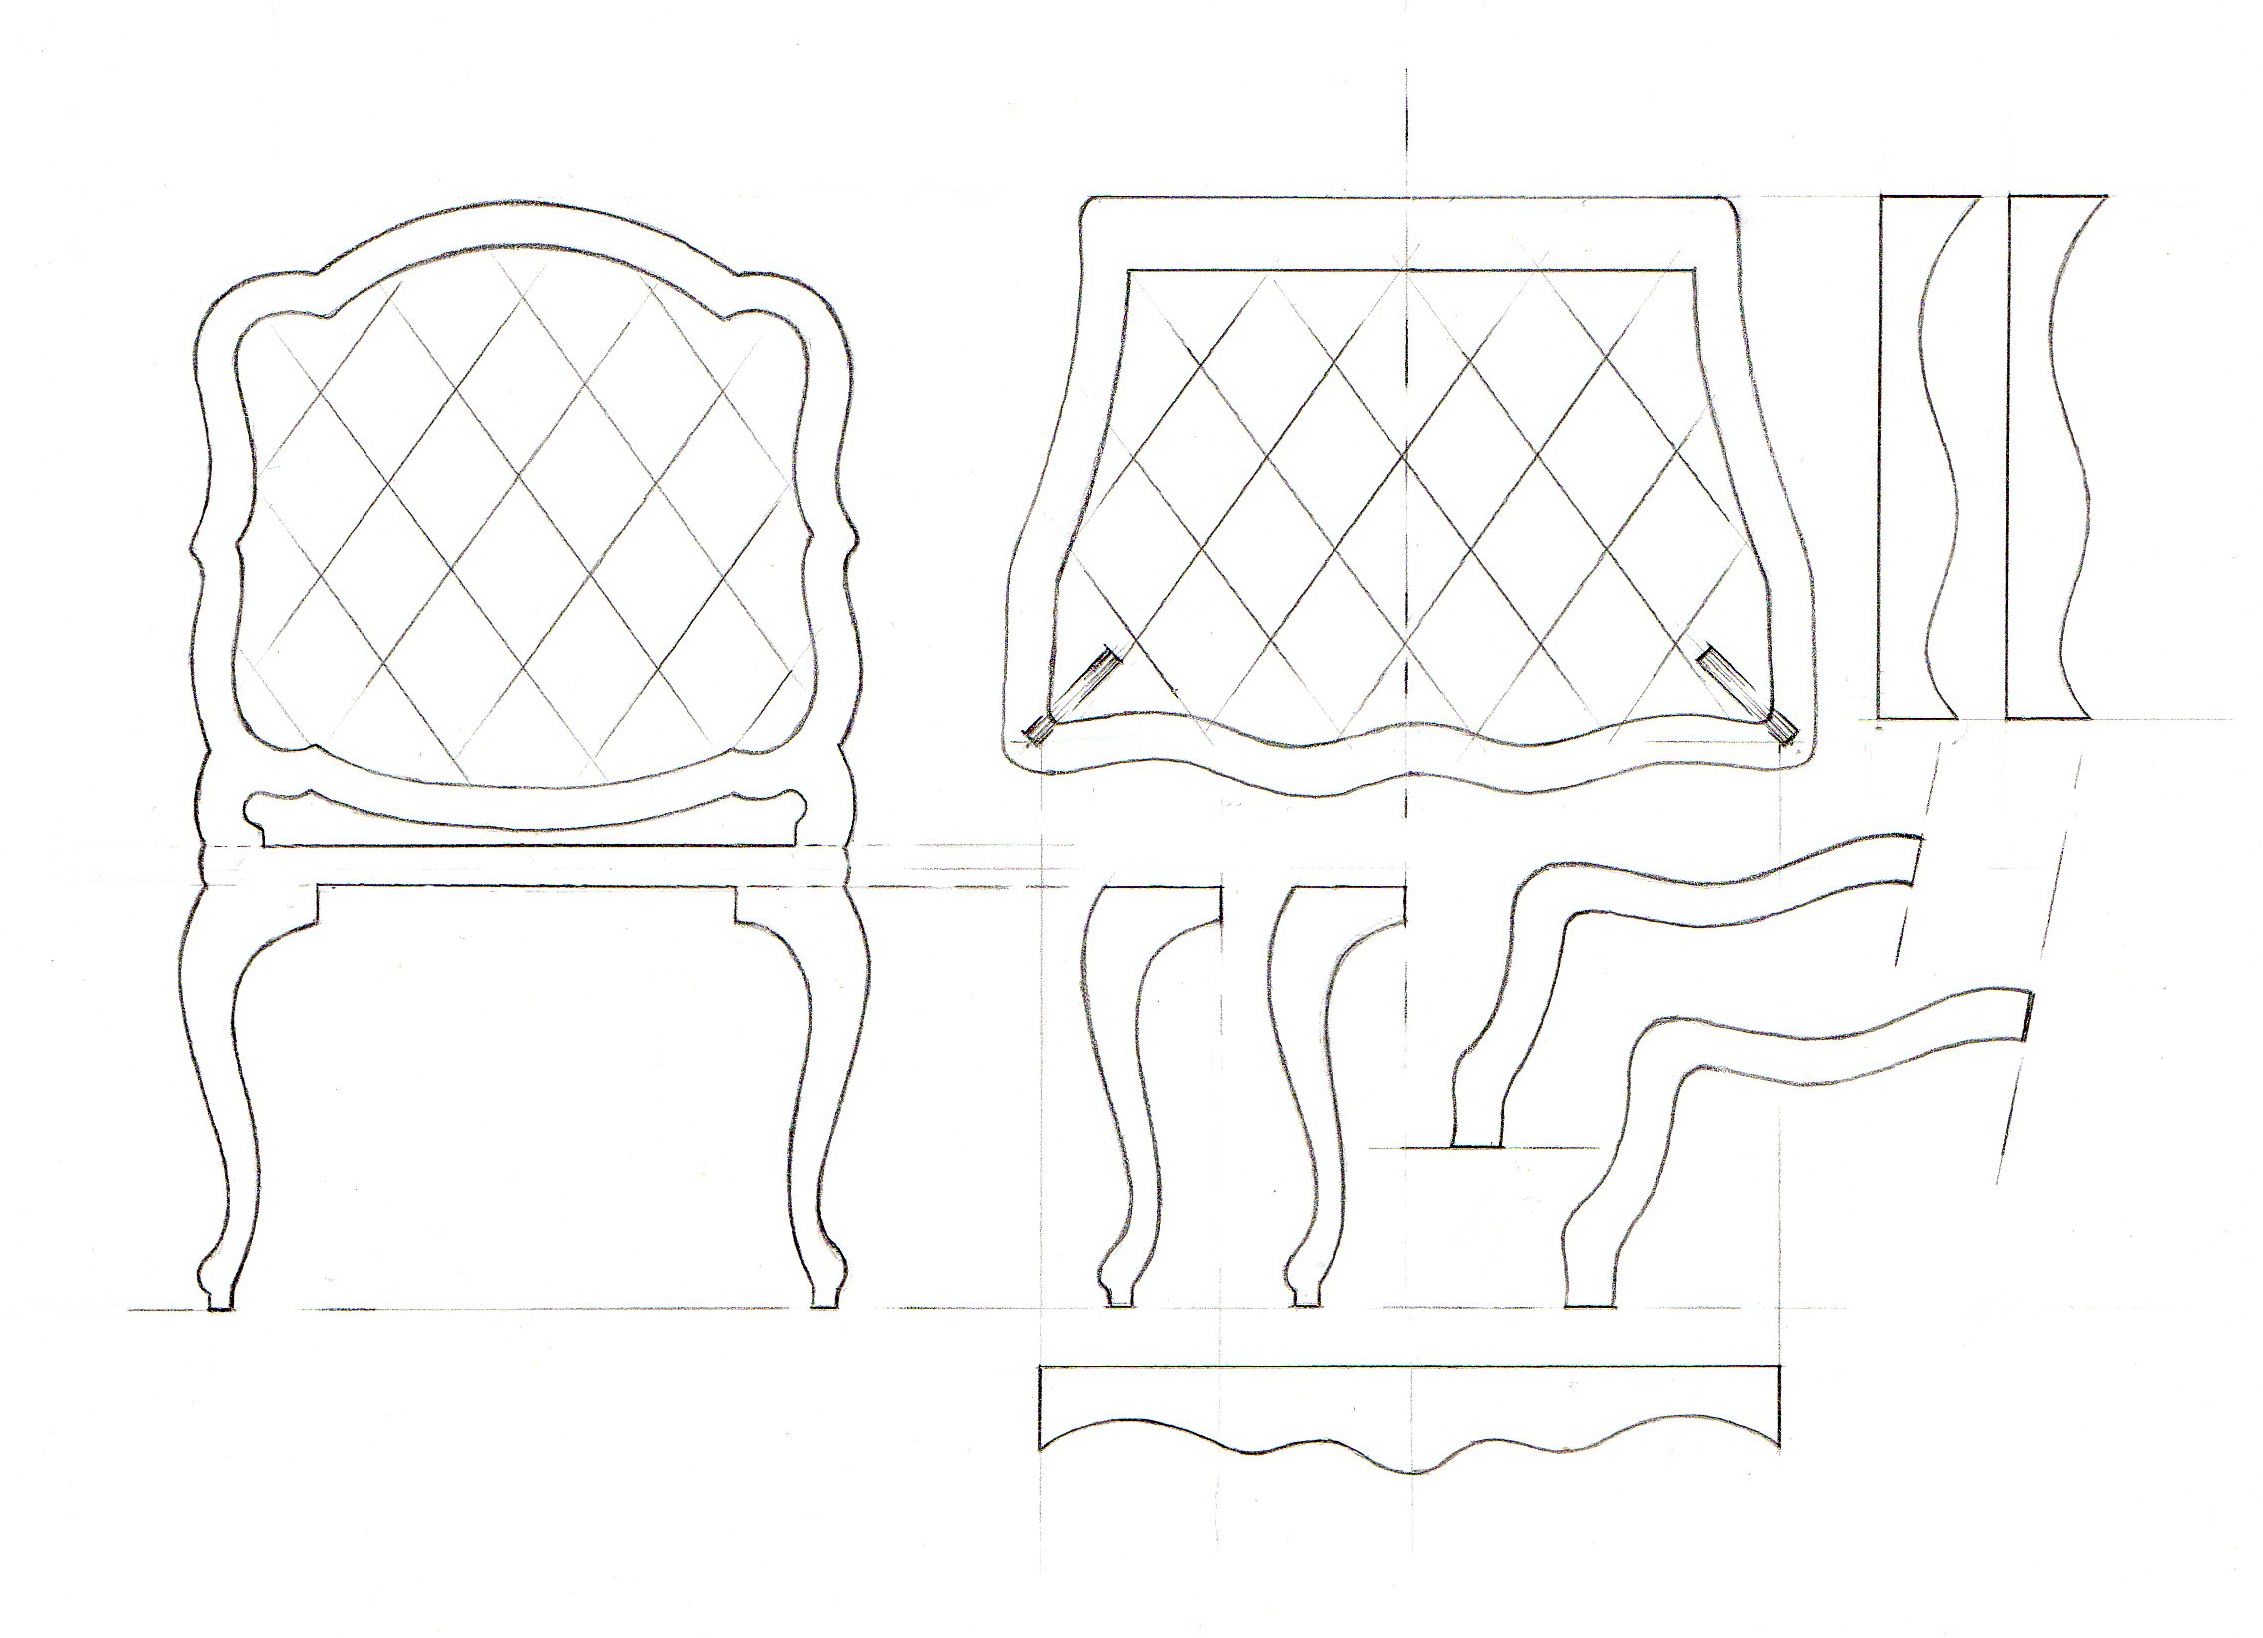
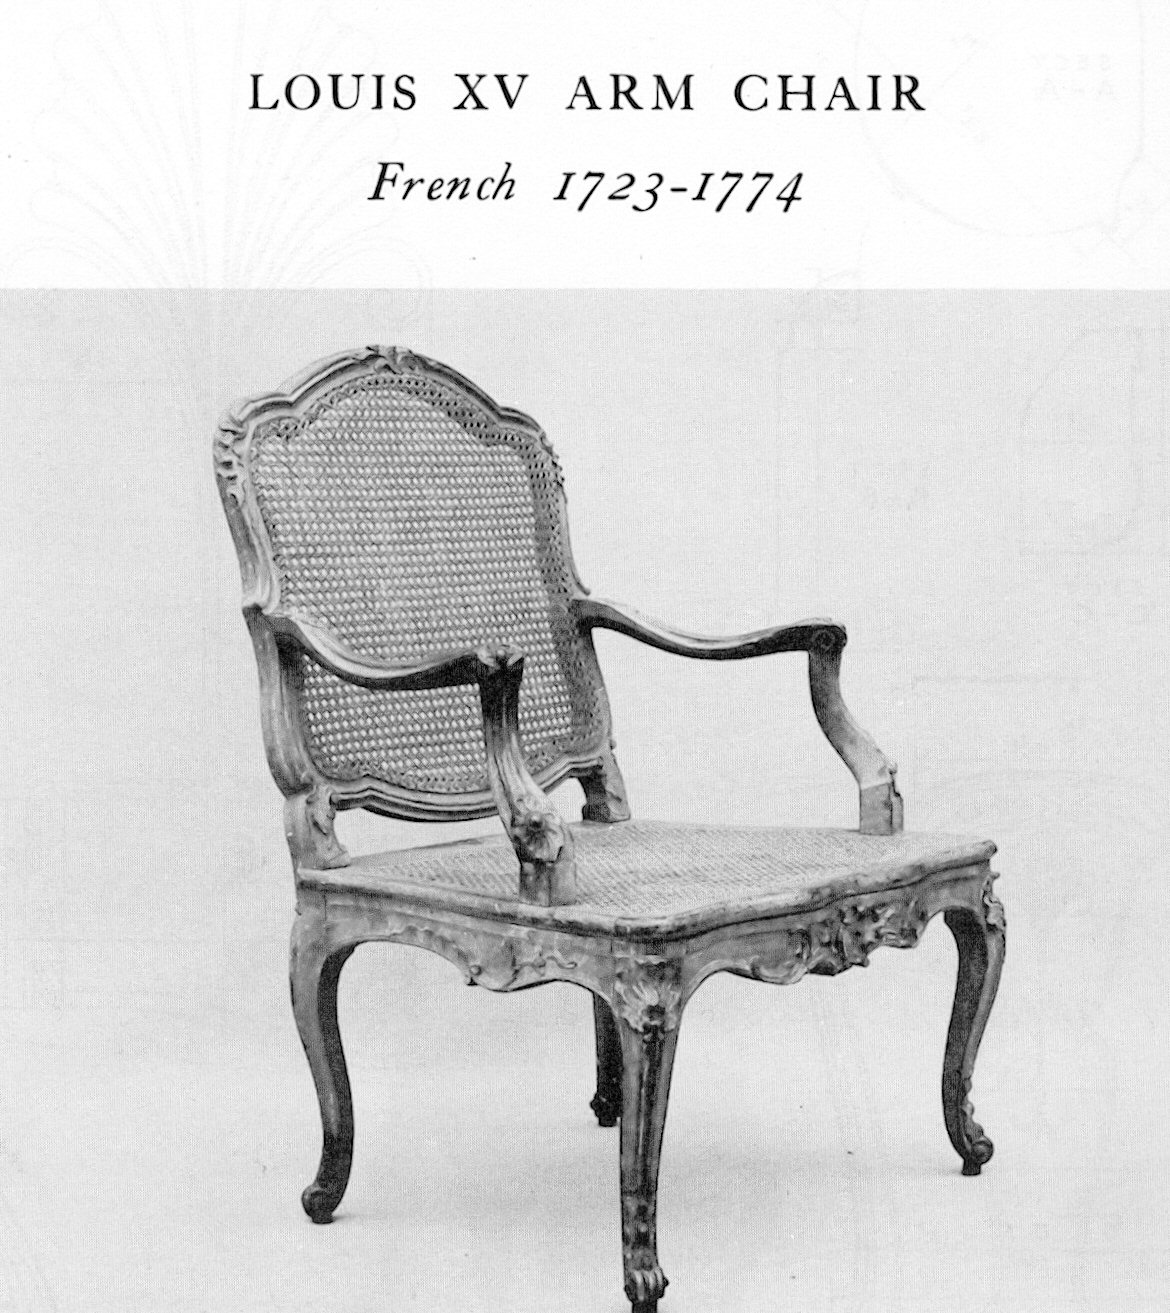
I’ve always included this Louis XV design for anyone brave enough to try intricate, curved cutting and it is popular .. most people have been brave enough to give it a go! It’s a simplified version of an actual chair from the mid-18thC featured in the unique book Masterpieces of Furniture from Verna Cook Salomonsky which includes the following photo and measured drawing.

Unlike the original chair my version is meant to have a solid, upholstered back and seat, so the inner outline on the back and seat portions represents the edge of the cushion. The darker markings on the seat show the angled (45 degrees) positions of the front legs underneath. I’ve also indicated how the upholstery might be ‘quilted’ (or more properly speaking ‘buttoned’ to produce this pattern). That’s something you may like to convey at 1:10 scale but hardly to be expected at 1:25! I’ve drawn what I think would be the best shape for the arms .. these work well, but they are optional. So too are the shaped strips of the seat-frame which can be added once the rest is assembled.
The height to the seat platform is just 39cm, the back is 94cm from the floor at its highest point and the width of the seat at the front is 69cm. On the arm drawings I’ve indicated the slope of the back as roughly 11 degrees.
Folded chair 1:25

In my book Model-making: Materials and Methods I included this photo of ‘folded’ chairs using stencil card .. but have hardly followed this method up since. Recently I’ve become more interested in stencil card again and I drew up this plan for a chair in one piece. This is only for stencil card and only 1:25 .. anything thicker won’t score/fold as neatly and anything bigger won’t carry the ‘trick’ as well. The arrows indicate which lines should be scored for bending. This will need practise .. testing how deep one needs to score for easy bending without cutting through by mistake! Note that the seat overlaps the front-leg piece a little so than when assembled the seat juts out very slightly. This little overlap needs to be cut through, the rest of the line scored.
Image size 1208 x 900
I don’t know whether it’s the right decision to arrange and join the pieces just like this. It makes it fairly easy to put together, but it may be better to add the seat separately. Also, this arrangement means that the main ‘back’ piece of the chair is turned around to become the front. Anyone used to cutting things out knows that the ‘other side’ never looks quite as good as the side one’s cutting from however thin the material might be.
The leg height is 45cm so with seat a little more and the back height is a total 93cm and 40cm wide.
Folded table 1:25
Image size 2157 x 1261
The table is a companion piece to the chair and is also featured in my book. Here the table-top has to be separate since the frame/legs sit 10cm inside the table edge, indicated by a dashed line. I have not included a ‘flap’ on one end of the leg strip for easier gluing as this tends to distort the shape, but it should be easy enough to join the last leg ‘edge to edge’, if a bit fiddly.

Panelled door
Image size 1485 x 971
I’ve included the panelled door here so that it can be found more easily, but for full instructions on how to use this drawing see my post Making a panelled door in stencil card from April 2016

The door accords with common UK dimensions for an interior door, altogether 198.1cm high by 76.2cm wide (in other words 6ft 6in by 2ft 6in).
Basic soft armchair 1:10
Image size 1060 x 1368

This is a different type of construction drawing to the previous ones in that it lays out the form but is not meant to be pasted because almost the whole armchair will be made out of sheet foam. In this case Kapa-line foamboard foam is intended, with the paper removed .. 10mm thickness for 1:10 scale or 5mm thickness for 1:25. Instead I’ve found that the best way to transfer the component shapes to the foam is to cut them out and draw around them. The way I’ve done this soft furniture so far is to assemble the foam shapes together first, then soften or round the edges with a sanding pad. One small mistake I’ve made on this drawing, now that I notice it, is that the fitted cushion comes right to the front and includes two small ‘wings’ at the sides though this isn’t indicated on the front view. You can get this shape by re-using the base template shape but cutting around the dashed line. There is no specific period suggestion with this chair, except ‘general mid-20th century’ perhaps. It could be from the 1930s but it is also typical of a ‘generic’ form still made today.

I can suggest two ways to make the legs. Either take the ends of cocktail sticks (chop the points down just a little) and do a little scoring/shaving on them to suggest ‘turned’ decoration .. or fix small pieces of brass rod with superglue, model a little Milliput on them and ‘groove’ that before it cures as I’ve done here.
Side table 1:10
Image size 1102 x 967
This is another drawing which is just for dimensional reference. It’s referred to as a ‘side table’ because it’s too small for a proper dining table. Notice that the decorated parts of the legs look round, with lathe-turned details, whereas I’ve indicated that the tops which connect with the table frame are square section. This is not a mistake, but accords with the way traditional table legs (and incidentally stair bannisters) are likely to be made. The problem is that when making a model it’s much easier to take thin round dowel as a basis for this, leaving the top bits round, rather than going to the trouble of starting with square wood and having an awesome amount of work to do on the rest. This is understandable! .. but it does result in a rather ‘kitcheny, dollshousey’ look to the table.

Chandelier segment 1:25

I’m including this drawing because I get many requests for it from people who have seen my stencil card chandelier in Working with stencil card. This is the only drawing I did and all that’s needed, because the chandelier is basically eight identical cut-outs stuck around a cocktail stick .. finished off with gold sequins! Like the folded furniture it’s something that works pretty well at 1:25 scale but not meant for enlargement. I did it mainly to show what is possible with stencil card .. if one has the control and survives the effort involved! Seriously, if you can do this, and make a good job of it, and still be smiling .. you’re a natural model-maker!
Image size 483 x 670

