
These page entries are meant to be added to and usually start with general outline information, price guidance, suppliers and useful links followed by my worklog where I can put further info and photos as they come.
Definition
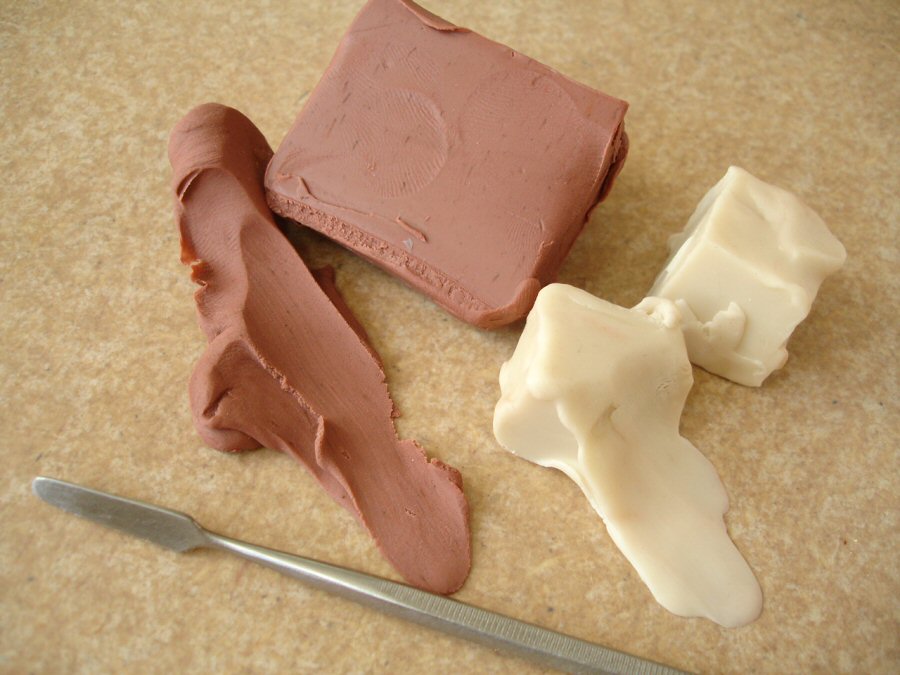
Modelling wax is simply a formulation of wax that is soft enough to be easily modelled by hand. It is usually supplied in solid block form and the wax readily softens with the heat and action of being worked between the fingers. Most modelling waxes share just a few common ingredients; such as beeswax, paraffin wax or microcrystalline wax, rosin and filler. But due to the different combinations of these ingredients there are many different types with different hardnesses and varying properties. For example Tiranti’s ‘Terracotta wax’ is comparable to fresh natural clay in terms of softness and surface appearance. Others may be harder, designed for achieving much finer detail and often used in jewellery making. Waxes can be softened by adding petroleum jelly or beeswax, hardened by adding paraffin wax or rosin (some refer to it just as ‘resin’). Similarly different waxes can be intermixed to vary their properties.
Modelling waxes are either filled with an inert powder such as talc to make them even more workable or, if unfilled, can be used as part of the lost wax or investment casting method (see below).
Advantages of using it
Modelling waxes possess one distinct attribute compared to other soft modelling materials in terms of their sensitivity to temperature. This means that the wax block supplied may seem quite hard and unmanageable, but as soon as a small piece is warmed between the fingers it becomes much softer (to the point where it can almost be smeared or trowelled on in some cases). But when left to return to regular room temperature the modelled form will firm up again. This can be a distinct advantage because it offers a firmer support for continued modelling (i.e. the surface can be added to without pushing the rest out of shape). Wax figure sculptures will certainly need armatures of some kind but it’s fair to say that they may not be so dependent on them as natural clay when it’s fresh. Polymer clays will also firm up a little when they’re left alone but the difference is not as marked and they can take a bit longer to be conditioned i.e. softened in the first place.
A soft modelling wax such as Tiranti’s ‘Terracotta wax’ can be as soft to work as natural clay but will not stick to fingers or tools in the same way, for those who prefer it. It can be very easily smoothed with the fingers, but with wax there is the added option of using heat, or heated tools, to modify the surface. It is even possible, if an intermediate mould is made from a sculpture in progress, to cast it either in the same wax or a harder one, thereby ‘saving’ the work or allowing continuation in a different material.
Because most, if not all, modelling waxes share common ingredients they can, in theory at least, all be intermixed. For example, I was happy with the very soft (and slightly grainy) consistency of Tiranti’s Terracotta Wax, perfect for large, bold and free modelling. But when it came to achieving fine detail it felt almost like trying to do it in ‘Nutella’, there was too little resistance! Scopas white modelling wax on the other hand, also from Tiranti, has a much firmer toffee-like feel but I prefer to model in a mid-tone colour and certainly not white. I experimented with mixing the two and found that a ratio of 2parts white to 1part terracotta created a wax that was still very soft and workable but equally good for fine detail, and in a very ‘readable’ light terracotta colour. Since I was making up fairly small amounts I blended these by hand, which works fine but is quite time-consuming. For larger amounts it would be more practical to melt carefully and combine them as liquids.
Modelling waxes tend to maintain their homogeneity very well. That is, their consistency remains constant to the touch even after modelling for many hours with the same batch of material. I’ve noticed with Super Sculpey that after repeated working it can develop slight lumps which refuse to be smoothed completely and similar is true of natural clay when parts start losing moisture quicker than others.
The sensitivity of wax to heat is also utilized to enable one of the most traditional methods of sculptural reproduction; lost wax also known as investment casting. For this the sculpture is modelled in unfilled wax and then completely covered with a clay shell, called the investment. When this clay shell is heated up the wax liquefies and can be poured out leaving a void which is an exact copy of the original form. The clay investment continues to be fired until it is hard enough to be filled with metal. Once filled the whole investment is broken away leaving the original form now in metal. This is the gist of the process, although highly simplified. In this version both prototype (the original wax) and the mould are destroyed in the process, resulting in a one-off. If copies are needed a separate and different kind of mould is created from the original wax so that duplicate wax castings can be made to be used for the investment process i.e. making the ceramic casing new each time. Modelling waxes generally have a low melting point i.e. 120-160C
On the whole waxes are non-hazardous to model with, posing no serious respiratory or irritation issues but, as always, product labelling should be read and the MSDS sheet should be checked.
Working life
This is also one of the biggest differences between the group of waxes on the one hand and either water-based (i.e. natural clay), oil-based (i.e. plasticine) or solvent-based (i.e. polymer clays and epoxy putties) modelling materials. Modelling waxes will not lose their ingredients to the air, so will keep indefinitely if properly cared for and, because they are not subjected to any irreversible chemical or physical change, they can in theory be indefinitely re-used. They have a better longevity than even plasticine for example because even this will lose some of its oil over time and the consistency will change Modelling waxes just need to be stored covered so that they don’t collect dust and better if stored out of the sun i.e. at a fairly stable temperature.
What it can’t do
Similar to plasticine, it can’t be made hard and permanent. On the whole it’s intended as a material for sculpting the prototype, which is then converted through mouldmaking/casting into a permanent copy. Notable exceptions though are anatomical wax models (often made from one of the harder, more durable waxes in the range), many of which have survived for hundreds of years.
Waxes are very good at sticking to themselves, especially when soft, but not very good at sticking to other things unless specially assisted. For example they’re not suited to being used even as a temporary filler between different materials, unless perhaps those are particularly rough or porous.
Cleaning up
These recommendations are based on removing ‘Terracotta Wax’, which because of it’s softness may be the easiest to dissolve, but they should apply to other waxes of the same general composition.
It’s always best to remove as much wax as one can mechanically first .. i.e. carefully with modelling tool, toothpick or scalpel blade wherever possible .. but for any other residues that are hard to reach, white spirit will dissolve them. The best way is to use a fine, small but fairly rigid brush (nylon hair is ideal) dipped in white spirit and worked into the wax, followed by soaking up the mush with tissue or cotton buds. If you don’t want to use white spirit, petroleum jelly i.e. Vaseline will do the same, with the same procedure.
As a final clean, if need be and if possible, the area can be scrubbed or lightly gone over with warm water and dish detergent. If .. after this .. something still remains (i.e. with the Terracotta Wax there may still be a slight tinge of red-brown) this is likely to be staining caused by the filler material rather than the wax itself.
What it costs and where to get it
There are economical modelling waxes for general sculptural use but also the main ingredients can be easily obtained and there are many recipes for making a modelling wax oneself. On the other end of the scale there are specialized waxes for fine jewellery work which would seem rather expensive if it wasn’t for the fact that the wax can be repeatedly re-used.
The following example prices were updated May 2017 and are adjusted to include VAT. This is intended just as a general idea of some sources and prices based on the ones I know, rather than a definitive list.
www.tiranti.co.uk A firmly established outlet for sculptors’ materials and tools. Small shop in central London (Warren Street) and reliable nationwide delivery service. Very clear, informative and comprehensive online catalogue. Reasonable prices (clearly shown with VAT included in online catalogue).
e.g.
Tiranti’s (Scopas) white modelling wax:- extra-fine for great detail (not for lost wax casting) ‘similar to old French White wax’ £7.15 per 500g, £53.54 per 5kg Filled (‘hydrocarbons and calcium carbonate’ MSDS). Flashpoint 250C
Tiranti’s Terracotta Wax:- very soft, similar to clay (not for lost wax) £8.16 per 500g, £62.70 per 5kg
Scopas Red Modelling Wax:- contains beeswax, paraffin wax and rosin. Traditional formula. A little harder. Also suitable for lost wax casting. Can be softened/hardened by adding either paraffin wax or amber rosin. Melts at c.52C. £9.70 per 500g, £80.82 per 5kg
Scopas Type ‘B’ Modelling Wax:- dark brown or yellow, very soft, easily softened by hand heat. Also suitable for lost wax casting. Can be hardened by adding harder wax such as Green Casting wax. Melts at 68-74C. £8.06-£8.50 per 500g , £43.74-£48.68 per 5kg
It is also worth looking at:
Further info sources
http://www.youtube.com/watch?v=RVL7nE4UiIs
Worklog
Jan 25 2013
I am currently using wax to model two puppet heads for an animation. I am working with the mixture of two waxes described above (Scopas White Modelling Wax and Tiranti’s Terracotta Wax) in the ratio 2:1 by volume. This takes advantage of the softness of the Terracotta and the firm detail of the Scopas. Moulds will be made from the wax prototypes and the heads cast in hollow resin.
I have built core shapes for both heads in foam, sealed with a few coats of polyurethane resin. This makes them very tough, so that they can withstand further layers of modelling wax pressed over them. There are two reasons why I use this method when modelling forms with some volume. I can control and smooth the foam better to provide the underlying symmetry and the overall weight is greatly reduced making the setup much easier to hold while working. Once the moulds have been made the core shapes can be cleaned of wax and re-used for other things if suitable.


When made soft with heat (often just heat from the fingers is enough) the wax can be smeared almost like butter, or if left to cool and harden it can be rubbed or scraped perfectly smooth with a metal tool.
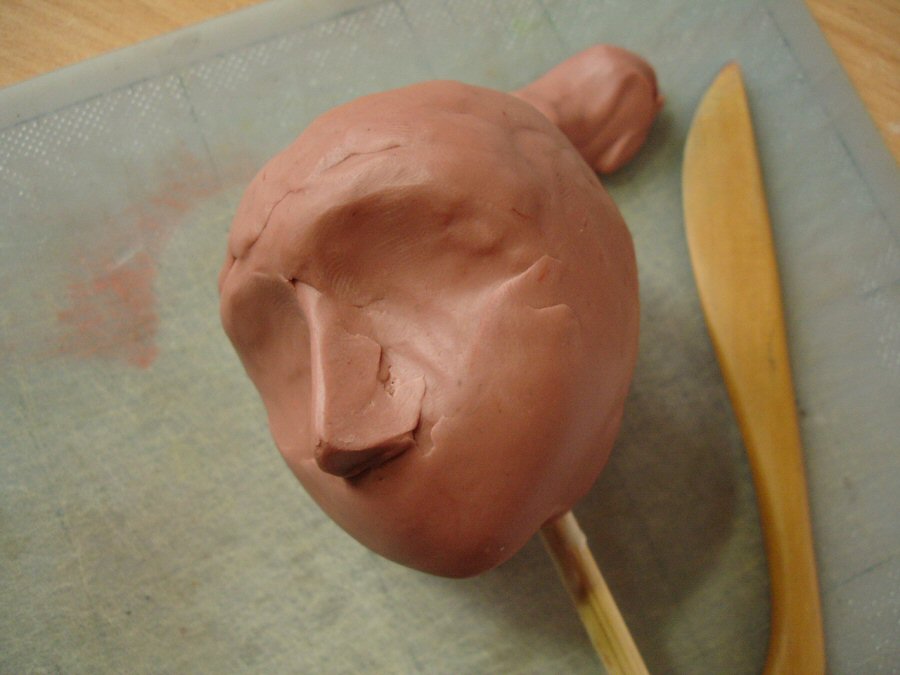
I’m using these modelling waxes for this current job because I wanted to get used to working with something other than Super Sculpey for a change. If, like me, you value the properties of Super Sculpey but would prefer something cheaper and which wouldn’t need to much reconditioning when old .. there are both pros and cons when working with wax! On the plus side: – wax is cheaper and available for even less in larger amounts; it will last as near as indefinitely without undergoing any changes as long as it’s stored covered; softness/hardness can be altered with heat according to preference and it can even be made liquid; on the other hand, putting in the fridge for a short while firms it more! On the minus side (and this is when compared directly to the polymer clay) I actually miss the very slight elasticity that Sculpey has. For example I missed it when I was trying to poke the nostrils of the head below, or doing much of the fine detail for that matter. If you use a little stick to poke a hole in Sculpey the edges of the hole stretch a little down with it so you automatically end up with a slightly smoothed edge, which is most often what one wants. Modelling wax (at least the type I am using) doesn’t do that. The inner edge of the nostril would need to be separately smoothed, which in the case of this and other small-scale modelling is almost impossible to do! In the same breadth because wax has no resistance when it’s soft one has to be incredibly careful about marking it accidentally and it’s sensitivity to heat limits how one can handle small forms. Really I’m just complaining about things which would work in its favour in many other respects .. the fact that there’s no ‘push back’ when modelling, the fact that it will go so completely where you push it to go. But so far I feel I’ve got to find a wax combination that has at least some of the very slight rubbery quality of Super Sculpey before I can look forward to much more fine modelling with it.
(image temporarily removed due to film-work ‘spoiler’ agreement)
The heads above are in progress, working to designs produced by the client which are meant to be fairly rudimentary. What I have found very much a plus so far with the wax is that I can keep a batch on the radiator (below) which quickly becomes as soft as butter for smearing on large amounts while at the same time a batch on a cool tile on the table (or even in the fridge) can be used very differently i.e. for rolling thin rods or sheets.

April 03 2014
Tiranti’s ‘Terracotta Wax’ is by far the best option I’ve found so far for mouldmaking setup .. i.e. either for embedding a prototype form half-way to create the first part of the mould, or for building temporary containment walls.
In the first place the wax is ready to use without too much ‘conditioning’ between the fingers .. it becomes very soft almost immediately. In the past I used standard plasticine (the Newplast type, in the long cellophaned packets) by default, and although this generally worked well enough it took a while to make soft enough to work with comfortably. Also, when it stuck to prototypes it was very stubborn, taking a lot of time and effort to remove it completely. Often (though not always) when silicone rubber was cured against it, residues of plasticine would remain like a crust on the cured silicone surface and again, although this could be removed it could take a lot of time and effort.
In a recent run of our ‘Modelling, mouldmaking and casting’ course we gave all of the students Terracotta Wax for embedding or setting up and on dismantling the first mould halves (in order to start the next) the wax came free like a dream and hardly any time was needed for cleaning up! I employed a particular method though, which I want to illustrate here using photos of a similar setup I made yesterday.

The example above is, in this case, not the initial prototype form .. this has already been covered with silicone rubber and the setup here is for making the plaster or Jesmonite jacketing (also often called mother mould) to support the silicone part .. but this will still serve as illustration. The object first needs to be just securely rested on a baseboard in a sausage-ring of wax (note .. the baseboard must be large enough to accommodate all subsequent stages i.e. if this were the initial prototype the baseboard must be large enough for the silicone layer and then, later, making the harder jacket parts. Generally, for medium-size forms like this, 5-6cm space around should be enough). It is important that the object is just resting securely in the wax i.e. there is no need to press the wax forcibly into the object’s surface at this stage, just make sure that the object cannot move around.

This ring is then built up, as above, keeping the contact between object and wax to a minimum. Below, when the ’embedding line’ is reached, i.e. the line around the object which is meant to serve as a smooth barrier or containment wall, the topmost wax can be pressed and smoothed against the object’s surface. It only needs just a few mm of contact, as long as this layer is properly supported by the wax built up underneath. I’ve found that modelling wax, at least this Terracotta Wax, can be smoothed much more readily with clean metal tools, tending to drag a little against the wooden ones. The most important factor at this stage is a ‘watertight’ seal between the wax wall and the object’s surface. This kind of barrier or containment wall just needs to be as smooth as shown i.e. certainly not perfectly!
As with the baseboard, a little forward-thinking is needed. The wax platform needs to be wide enough all-round for whatever will be applied to it i.e. in the case of starting with the initial prototype, both the silicone layer and then the subsequent mould jacket. But, unlike the baseboard, at least the platform can be extended later if need be.

Below, I have pressed natch marks in the wax around the form using a ball-headed modelling tool (these can often be found in modelling tool packs for cake decoration). These natch marks should not be too deep! Whatever material is going on top will reproduce these marks (and transfer corresponding ones to the other side of the mould when made) and they are simply there to locate the finished mould halves together properly. I’ve found that the modelling wax sticks much less to tools than plasticine, though about the same as Super Sculpey.

The final task in this setup is making a small vertical containment wall around the natch marks. For medium-size forms around 1cm distance from the object is sufficient. In this case building a wall was necessary because I was planning to start the mould jacket by pouring Jesmonite over the form.
Terracotta Wax sticks very readily to itself, much more so than either plasticine or especially Super Sculpey, partly perhaps because of its extreme softness! It was only necessary to press this wax strip lightly onto the platform to establish a proper seal. I’ve found the most effective wall is made by flattening a rolled strip of wax first (by pressing and turning over a few times) and then trimming the edges to a flat right-angle with a scalpel.
On the whole no release coatings are needed with this wax. It releases well from a variety of materials even if rough or porous, as long as it’s not deliberately worked into the surfaces. Most importantly silicone rubber will cure and detach cleanly from it. I have found that if Jesmonite is poured onto it and the mix is ‘polymer rich’ i.e. towards 2:1 powder to polymer liquid (the standard recommended for economy is 3:1), the wax can adhere to the cured Jesmonite in some places. But if this happens the wax is very easy to scrape off.


(t.b.continued)

Pingback: How to Prepare the Wax Model for Molding
Hi David, thank you so much for your information, i’n wandering about doing a body in real scale with wax sit in a chair, in this case i would like to use wax strained(dripped) into a mould.
I need a wax that should be hard because the body is going to be heavy and i would like to use a wax that look clean , with an uniform color and surface. I tried with just paraffine but its not look very clean.
Please help!
I hope you can understand my english.
Thank you . my email is lucasorellanaprocopio@gmail.com
Hi David , just to say I’ve been working with casting waxes for a long while and have come up with a few good ones, natural and casterable. I’m really interested in Lorenzo Ghiberti wax used for the gates of paradise as I know he modelled all his work in wax and it’s beautiful. Anyhow look forward to chatting with you and sharing formula, especially with a person who’s heart is in it
Regards
Geoff
Cambridge
New Zealand
Thanks Geoff! I’m not as intimate with it as you are though! I haven’t had the need so far to formulate my own since the waxes I get from Tiranti behave just as I’d want.
hi
I’m looking for a recepie for such modeling clay, having a natural resource of beesax and clay. Have you any insight about this? I’ve been looking around the web and your blog was the closest I found.
No, unfortunately no ideas. I’ve never been motivated to look for recipes or try anything home-made .. mainly because the modelling wax I use is fairly inexpensive and lasts forever if cared for.
Do you know if there is a difference between black modeling wax and this modeling wax? I have to do research on black modeling wax and this site seems very helpful but I don’t know if it is the same
Thank you!
.. replied to Lieke by email. But then I realised .. silly me! .. that somebody else might know? I don’t! I know that the wax used in the small casting workshops i.e. India looks almost black, also that ‘Montan wax’ derived from crude oil I think, is a hard and very dark brown wax .. almost black.
Hi David,
we are coating a sculptural form made from expanding foam in tiranti’s yellow wax (type b) we are melting it in a pot and painting it on but the finish we are getting is not as smooth as desired, could you recommend a better application process or any tips for achieving a smooth finish using wax.
Many thanks,
I don’t think I can help, because I’ve never used that type of wax before .. or built up a wax surface by painting it on for that matter. What it sounds like is that, although it’s fine to use that method for ‘getting it there’ it would still need a lot of levelling work. I have no problems with Tiranti’s Terracotta Wax because it gets almost ‘liquid soft’ in no time just between the fingers and can be smeared around. One thing perhaps .. have you tried making the wax surface warm again (i.e. gentle hair dryer) and placing clingfilm over it and smoothing ‘through’ that? Sometimes one can achieve remarkably even results that way.
I am trying to find a simple way of reproducing a 1:25,000 scale relief model of the Lake District. Do you think wax might be a solution ? The model is large (4x5ft) and painted showing rivers etc etc. If I made a wax casting, could I then reproduce from the casting in another material which I can then paint? Your advice would be immensely helpful. Chris Bagot, Chorley, Lancashire.
Sorry not to have been able to reply sooner! I don’t quite understand though. Do you mean that you’re making a copy of a model that already exists, or that you want to make a one-off scale model from scratch? Whichever way, modelling wax would not provide any solution really .. for one thing the expense of it! .. for something that size I’d estimate at least £1,000 worth!