
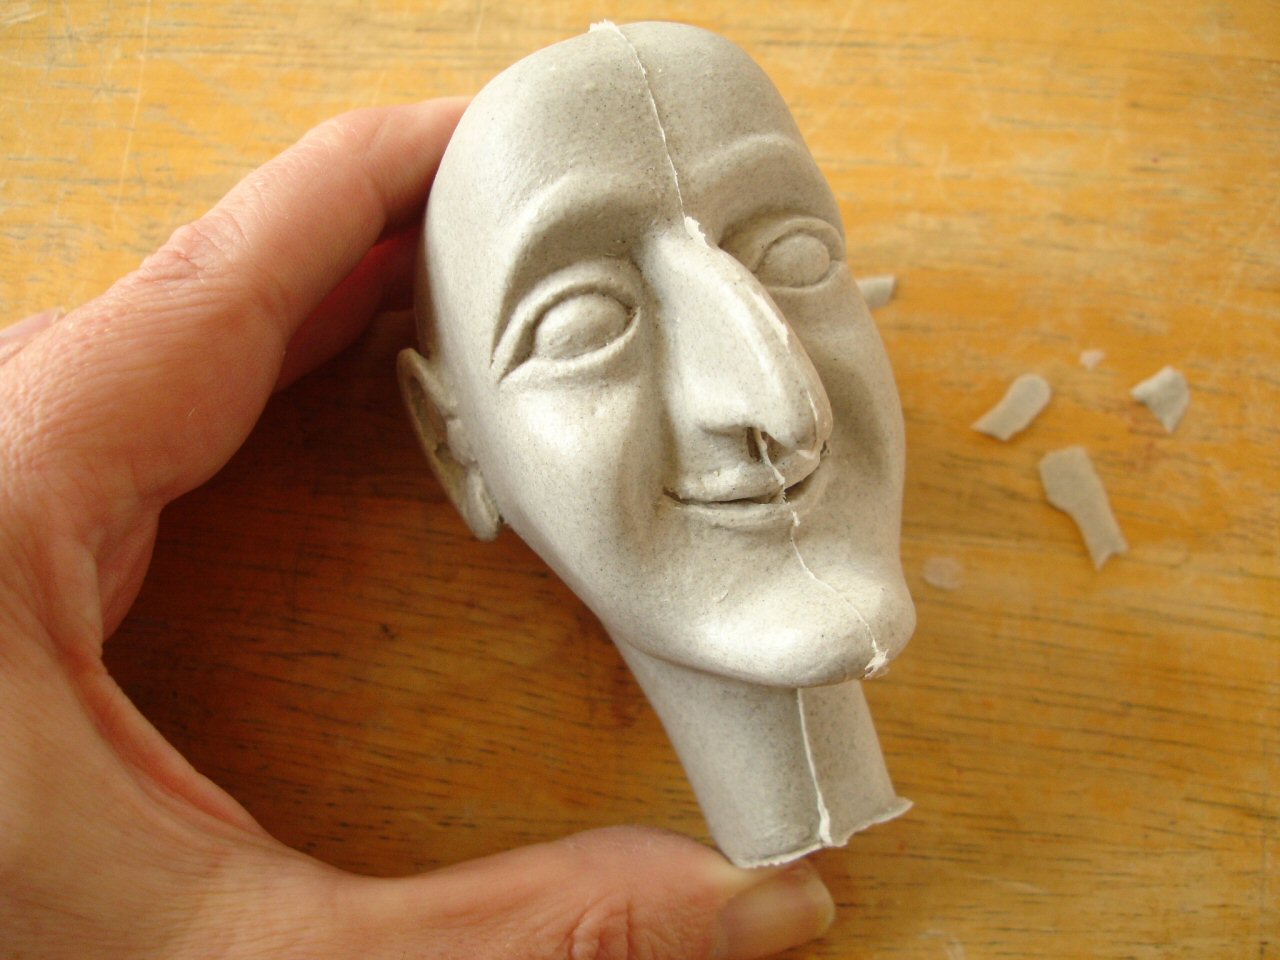
This article follows directly from Making a simple 2-piece silicone block mould for a puppet head. At the end of this I included a couple of photos of a hollow casting using filled polyurethane resin and now I want to explain how to do this in more detail. I will also deal later with the advantages of being able to make a hollow cast in a ‘closed’ mould .. i.e. without having to set up a pouring hole at the mouldmaking stage .. and look at some other materials for hollow casting, such as Sculptamold and Jesmonite.

Jumping forward for the moment above and below, the hollow resin cast is almost finished and just needs a little cleaning up on the seam line. Polyurethane resin normally cures a white-to-beige colour dependent on the type and this cast is light grey because I added a filler called Fillite when mixing it. Fillers are added to resins for many different reasons (see Common fillers for resin casting in the Materials section) but in this case it is specifically to thicken the resin to help it stay put on sloping surfaces. Fillite also makes the resin easier to carve or sand without reducing its strength too much. Unlike polyester resins, there is no thixotropic or ‘gelling’ additive available for polyurethane resins (note 2017: but see entry re Polytek’s Poly Fiber II in ‘Common fillers for resin casting’).
For this test piece I used Fast Cast Polyurethane Resin from Tomps (see Quick view comparisons of casting materials for current prices) which is particularly thin to begin with, but the slower version has the advantage of a slightly longer working time and the ‘turning’, i.e. when the resin changes from liquid to solid, is not so abrupt. Below is the equipment needed for correct mixing. Polyurethane resins come in two equal parts, almost always mixed 1:1 by weight but in the past I’ve often got by without any problems by judging equal volumes in two disposable plastic cups, even though the weights of the two parts are slightly different. Now that I’m even more grown-up I prefer to measure properly by weight, using a fairly inexpensive kitchen weighing scales. Because the cans or bottles resin comes in are never designed to assist the pouring of small amounts .. the manufacturers would prefer that we use it all up in one go! .. I always decant some of each part into plastic cups and then pour from those when measuring. To avoid knocking these over while working, I made the cup-holder shown out of foamed Pvc.
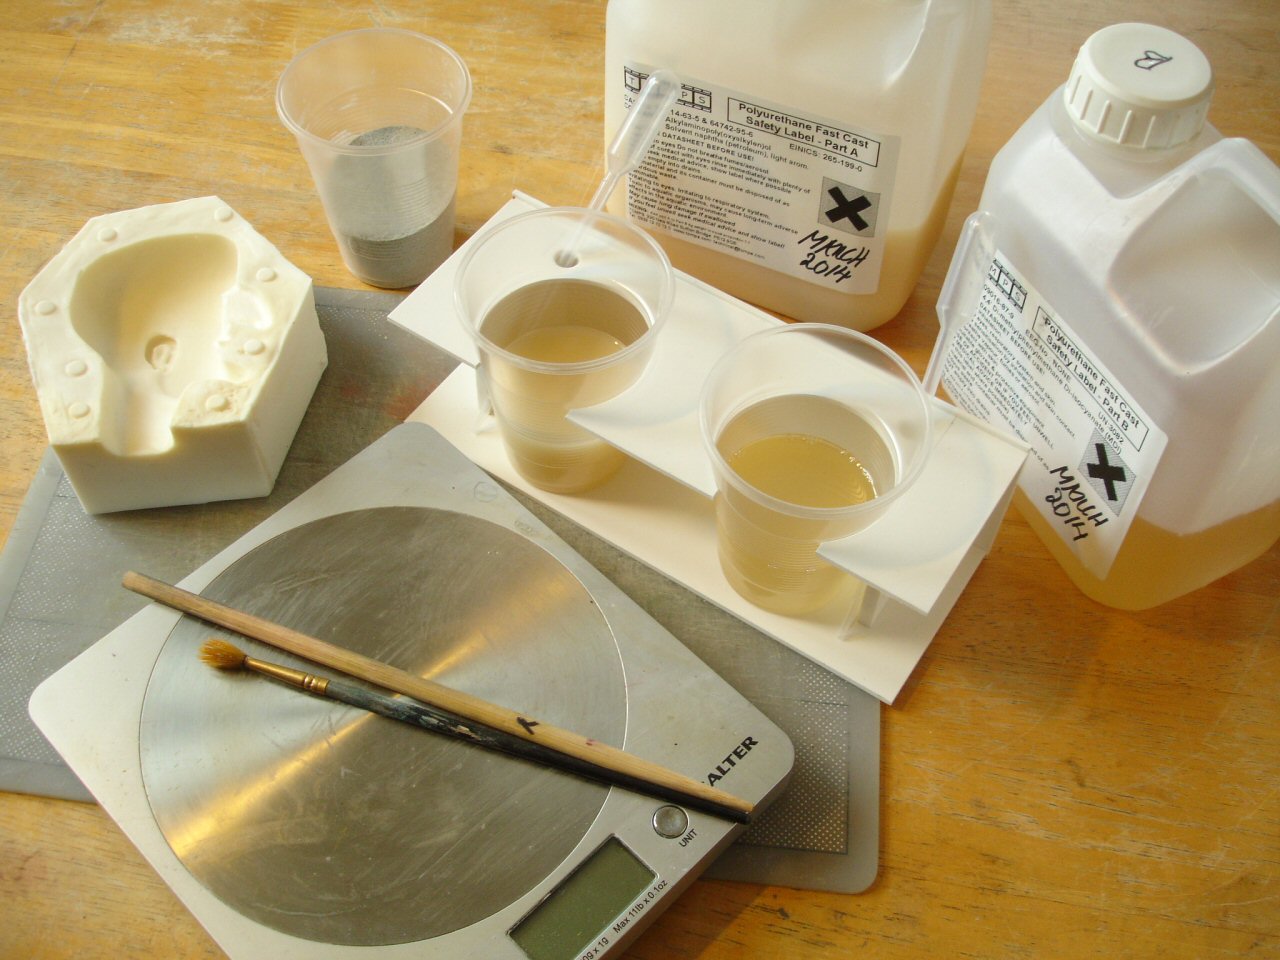
I usually mix Fillite with resin in the proportion 1:2 .. that is, equal amounts by weight of all three parts. This is easiest to remember and it also usually results in a thick sludge which is still easily spreadable and which will still manage to fill fine detail. It’s best to mix the Fillite thoroughly into part ‘A’ of the resin first (which is the ‘resin’ part of most polyurethane brands). The resin will combine with the Fillite surprisingly smoothly, to form a thick paste, which of course becomes thinner and more manageable when part ‘B’, the hardener, is added. Mixing must then be both thorough .. and fast! .. but shouldn’t need more than 30 seconds or so for small amounts like this. I usually mix up 10g part ‘A’, 10g Fillite and then 10g part ‘B’. The best mixing sticks I’ve found are disposable chopsticks because they’re very resilient, clean easily and can be re-used.

The best practice is to pour most or all of it into the open mould-half straight away and sway the mould to let the slushy liquid cover the surface naturally first. In my experience it’s rare that air gets trapped with this method and using this mix, but if you’re concerned about deep detail there’s always a bit of time to poke around with a cocktail stick or small brush to make sure air is freed. An alternative is to take the extra time to brush on a thin detail coat all over first and let this firm up before pouring in more. For a few minutes the resin will pool back into the centre, but I work round the mould with a soft but rigid brush (synthetic is good) pulling it back up the sides for as long as I can until it starts to change. I try not to take it over the mould edge i.e. the outline of the form, but it doesn’t matter if this happens because this line can be cleaned up before the resin is fully hardened. Obviously, with the mould I’m featuring the neck part is completely open .. I had to edge the mixture very carefully into this part at first, but as it congeals it’s easier to build up a thickness.

After about 5mins or so (though this will vary with different resins) it can no longer be distributed so easily with the brush .. and it’s very important to stop trying at this point! .. because in doing so one risks separating the now gum like resin from the mould surface. In this state it’s possible though to press it, almost model it, with the fingers. Also at this stage if you want to use the brush again you need to clean it quickly in acetone.
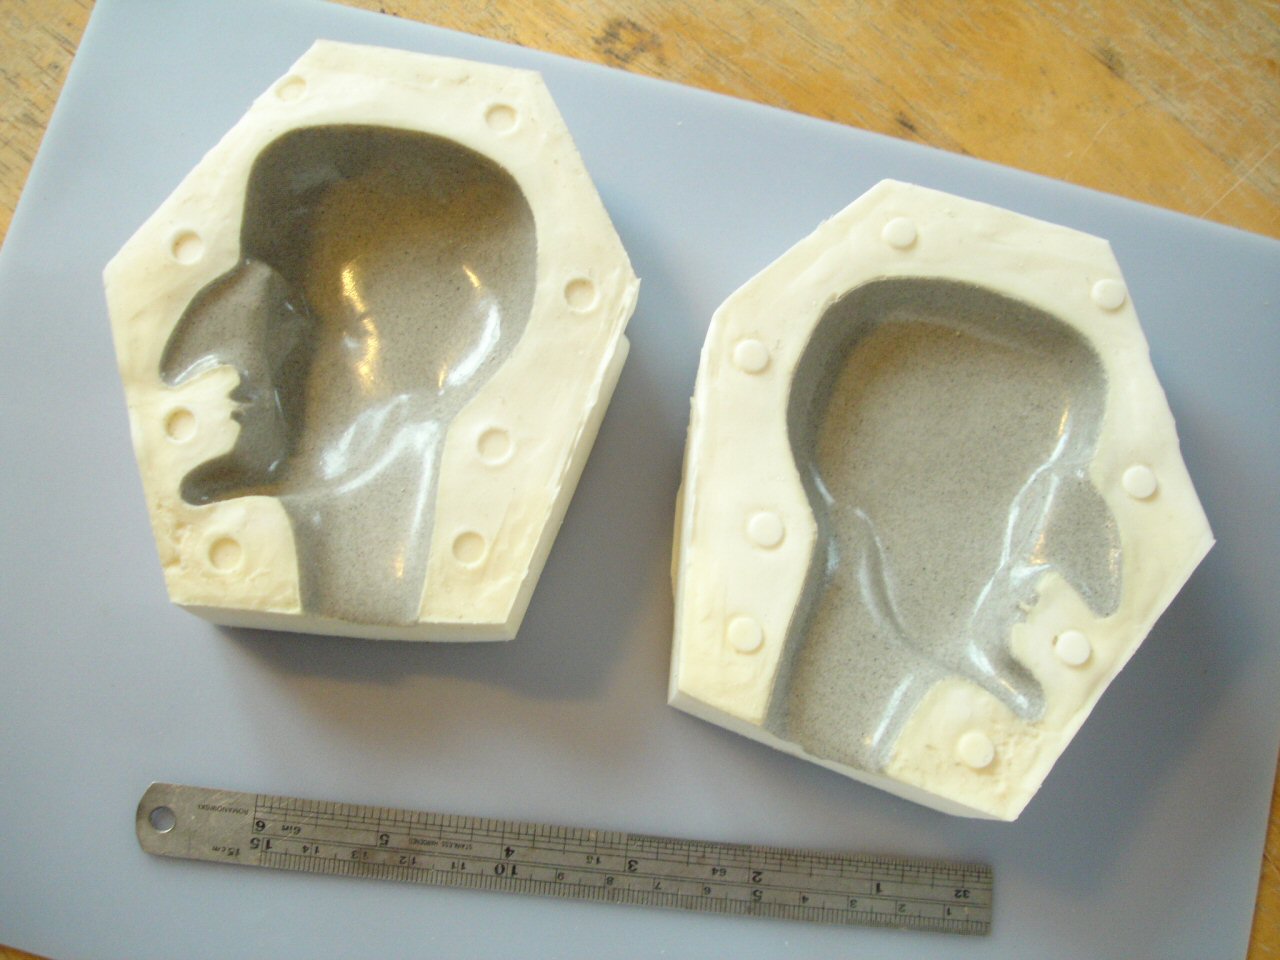
I never try to do the two halves of the mould at once, however simple the form is .. most often the quick curing of the resin doesn’t give enough time for this. It is inevitable that the cast is much thicker in the deeper parts, but I’ve always found that if I follow the procedure described even the thin sections end up strong enough. They’ll get an extra covering during the next stage anyway. Resins have a so-called green stage (polyurethane having a longer one than polyester) when the thinner sections of the resin remain quite flexible. This can be taken advantage of .. let’s say it’s been 20-30mins since pouring .. for going round the mould edge with a scalpel or fine wooden modelling tool and peeling away anything that’s crept over the line. If not, the mould halves won’t fit together tightly! Now that they’re ready, the two halves of the hollow cast are going to be joined together from the inside .. by closing the two mould halves together and pouring in just enough resin to fill the seams.
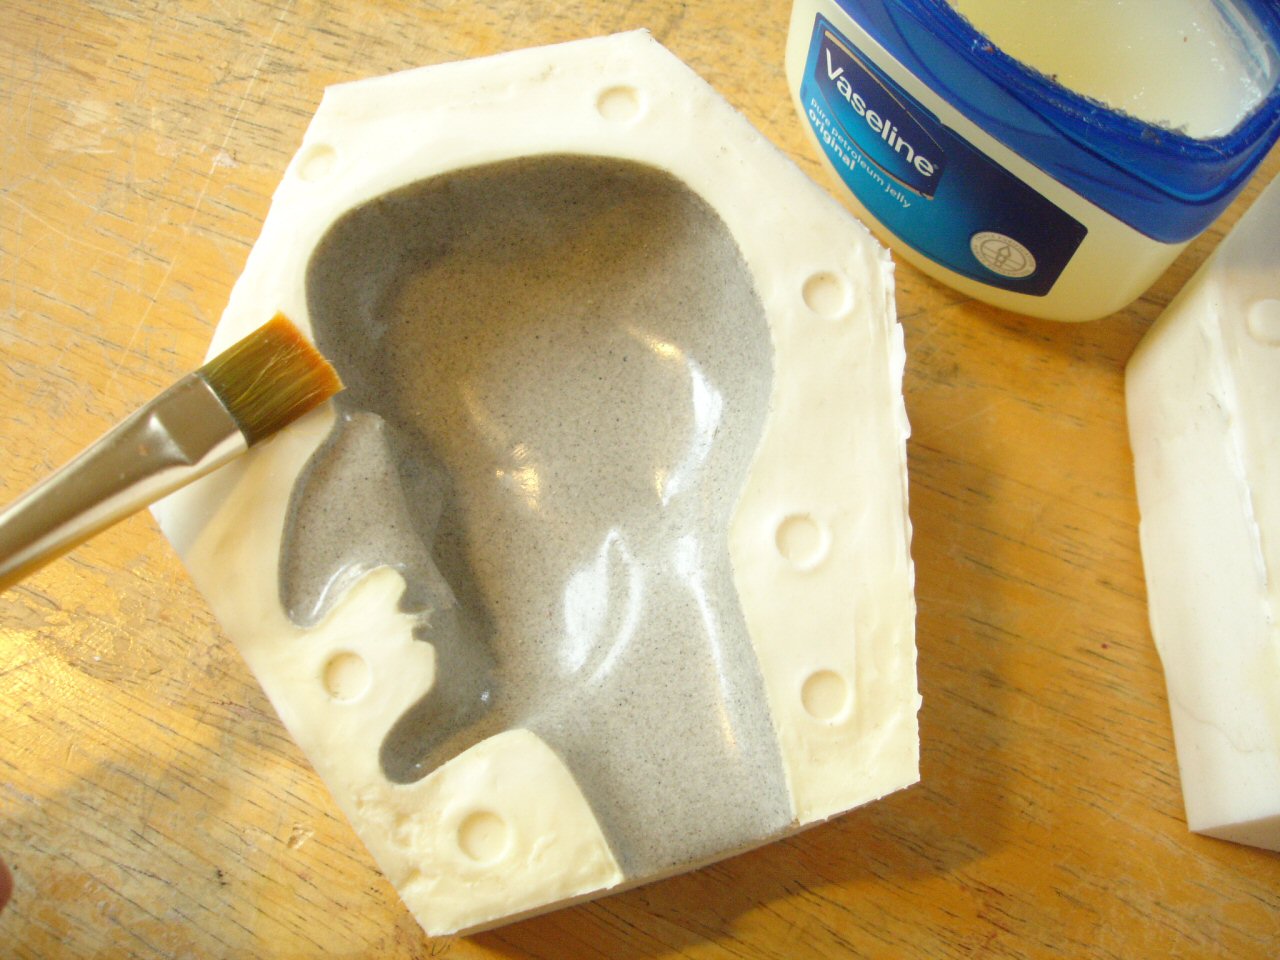
Above, I am brushing Vaseline on the remaining silicone surface, but being careful not to get it on the resin .. not so clear in the photo above. Vaselining the ‘seam faces’ (that is, the parts of the mould which come together to form the seam) is not an essential move when using silicone, but I’ve found that it often helps a lot! It provides an extra seal which halts the seepage of resin (this time mixed with a little less Fillite, to make it more liquid) out of the mould. I’ve also found that the Vaseline helps the silicone halves to align better.
For this internal coating I mixed up a small amount of resin and Fillite in the same way as before, but this time 10g part ‘A’, just 7g Fillite and 10g part ‘B’. I poured most of the mixture immediately into one half of the mould, placed the other half of the mould on top, made sure that the mould was secure and then rotated the mould carefully along the axis of the seam line to concentrate resin in this area. Obviously I had to be careful not to tip too far when running the resin close to the open neck part. Basically one has to continue in this fashion, ‘see-sawing’ around the whole seam and back, until one’s fairly certain that the resin has become too thick to move much more. Here it helps to have some of the resin remaining in the cup, as shown below, to indicate how thick it’s become. Another option, for those who have a little less patience, is to accelerate the curing with heat. Below I’ve set up a small heat gun to blow into the mould. I’m holding the mould because it needs to be moved around .. if left static it would get too hot. Once there’s no more obvious movement of the resin I usually leave the mould alone for a while, only demoulding the form once the extra resin in the cup is completely hard to the touch. If you don’t have this as a control, it should generally be safe to demould 1 hour after pouring, whichever brand of polyurethane resin you’re using.

Obviously the advantage of being able to make a hollow cast like this is that it is lightweight, while still being strong. It also saves on material. If strength is of particular importance, more than one coating of resin can be applied or strengtheners such as glassfibre matting or scrim can be integrated into the two halves before the mould is put together. This is not a method of speedy mass-production .. it takes considerably more time than pouring a cast .. but manually ‘applying’ the cast in sections, as it were, does ensure that you can make perfect, blemish-free casts every time. If for any reason a solid cast is preferred, it’s easy to fill the hollow casting with more resin .. although it may be better to do this in stages for forms larger than this one because the heat produced by larger amounts of resin could cause tensions during curing which have been known to crack the casting.

As I’ve said in previous posts, there’s always a seam to be cleaned up .. but in this event the work was minimal. With polyurethane resin the flashing (as the excess is called) is particularly easy to remove .. but trimming and sanding is made even easier by the addition of Fillite. My preferred method is to scrape with a scalpel, in the direction away from the blade edge, because I find this easier to control.
Working with ‘closed’ moulds
I mentioned that hollow casts can be made in ‘closed’ moulds i.e. without having to set up a pouring hole. The cast is achieved in exactly the same way as the puppet head .. by building up a sufficiently thick layer in both halves of the mould, then joining them together. In fact it can even be a little easier since the two mould halves often have a consistent rim to work up to. This method of casting is a big advantage when the prototype form offers no convenient area for setting up a pouring hole, as is the case with the form below.

Chloe Allen moulded this lightbulb while participating in our Modelling, mouldmaking and casting course in 2012. She wanted to preserve the distinctive shape of the contacts at the base, which would have to be remodelled if this area were cut out to form a pouring hole.
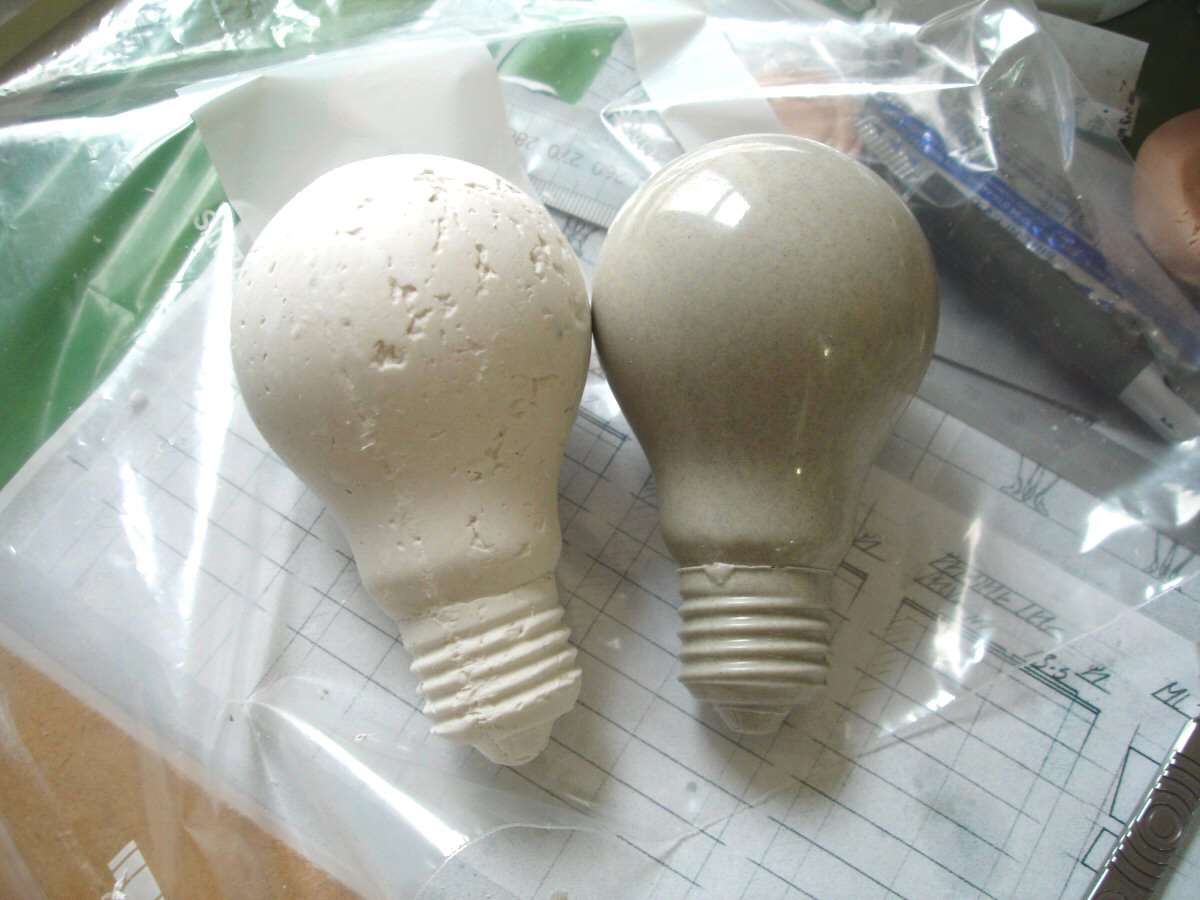
The cast on the right, which came out near-perfectly, was a thin shell casting using polyurethane resin (Biresin G26 in this case) and Fillite. Note how finely the silicone rubber and resin have captured the smoothness of the glass. When silicone rubber is used on glass the surface must be very thinly greased with Vaseline to prevent the silicone from sticking. The distinctly different result on the left was obtained using Sculptamold as a casting material. Sculptamold is a mix of casting plaster and cellulose fibres, bought ready-mixed in dry form, making a thick paste when water is added. It feels and looks very similar to papier-mâché pulp, except that it sets hard in about the same time as regular casting plaster i.e. around 30mins. One has to work fairly quickly and paste the mix into both halves of the mould to form a thick shell. The paste is very workable and has good thixotropic properties, meaning that it is non-slump. When working with polyurethane resin the shell can be left fairly thin at the rim, because this will be strengthened when more resin is rotated around the closed mould. But Sculptamold is too thick to do this with .. instead the walls of the cast need to be built up to a good thickness right to the rim, but preferably with the top edge sloping down towards the centre of the mould, so that the mould halves will close properly when they’re put together. Usually once this is done the Sculptamold has already set firm, the top edge can be trimmed with a knife if need be and excess Sculptamold cleaned away from the mould surfaces. A little more needs to be mixed and then ‘piped’ or troweled on one or both of those edges before the two mould halves are joined together. Since the edges were sloping downwards most of the fresh Sculptamold will be pushed towards the centre of the mould, though a little will be squeezed the other way and will form a thin flashing on the cast which can be easily removed.
Because of its mix of plaster and fibres Sculptamold traps a lot of air, and this is impossible to get rid of, resulting in the surface effect shown above. Although the plaster component becomes firm very quickly the fibres retain moisture so, like traditional papier-mâché pulp, the material needs many days (weeks even! .. for thicknesses over half an inch) to dry out completely. After the two mould halves have been pressed together the setup should be left at least for a couple of hours before the cast can be safely demoulded. Even then the damp Sculptamold surface is somewhat fragile, rather like slip-cast clay, but this can be an advantage because it means that the mould seam can be more easily cleaned up, even using sponge and water to blend it a little if need be.
A while ago I wanted to reproduce two interesting fragments of driftwood I’d found on the Thames shore (we live only a couple of hundred metres away). The one below was a fairly complicated form which I knew would be difficult as a poured cast because of air entrapment, plus the fact that I didn’t want to compromise any detail of the form by cutting out a pouring hole.


In each case the original driftwood is on the right, the resin copy on the left. The paintwork isn’t complete in these photos .. just a basecoat with the first, lighter dry-brushed colour over it. I’d scrubbed the casts with warm water and Cif to give a slight ‘key’ to the resin surface and to remove any remaining greasiness. I used Rosco SuperSaturated acrylic, a theatre/film scenic paint which dries especially matt and has a strong binder.
Note 18/03/2016: for more on painting see ‘Painting polyurethane resin’ near the end of the polyurethane resin entry in Casting in the Materials section. The painting procedure described above is really the minimum one should do to make sure that paint stays put on polyurethane resin. It is strong enough for ‘art objects’ not meant to be handled too much but certainly not for ‘toys’ or used objects.
I made the silicone moulds in the usual way .. by embedding the form up to a half-way point all round in plasticine or wax; coating the first silicone half over that, followed by the first-half plaster jacket once the silicone was cured .. etc. See previous articles e.g. Making a supported silicone mould for a life-size head .. for details of this method. Again as usual I coated the two mould halves with a polyurethane resin/Fillite mix, building up a strong shell.

As with the mould above for the smaller of the two forms, it can get tricky to determine in some places where the object surface ends and the mould seam surface begins, especially if some parts of the object are flat and thin. Although I’m only thinking of this now, and am yet to try it .. it could help if the very first, thin layer of silicone on the object, the detail coat, is coloured differently from the rest to make the border of the form clearer. Silicone rubber will accept a small amount of powder pigment to colour it without affecting its properties, as I illustrate in the next example.

As always with this method, the edge of the resin shell needs to be cleaned up so that there’s nothing preventing the two silicone mould edges from fitting together. If in doubt or if the mould halves no longer meet properly when testing them together, it’s better to shave away a bit more than necessary. Usually the resulting gap in the shell is filled when the final batch of liquid resin is rotated around inside the closed mould. In the failed example below, either the resin/Fillite mix was a little too thick with Fillite to begin with or I’d waited too long before pouring into, closing or rotating the mould. The resin hadn’t travelled enough along the whole seam line.

Here’s a brief account of making a similar mould .. at least, done for the same reasons .. but with some differences in the method. Once again, I used these found objects mainly as test pieces .. this time tackling a dryer ball. The original below is pink and the cream coloured one is the cast. Fairly obviously this form presents only one option for making a poured cast .. setting up a pouring hole in the space where the writing is. But I wanted to keep the writing, and in any case .. managing to fill all these little ‘horns’ without trapping air would be impossible without the assistance of a vacuum chamber to pull the air out. I don’t deal with these more commercial methods because most people, like myself, are unlikely to have one.

I also wanted to try covering with a complete silicone layer first, without embedding the form and applying it in two halves as I’d mostly done before. I intended to cover it and then split the silicone skin with a scalpel. The problem though would be finding the right place to cut once the form is covered .. ideally I needed to cut around the middle exactly in between the rows, where the manufacturer’s seam line is. I thought I’d solved the problem with the following, but it didn’t work out as cleanly as hoped.

I applied the silicone rubber layer in two stages .. the first one above, and once this had cured, I completed with the second half below. It doesn’t make any difference if it is applied in sections like this .. the second section will fuse completely with the first. My idea here was to colour the second half to make the cutting line along the mid-point clearer. This is ordinary, not especially finely ground powder pigment, used in theatre scenic painting. The best way to mix with the silicone is to combine it thoroughly with a very small amount of silicone first .. to wet it in other words .. before adding more silicone. I’ve found that powder pigment blends very readily with silicone rubber. Apparently up to 10% powder pigment by weight can be added to silicone without affecting its properties. For this I used roughly 3g Ultramarine for 40g silicone rubber.

Below is the containment setup I made around the mould using modelling wax, in order to make the first half of the rigid mould jacket, also called the mother mould. This enclosing jacket is necessary, especially when making larger moulds, to keep the flexible silicone skin in its proper shape. There are more, step-by-step photos showing how to model this containment at the end of Modelling wax in the Materials section.

The mould jacket can easily be made using a hard casting plaster, especially if this is left for a while to thicken up so that it can be troweled on over the form. For this though I decided to use Jesmonite .. which is basically the same as plaster but using an acrylic polymer liquid in place of water. This makes the material much tougher, and if a reinforcement such as jute scrim is also used, a stronger but thinner shell can be made.

Jesmonite powder and polymer liquid can be mixed together in a ratio of anything between 3:1 to 2:1 powder to liquid dependant on the pouring consistency needed. 3:1 gives a thicker mix and is more economical since the powder (basically just a fine casting plaster) is by far the cheaper of the two. Contrary to the way plaster is normally mixed .. the polymer liquid should be added to the powder. This should be thoroughly and vigorously mixed until the consistency is even. This is possible by hand for small amounts but the manufacturer of Jesmonite recommends using a special power drill attachment for mixing larger quantities.

Above, I have poured the first small batch of Jesmonite over the mould form and to fill the ring around it. Below, I’ve started pasting small pieces of jute scrim into the wet Jesmonite. More can then be mixed up to cover the scrim .. and the procedure can be repeated to build up a strong shell. I used two layers of scrim for this small form, but one would probably have been enough .. even for much larger mould jackets such as the one featured in Making a supported silicone mould for a life-size head .. I only used 2-3 layers.


The Jesmonite took very little time, less than 40mins, to set hard and shortly afterwards it was safe to remove all the wax and turn the form over. The silicone will eventually be sliced using the Jesmonite rim as a guide.

But first, shown below, I’ve set up a wax wall for making the second half of the Jesmonite mould jacket. This is exactly the same procedure as before except that the Jesmonite rim needs to be thoroughly Vaselined to prevent the second half from sticking to it!

Here is the completed mould being dismantled. I had thought that applying the silicone in two colours would indicate the line I had to cut in the silicone (i.e. between the rows of ‘horns’) clearly enough. But it wasn’t accurate enough, and in the end I got some parts of the horns on the seam line.

It meant that these along the seam were much more difficult to fill, and my first tryout using polyurethane resin and Fillite didn’t work perfectly.

But for the second attempt I used a very thin, unfilled resin .. Tomps Fast Cast .. manually filling each ‘horn’ bit-by-bit, including a lot of jiggling around with cocktail sticks to dislodge trapped air. It was quite a lot of painstaking work .. but here again is the perfect cast, just to prove that it’s possible!

can you use plaster instead of Jesmonite?
Yes you can .. just won’t be as strong. Best if it’s a proper casting plaster.
Hi
Thanks you for such a quick reply! I only need to use it a couple of times so that won’t be a problem! We do have casting plaster. I am not sure my mold will look as neat though!
Thank you 😀
Just out of curiosity, what type of silicone did you use for this mold? Tin or platinum?
Tin cure (condensation cure) .. a very standard one, Lukasil 429.
I was wondering if you would make a mold of something for me if I were to pay you ?
Hi Jeff,
Thanks for your enquiry. Yes, I can do this if your deadline fits with my other commitments. I suggest that you send the details to my email address davneat@aol.com and I’ll let you know if it’s possible and what I think it may cost.
best,
David
Just to let you know, there is a thickening fibre available for polyurethane resins and rubbers called “PolyFibre”
Thanks! .. I’d heard that there was something made by Polytek from polyethylene fibres but hadn’t had the chance to try it yet. This must be it. I’m hoping that it will be more successful than Cabosil (which I tried in PU resin .. some effect but A LOT is needed, so expensive). I’ll give it a try!
Pingback: other sources to get info on how to do moulding casts – Jason Lee Billington
Pingback: looking in to casting. – Jason Lee Billington