
Please note before you start reading this older post that I have long since included a version in my Methods pages, under Making realistic models, which can be accessed above. That version may have been updated or expanded since.
I will be teaching five 3-hour sessions in model-making for the theatre design students at RADA (Royal Academy of Dramatic Art) in London throughout this month. The fact that I’m given five, short time-slots is convenient, I think, because it fits in with the way I usually divide up model-making, at least in practical terms, into five areas; .. main construction, fine construction, modelling and shaping, creating surfaces and painting. I’ve delivered these sessions many times before but I’m always driven to ‘re-evaluate’, so this time I’m using that as an opportunity to write up my preparation for those sessions here. The next five posts are therefore geared towards the specialities of making theatre set design models, but many of the points apply in general terms to work in other disciplines
I find the last four areas relatively easy to advise on, perhaps because they can be more easily illustrated, but I’ve always had some difficulty sorting out what I should say for the first. It’s not that there aren’t a whole many detailed practical tips to give .. the ‘hands-on’ part of construction is a methodical, step-by-step process which can be easily broken down into handy points .. but I think the difficulty has come from my suspicion that constructional ability in this case may rely more on ‘ways of thinking’ than ways of doing and that these may be harder to help with!
Model-making is a very practical subject, in that it involves the handling of materials to produce a physical outcome. It could be taught purely from that practical standpoint .. focusing on the materials and tools needed, and the methods or techniques employed to make specific things. But model-making is also part of the act of designing .. a means of assisting the designer’s ability to pre-visualize. It’s not just the necessary visual embodiment of ‘worked out’ intentions (necessary because others have to see them) .. it’s a major part of that process of ‘working out’! Because of this the ‘materials and tools’ for effective model-making are not just those which can be conveniently placed on the table; they include the more fundamental attitudes, areas of acquired knowledge, and ways of thinking/or seeing/or organizing which underly the whole process of work.
For this reason I’ve arranged these notes .. going from the general to the specific .. firstly under the heading ‘General approach’, which is more about ways of thinking; followed by ‘Practical guidance’ which turns more towards ways of doing; ending with more specific ‘Working examples’ which aim to illustrate how these ways of thinking and ways of doing combine ‘at the worktable level’.
What do I mean by ‘main construction’?
I mean the ‘big things’, starting for example with the theatre model-box and then the main structures of the set .. the ‘principle architecture’ in other words. This includes elements such as walls, platforms, seating banks and staircases, but also curved set elements, raked floors and open frameworks such as scaffolding. Although many are quite simple shapes, just to look at them, it is not often obvious how to make them .. or perhaps more correctly, how to start on them.
GENERAL APPROACH
Leading with the head
It’s a favourite catch-thought of mine that success in model-making lies ‘more with the head than the hands’, meaning that it rests upon thorough planning or ‘thinking through’; that nothing reliable can be achieved without researching the right information; that problems are solved by a mixture of focused and divergent thinking; that one can only be as good as the materials one knows about. Against this though, one has to weigh up the fact that a great deal can only be learned by doing; that there’s a limit to what can be visualized beforehand; that being ‘hands on’ with materials will suggest and inspire different and unforeseen ideas!
The ability to ‘see’ ahead .. to actually ‘work’ in a very practical and realistic way, but ‘in one’s mind’ .. is the first and most important tool that the designer reaches for! Everyone has it, because otherwise none of us would be able to rehearse a difficult conversation, write a shopping list or plan a journey! Undoubtedly some would seem to be ‘better’ at it than others .. but it’s more a case of some being better at aspects of it. Some can let their imagination roam further than others; some may not wander so far but can ‘see’ what they have in more detail; some are good at shutting out what they don’t want or need to see in order to focus. My point here is that it’s important to recognise which of these you are, acknowledge your strengths and question whether you can improve. Although the second point on this list is the accepted way of dealing with any deficiency, or safeguarding against being misled, there is still a great deal that we either don’t have time to test or don’t realize there’s a need to.
Probably model-making taxes one’s ability to plan ahead in this way more than most other things I can think of, because there are so many variables! The materials chosen need to be reasonably durable (though not to last forever); affordable; obtainable when needed; ideally within one’s ‘comfort zone’ in terms of familiarity or technical ability; but perhaps not so familiar or comfortable that they engender predictable results i.e. better if they’re a little challenging or even inspiring!. Similarly one’s methods of working with them need to accord with the above; they must be affordable timewise; they must be flexible enough to give freedom to the development of the design; they must keep the sense of discovery alive! The builder’s mantra ‘strongest, neatest, quickest and cheapest’ already gives many things to juggle with, but ideally ‘most creative’ should also be added.
Can one’s ability to visualize be strengthened? Is it possible to ‘see’ or to foresee more? Absolutely! .. by feeding the mind with better information for a start! The quality of what comes out depends on the quality of what goes in. But it doesn’t start with ‘quality’ necessarily .. it starts with quantity. The more we’ve seen in our lives, whatever the sources, the more we’ll be able to visualize. Then, the move towards ‘quality’ begins simply with questioning; the act of interrogating what it is we’re seeing, where it might come from, how good those sources are and what visual assumptions we might have been making.
For example, it’s hard to visualize the concept of a ‘circus’ on stage (i.e. to shape it in our minds in terms of what general actions are going on, what sort of background the performers are seen against and what they look like) if we’ve never seen one before. And yet we are all required to do that in an instant, just to establish where we are even very vaguely, as we read a novel or a play text. I’m willing to bet that although probably very few people nowadays have actually been to a circus, we will all have some kind of scene-setting image which is pieced together from various sources .. storybook images seen as a child, related scenes from other plays or performances we might have been to, scenes from films or television. When we are reading a novel for enjoyment we just need to set the scene for ourselves vaguely, without even being really conscious of it, just to get through the story and unless the writer refines or directs our vision with a more specific description, that image of ours has to serve. It probably doesn’t matter how incomplete that image is or how silly the sources are, as long as the writer is doing their job properly in directing our attention to what’s important. Now, compare that to reading a play text with the view to designing it. Ideally, our first experience of the material should be exactly the same! Ideally our initial reading should be just as free, ‘unselfconscious’ or unbiased .. initially that is. It’s a subject for another discussion whether that’s at all possible for us of course, but then afterwards .. our reading has to become very selfconscious, biased and critical. We do then have to examine that scene-setting image we’ve formed of the circus and subject it to questioning .. what are we really seeing; how complete is it; where have those visual impressions come from; which of those are coming from the text; what more do we need (whether in terms of quantity or quality) to start ‘building’ that image for real?
The process is similar in many respects when planning the making of something. We may be able to visualize the whole process in some detail, if we’ve done it or something very similar before. Again, the more we’ve made the more we’ll be able to realistically visualize making. If not, we can still piece together a ‘provisional’ visualization from general things we know about materials and ways of making, mixed with some more specific ‘snap-shots’ of things we’ve experienced which could be related. So for example we may have the general ‘circus’ image, but then we have to start ‘making it real’ by questioning .. can we trust what we think we know; what bits don’t we know, and which can only be found by starting or experimenting; what more do we need to start that?
Sketch model-making
Sketch model-making .. in other words making quick, rough mock-ups to get a better idea of how something is truthfully likely to look .. is a standard and, I believe, indispensable practice in theatre design! One could say that the less you’re confident in your powers of visualization the more you should do this. But because the sketch model has the other function, more a communicative than a freely exploratory one, when working with the director for example, its uses can get a bit confused. You, as the designer, may view the sketch model properly as the closest approximation of ‘something yet to be properly defined’, whereas it is difficult for the director to look at it as ‘blurred’ in the same way you do. You have to be prepared for the sketch model being judged on exact face value and you need to be clear about what you consider purposely vague and what isn’t. The other thing is, ‘sketch’ or ‘rough’ in this context should be understood more in terms of ‘quickly made’ or ‘not precious’ rather than necessarily ‘inexact’. Scale for example needs to be as exact as you can manage, even in a sketch model, otherwise nothing specific can be learnt from it.
Defining with ‘measured’ drawing
After basic structures have been tested in the sketch model and are ‘approved’ they often need to be further refined in terms of exact dimensions or, more understandably, the method of making them, and it is better to work these out on paper first. An example of the first might be a flight of steps which it might be acceptable to generalise roughly in the sketch model but which need to be checked on paper (see ‘Working Examples’ below). An example of the second is a raked floor, which could be improvised in the sketch model just by propping a piece of card over an object. To make the rake properly the height at the highest point needs to be measured together with the length along the floor from the lowest point and drawn up on paper (as a long, thin triangle) to get the gradient. The gradient (the slope) is the amount the rake rises compared to its length, so for example a gradient of 1:8 (as it’s normally written) rises one unit of measurement for every 8 of those units along. The best way to make a stable rake is to cut a number of those triangles and glue them at regular intervals to the underside of a sheet.
Knowing when the planning should pause
Models can easily go too far into unnecessary or gratuitous detail and it is the same with planning. It’s not entirely true that ‘There is no such thing as too much planning’. There are dangers, both in terms of scrutinising the present in too much detail or trying to look too far into the distance.
For example, some people take refuge in planning for much longer than necessary because the part that follows either involves more effort or it involves more ‘unprotected’ engagement with the unknown .. exactly what one should be doing in fact! Some people are such good visualizers (those who can see quite far ahead in detail, ‘rehearsing’ doing things in their minds and even mentally picturing the outcomes) that they’ve worked everything out from start to finish, leaving themselves seemingly nothing more to discover. Planning is supposed to be logical and rational, but it can also become paradoxically unrealistic! It often delivers the ‘ideal’, based on a string of assumptions
about what one thinks one can achieve and when, setting up an end-goal that is
often as far removed from reality as it can get! That kind of planning usually only
results in frustration and disappointment!
Instead, the kind of planning I’m advocating is ‘episodic’ rather than ‘epic’! Make sure that you’re always planning enough in hard practical terms (i.e. that you have the basic materials, tools and information) to get you through the next few practical steps. Of course it’s important to have a notion of the bigger picture, why it is you’re doing things and where it could all lead, but don’t allow this picture to overwhelm the present or close your mind to the changes that each step could generate. It may not work for everybody, but I seriously believe from my own experience that if you keep the conscious mind reasonably focused on the practical/immediate, the subconscious mind is left to work calmly on the ‘bigger ideas’ and deliver them when needed.
Knowledge of materials and where to get them
As I’ve said, as a maker you’ll only be as good as the materials you know about! But, as with everything seemingly, there are points and counterpoints .. to accommodate the innate differences in people and their situations. I still hold that the key to solving most model-making challenges is to at least know of the existence of a wide variety of material options. Thinking purely of my own experience, I can’t imagine what quagmire I’d still be in now if I hadn’t found out about and played around with Kapa-line foamboard or foamed Pvc sheet! It’s not just that I am enabled to do things with these materials which would either be impossible or impractical with others. It actually needs far less technical expertise to get results with them than with the others, and they suggest new ways of working that I wouldn’t otherwise have thought of. I’ve got to the stage where I can comfortably make almost anything imaginable from either foamed Pvc, Kapa-line foamboard, blue Styrofoam, strip styrene, obeche wood sheet and Polycell ‘Fine Surface’ polyfilla. This is my point though .. I’ve made my selection from exploring many! It pays to be divergent and explore all sorts of different options but after a while it also pays to converge upon a chosen few that one ‘knows’ particularly well.
Learning about new materials isn’t difficult or particularly time-consuming! You can dip into the articles here, or browse through the ‘Lexicon’ for example .. or countless other websites .. not to mention books! But probably an even better, more memorable starting point is just to go and see what an outlet like the 4D modelshop in London has to offer.

Just spending the time to look systematically at the range they have, including many options for ‘preformed’ structures as above, can be quite an education in itself and it means much more because you are actually seeing and handling things.
Thinking in terms of ‘base layers’ and ‘add ons’
Structures, particularly architectural ones, often have a defining shape which I call the ‘base layer’ meaning the most significant outline, although this may not be located literally at its base. This is usually the place to start when sorting out how to construct the structure. For example the proscenium wall i.e. the front of this theatre model-box is a relatively simple structure which can be put together in layers.

That is, the ‘base layer’ is a cut-out following the exact dimensions of the proscenium window with a thick strip built upon the front of it and another strip fixed to the back of it to complete the proscenium arch depth. It needn’t be more complicated than this and if you don’t like the visible join (indicated by the shaded strip on the drawing below) this can be faced with black paper. Most wall structures turn out to be just a base layer with additions one side or the other (speaking in terms of making them in a model! They may be built differently in reality).

I made the wall pieces below to illustrate how seemingly involved wall surfaces can just be a collection of boxes on a base layer. For example with the simpler one on the right it’s easier to cut a main wall piece as a continuous strip and stick the protruding part over it as a box if the construction isn’t going to be seen. It’s stronger anyway, it’s actually quicker, and the extra material hardly makes a difference in cost. It also means that, if need be, individual sections can be more easily kept separate for painting.

Keeping built elements as separate as possible until they’re textured or painted is quite an important general consideration in model-making .. one of the important points on the ‘planning ahead’ checklist. How separate, or rather where exactly to draw the line in terms of having a lot of separate bits, is something one can only learn by doing. Similarly, the way one chooses to create a surface may add a lot to the thickness, so it also needs to be thought about at an early stage .. unfortunately far too early in many respects!
If you’re not good with measurements .. do something about it!
My theory is that it’s the creatively divergent thinkers that make the best theatre designers, and quite a few of those that I know or have taught have difficulty with the ‘number processing’ aspects of the work (although I’m sure it doesn’t follow that if you’re good with numbers you’re neither creatively divergent nor a good theatre designer!). I also suspect that this difficulty arises, not because those people are unable to think logically or systematically enough or that they’re not mentally organized, but rather it’s something to do with not being able to retain information that has almost no emotional or visual reference.
Many people get by without undue stress, but if you feel you are not or if this is damaging your work, you have to take positive, compensatory action because otherwise it will always stand between you and your confidence! First of all you need to focus on what exactly it is that you find difficult, and it could be just one, a few or a number of things. Is it that you find it difficult to retain numbers in your head long enough to work with them or that you can’t ‘see’ them in your head sufficiently as quantities for adding together? Or might it partly be the way measurements are written, for example?
I know for a fact that my problems with numbers are because I don’t retain them, they’re not ‘memorable’ in my head for more than an instant if they remain as just numbers. I’ve found some ways which have helped .. I write numbers down fairly bold on pieces of paper so that there’s also the sense of the movement I’m making with the pen; I say the numbers out loud and often retain the sound of my voice saying them etc. I think I’ve also assigned some kind of ‘character’ to each of the 9 single digits, in a very vague way, to help with both differentiating and remembering them. I always try to transfer a group of measurements I might need (ideally no more at one time than can be fitted with large writing on a post-it) to lie directly in my field of vision while working, as below. This has helped a lot, because at times it’s felt as if they can disappear somewhere within the 2metre journey from drawing-board to worktable!

Cutting needs to be learned and practised!
In my experience a standard surgical-type scalpel (i.e. Swann-Morton No.3 handle, on the left below) is by far the best knife to use for model-making work. The best blade to use with it is the ’10A’. It’s the most general-purpose but also the most precise. The scalpel in the centre has been fitted with a rubber cover, which is much more comfortable and makes the knife much easier to control. Unfortunately I have only seen these on sale in Sweden! The knife on the far right is not a ‘scalpel’, but is another very common type (especially with hobby or ‘craft’ shops) and is not as good in a number of respects. In the first place the flat orientation of the scalpel helps with controlling it, compared to the round barrel. Secondly the scalpel blade is more firmly supported and this support extends further towards the fine tip, as you can see. The blade in the other knife will tend to flex and wobble too much, especially when pressing hard. Lastly the blades for this knife are more cheaply made, not as sharp and .. I think .. not as easy to find. Often the blades are a little thicker than scalpel blades and this can make a noticeable difference when cutting because they produce more friction! These knives are not necessarily cheaper than scalpels (at least they shouldn’t be if the shop prices fairly) and in any case .. why should one think about saving just £1 or so on a tool which will last and which one’s using all the time?

I’m sure I must have said many times that there’s a whole little book to be written just on cutting with the scalpel, hence the devotion of space to it here! At the very least, anyone not practised in cutting needs to consider it a subject in itself which needs to be rehearsed, explored and ‘made peace with’ as far as possible before being able to do anything else. Scale model-making of this kind is so dependent on being able to cut a straight line in the right place. It sounds so simple .. but it’s not! It can’t just be taken for granted that everyone will be able to do this with just a little practise and often people who could otherwise become excellent makers are put off the whole idea of model-making just because this one aspect is never really ‘conquered’. Here are a few guidelines:
If you’re using a material for the first time you should take a while just to get a sense of how it cuts i.e. starting with how steady the metal ruler will lie on it, how resilient or giving the surface is to the initial pass with the blade, how many passes are needed to cut through cleanly without excessive pressure. If you don’t feel confident that the ruler will stay where you’ve put it, you either need a better ruler or you need to do something so that it will grip better. Flat steel rulers will certainly need a strip of masking tape on the back at the very least but sometimes this isn’t enough so pieces of double-sided tape could be added provided they won’t damage the material. If left on permanently they will lose their tack over time but will still improve the ruler’s grip.
You should also rehearse what it feels like to run the tip of the blade steadily along the metal edge, without necessarily cutting at all. It should feel locked there, able to run freely along but not to depart from the edge. The scalpel blade is slightly flexible and it should be pressed hard enough into the metal edge so that it flexes just a little.
There are no special prizes for being able to cut through in one go! The first pass with the knife should simply be to establish a guiding ‘scratch-line’ which only has to be deep enough to be found again with the tip of the blade. One’s focus at this stage should be more on the edge of the ruler than the material to be cut. Pressure comes afterwards, once one’s established this line and it shouldn’t matter how many passes it takes to cut through. If you’re having to press so hard to get through the material that you can’t control the straightness of the cut anymore it means one or more of the following:- the material is too tough or thick to be cut with a scalpel and you will have to try with a Stanley knife or failing that a saw; you can turn the sheet over and try cutting in exactly the same place on the other side (when cutting thick materials it’s the friction on the blade that becomes the problem and starting ‘new’ from the other side often works); or you need to build up some more strength in your hand and arm through practise.
If, for whatever reason, the ruler moves while cutting, don’t try repositioning it by eye. Put the tip of the scalpel in the beginning of the line you’ve started and slide the ruler up against it. Holding onto that position put the tip of the scalpel in the end of the line and move that end of the ruler against it. You might need to adjust, beginning and end, a couple of times.
It’s worth asking yourself consciously whether you’re working under the best conditions or whether they can be very simply improved? For example .. is the cutting matt flat and smooth or is it more like a Jackson Pollock? Can much of this be scraped off? Is the cutting matt really flat on the table or are there small bits of scrap under it? Have you really got enough proper light to work by? .. in particular, can you see your marked line clearly enough or is the edge of the ruler casting a shadow over it?
Usually with thin materials (i.e. up to 1mm) the angle of the cut edge, in other words whether it’s at a right-angle to its surface or not, doesn’t matter so much. Generally, if one’s holding the scalpel normally it will be fine. But if over 1mm thick it can matter, especially if the edge is to be glued on something else at a right-angle. If using foamed Pvc or wood it would be normal practice to straighten the cut edge using a sanding block and this will even work with foamboard or some types of cardboard. Even so it’s best if one gets used to holding the scalpel upright in the first place. It’s much easier to maintain the knife upright if you can actually see the angle while cutting, i.e. by cutting the line in the direction straight ahead of you rather than side to side. Especially when cutting longer lines it’s usually better to stand up for this so that you can reach over the work properly and use your own body as a ‘measure of uprightness’.
Changing the scalpel blade (i.e. when it gets blunt) should be the easiest thing in the world (if the world were fair) but unfortunately it can be a bit of a nightmare with a new scalpel handle, because the fixing is often too tight at first, making it hard to slide the blade either off or on without fear of injury. The only way to solve this (until it wears down a little with use!) is either to use pliers to get the blade off and on, or to file into the blade channels a little. Below is not intended as a solution to this, but it does help to know that blunted blades needn’t always be replaced. They can quite easily be sharpened on a piece of ‘wet and dry’ or Emery paper (usually best 600-800 grit) by stroking the blade firmly at a shallow angle, a few times each side. It’s usually only the very tip of the blade that gets blunt so it’s best to focus on sharpening just this small part, flexing it a little into the paper.

PRACTICAL GUIDANCE
Keeping track of what is being glued to where
A common exercise for beginners is making a complete 6-sided cube using flat card. All sides and all edges of a cube need to be perfectly equal. Does this mean that the first task is to cut out six perfectly identical squares? If your answer was ‘No, of course not! Some need to be a little smaller’ you’re ok and on your way, but if it was ‘Yes’ and you really can’t see why this could be wrong you’re going to be challenged!
The fact is that when pieces of card are glued ‘edge to face’ for things like this the thickness of card becomes part of the measurement, so some pieces of card need to be cut shorter to allow for this. Working out the measurements needed and best method of assembly for a simple cube can be challenging enough, so one gets an idea of the forethought involved in making more complicated constructions. The only way to keep a mental grip on this is by drawing up and noting clearly on the drawing what goes on where .. or at least what you plan to do at that stage. Consider the drawing a master-plan .. take time over it, treat it with respect, put it up on the wall if you can, update it immediately if you make changes. Don’t be afraid of making it multi-coloured if that helps .. this is not prissy!
Labelling cut pieces
It’s an annoyance I used to experience countless times! .. looking at a mass of cut pieces on the cutting mat having lost track of which of them were ‘pieces’ and which were off-cuts. There was often one that I never managed to find again, probably because I’d mistakenly cut it up to make something else. These pieces need to be labelled as soon as cut, including the record of where the top or bottom is etc. You can use bright post-its as below; these are cheerful and important looking, but they could come off. Another way is writing on a piece of masking tape.

Getting and ‘keeping’ right-angles
In the first place, never assume that a sheet of card (or especially an off-cut of card) has perfect right-angles even if it’s straight out of the shop. These need to be checked first. Laying a set-square over the corner is often the way that people check but because set-squares are usually transparent one has to strain the eyes a bit to see this and it may not be sufficiently accurate. Using a try square is a clearer way of checking, not least because one only has to look at one edge rather than two.

‘Setting up’ for gluing
Almost all glues are meant to be used as sparingly as possible, because bonds between things are always stronger the tighter they can be pressed together, regardless of how thick or ‘gap-filling’ the glue may seem.
Whichever materials are being used and whatever the properties of the glue (i.e. whether fast or slow), gluing needs to be prepared for. If the glue is slow-setting such as Pva wood glue, pieces need to be held (ideally fairly tightly) in position until the glue ‘grabs’ sufficiently. With a good quality wood-glue and normally-absorbent card this will not be long, perhaps just a number of seconds. The glue takes longer to set completely but the piece will stay together in the meantime and can be moved .. it just shouldn’t be put under any pressure for a while.
If on the other hand a fast-setting glue such as superglue is used this will not offer the same margin for repositioning so the ‘set-up’ is important in this case as a means of making sure that pieces can be positioned ‘right first time’. I use metal blocks (steel offcuts) to glue pieces against. For example, below I placed the edge of the base piece up against the block, put some glue on the edge of the upright piece and just had to slide it down the block surface into position. This ensured that the upright piece was glued in the right position along the edge of the base piece. Metal blocks like these can be bought from metal retailers such as www.metalmaniauk.com for just a few pounds (see Lexicon entry ‘metal construction blocks’).

Another way of setting things up, involving a different technique of gluing, is offered by the fact that thin liquids will be drawn into tight gaps (what’s known as capillary action). This means that difficult-to-glue pieces such as the curving sheet below can be set up in the correct position and the glue is introduced along the joint afterwards. Here a thin plastic solvent is being used to glue styrene plastic, but thin superglue can also be used and this can also work with card.

The scaffolding construction below needed a bit more preparation to set up the pieces for gluing.
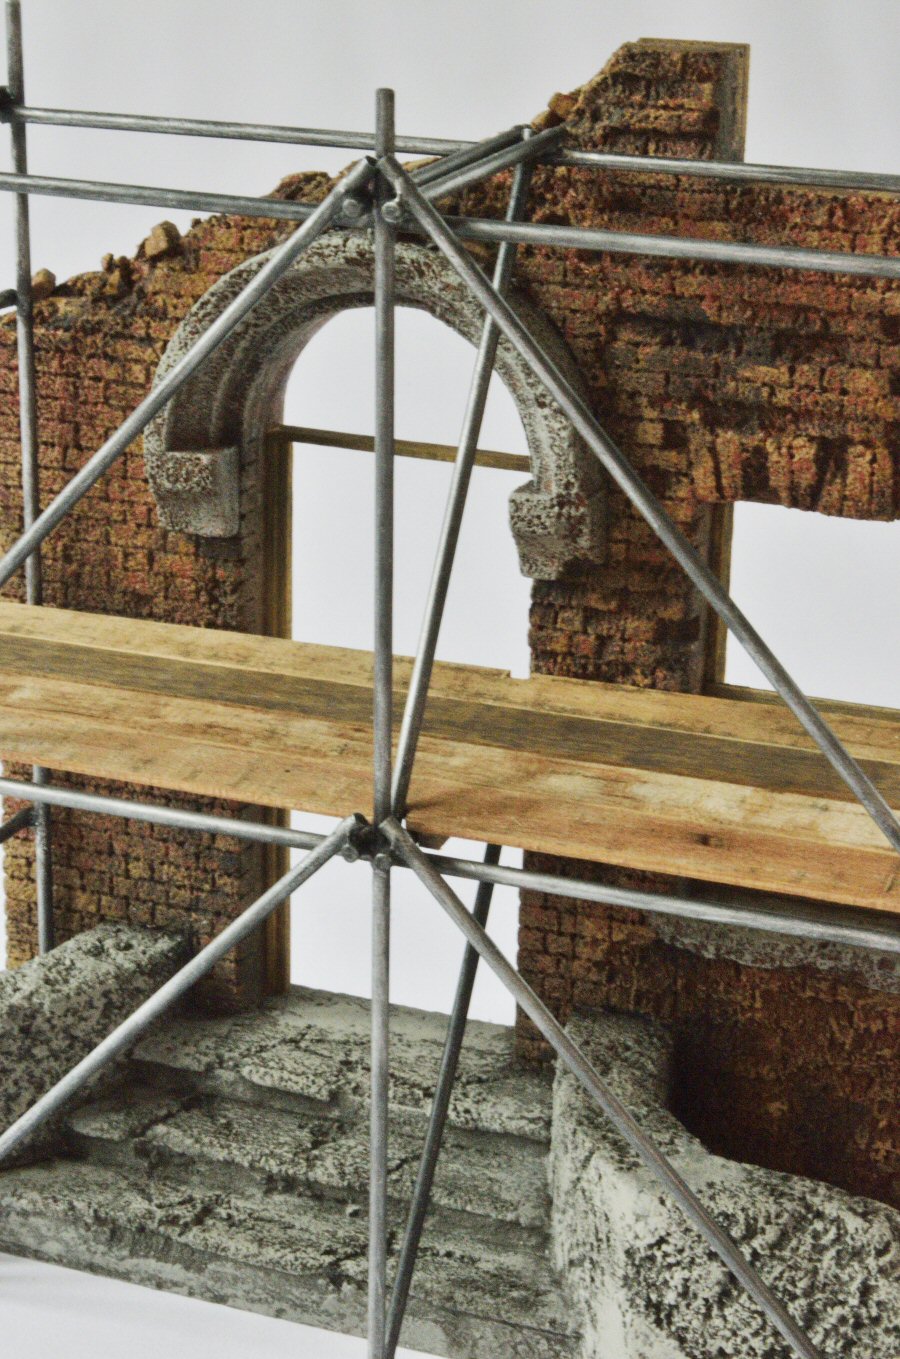
The scaffolding was made from 2mm acrylic rod, superglued together and then painted to look like metal. The individual pieces of rod needed to be taped onto card to hold them in position while glue was introduced into the joints.

Because the structure was three-dimensional I had to make the special foamboard construction below to glue it on. I needed to be careful not to apply too much superglue to the joints otherwise it would have glued the scaffolding to the card. After gluing I just needed to remove the pieces of masking tape and slide the scaffolding construction off the supporting form. Specially made supporting forms like this are known as ‘construction jigs’.

Below, some of the side poles needed to be glued afterwards and these also needed small temporary supports to assist gluing them in the right place.

Faking surfaces
This is not a sudden jump forward to talking about how to create surfaces although, as I’ve mentioned, one does have to include certain decisions about them from the beginning especially if they’ll add to the thickness of structures. What I mean here is that if for example I need to make a structure that looks like real wood it often makes sense to use real wood (if the scale looks right), but it doesn’t make sense for me to construct in wood because I’m not familiar with working with it in a constructional way. I have confidence in being able to construct whatever I want in Pvc plastic, so the best answer for me is to construct in plastic and thinly clad with wood. This has many advantages; it cuts down on cost, it gives more control over the appearance (type of wood, staining, direction of grain), and it doesn’t require special tools or woodworking methods.

Dealing with curves
By this I mean two different tasks .. firstly being able to cut circles or regular curves in a flat sheet, and secondly building structures such as curved walls. As for the first, I could just say that, really, cutting out a nice, smooth circle which you have drawn with a compass is just a matter of practise! One really does have to have a feeling of ‘steady flow’ to do it properly and it usually doesn’t work if you’re agitated. You need the practise to get an idea of how your hand behaves in that situation; how much you can rest it on the material but still slide it along smoothly; whether it’s easier holding the blade upright or more oblique; whether it goes more smoothly using a sharp blade or a slightly blunted one; whether you need to be sitting down or standing up over it. All of these, and more, are considerations and only you can discover what works best for you.
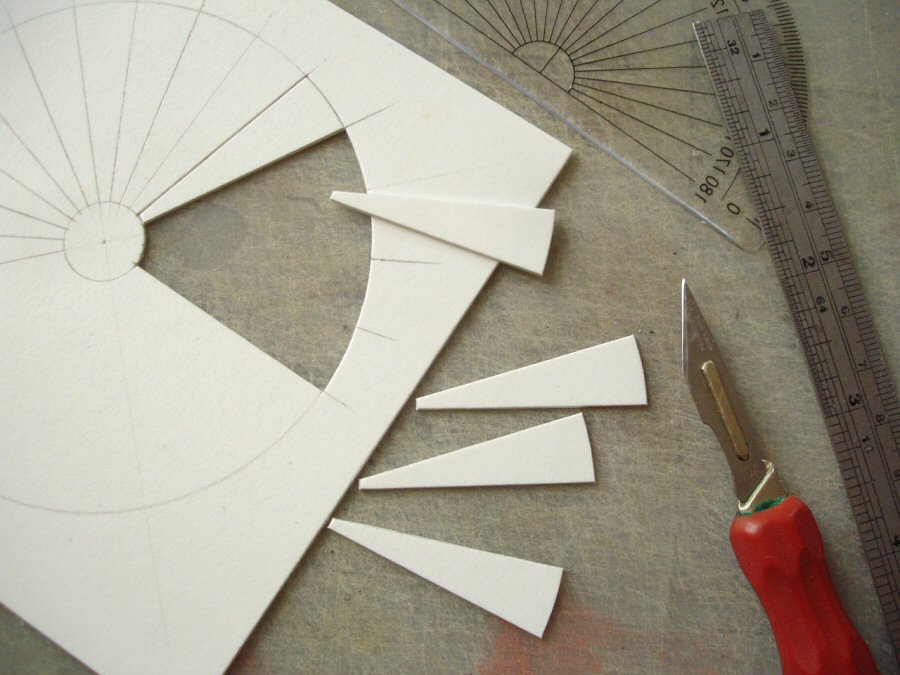
But I can suggest other things that are likely to help in any case, and these are: if you can, find a lead for your compass that’s slightly harder than the standard supplied i.e. ‘H’ rather than ‘HB’ to give a sharper pencil line or, failing that, sharpen the end to a fine point using a nail-file; as with most other cutting, make your first pass just a gentle guiding cut on the surface to be able to move more freely without having to press down too much; if possible use a different, i.e. softer or less fibrous card for these circles than you’ve used for the rest of the model and don’t even attempt to cut circles from the thick, dense, hard recycled type!
But if you’ve tried and tried again, and you’re still not getting anything like a circle, there are other things that could help. There are so-called ‘cutting compasses’ like the one below which usually don’t cost too much. They have a very small blade in place of a pencil lead. I can guarantee that you won’t be able to cut anything like mountboard right through with them (it’s impossible to press down enough while moving round) but you will be able to make a good, precise guiding cut. You will then need to trace this with the scalpel. Another way of making a good guiding mark is if you can rig up your compass with another metal point (in place of the lead). Art or graphics shops often sell spare points.

The photo below illustrates how one would normally approach building any curved structures in the model, whether concave (curving inwards) or convex (curving outwards). If card is being used it needs to be a relatively soft one, such as mountboard, and .. this is important .. not too thin, i.e. 1.5mm mountboard is usually fine. You may think that it’s going to be easier to curve thinner card, but it may not keep its shape well enough. After getting a reasonably good idea of the length of card you need to complete the curve, cut a piece to size but with some extra length (I’ve used ‘foamed Pvc’ plastic below, because I wanted these demonstration samples to last and I prefer foamed Pvc over card anyway). Make repeated and regular-spaced ‘half-cuts’ (i.e. not all the way through) from top to bottom. The closer these lines are to each other the better, and the smoother the curve, but it depends how much patience you think you’re going to have. Ideally each cut should have the same depth (or rather they’re cut with the same pressure) but this is very difficult to regulate. If all goes well the scored card should bend easily and evenly, and the strips act as reinforcement keeping it straight vertically.

Curves almost always need a support behind them to keep them in shape. This can vary according to what you’re prepared to do or the amount of space there is behind, from just bending a piece of wire and attaching it to the back, to the supporting construction I’ve made here.

Here I am gluing it into position against the top and bottom support curves in stages, starting by fixing one end firmly, pressing it tight and then introducing thin superglue into the seam from outside (the technique of ‘gluing from outside’ illustrated earlier). I’ve made the curved piece longer than necessary because it’s easier to handle it this way and it’s easy enough to trim the end off once it’s firmly in place. With this method the score lines are always visible, whichever side you’re facing, but the way to eliminate this completely is to cover the curve with another surface of strong paper (or thin plastic), preferably using spraymount to glue it evenly.
There are other sheet materials which can be used for creating curved surfaces without the need for scoring. Thin (i.e. 0.5mm) white styrene sheet is very bendable (available from model shops such as 4D). Also available from 4D is a special form of soft cardboard called ‘Finnboard’. This is made from pure wood pulp and if it is soaked thoroughly in water it can be bent into a curve without creasing. It needs to be kept in that curve while drying though i.e. by securing it around a bottle or similar former.

WORKING EXAMPLES
Steps and staircases
I often use the example of making a unit or run of steps to illustrate many of the issues of ‘main construction’, and in any case the question of making stairs is always coming up. I’ve adapted this account from my book ‘Model-making: Materials and Methods’ but I’ve also extended it to include a method for open steps and a basic approach to making a spiral staircase.
Even with a simple staircase unit it will become clear after a bit of thought that certain things need to be found out before starting .. firstly the standard acceptable proportion (i.e. height and depth) for a step, the height you want your staircase to go to and the distance along that’s going to be needed to get there. See ‘Common sizes of things’ in the ‘Methods‘ section for more on standard step measurements, but let’s say that each step needs to be 200mm high (known as the rise or riser) and 250mm deep (or along, known as the tread). If you want the flight of stairs to reach 4 metres you could use something similar to the ‘counting on fingers’ method for working out what length on the ground this will come to i.e. dividing 200mm into 4 metres to give 20 and multiplying that by 250mm to give 5 metres length. It might have been simpler and perhaps quicker though to think of the step proportion 200:250 (which is the same overall) reduced to 1:1.25 and simply multiply 4 metres by 1.25.
Once the dimensions are sorted, two identical profiles (side views) need to be drawn up and cut out. These will become the sides of a freestanding stair ‘box’. Believe me, it’s best and easiest to make it this way, even if the stair itself is going to be enclosed between other walls. There’s nothing harder than trying to construct something in mid-air! A lot of construction challenges are solved simply by taking the time to rig up a support to glue upon. This can be left if it’s not going to be visible, and if it has to go it can usually be easily cut away afterwards.

The best thing to do is to draw up a complete grid (above), composed in this case of 200cm x 250cm rectangles. The try square comes in handy for this, or the card can be taped to a drawing board. The grid helps in keeping lines straight and spacing regular, and the extended lines will help when positioning the ruler to cut against later (it’s hard to keep to parallels when all you’ve got is thumbnail sized lines). Maybe it’s the only way of doing it anyway, it’s just that I’ve seen attempts at steps that appear to be more ‘organically improvised’ shall we say! In the past I often drew up a larger grid so that I could make use of the cut zig-zag for both profile pieces. But I have to say, they rarely matched completely. The following three photos were taken for the book by Astrid Baerndal.

After checking for a reasonable match, the profile pieces need to be fixed in a position where they’re upright, the right distance apart, parallel and ‘in sync’. The easiest way to do this is to stick them on a base cut to the proper size. This will add a little extra height though, so to compensate the same needs to be taken off the base of each profile. The right-angle supports glued inside are essential to make sure that the profiles remain properly upright.
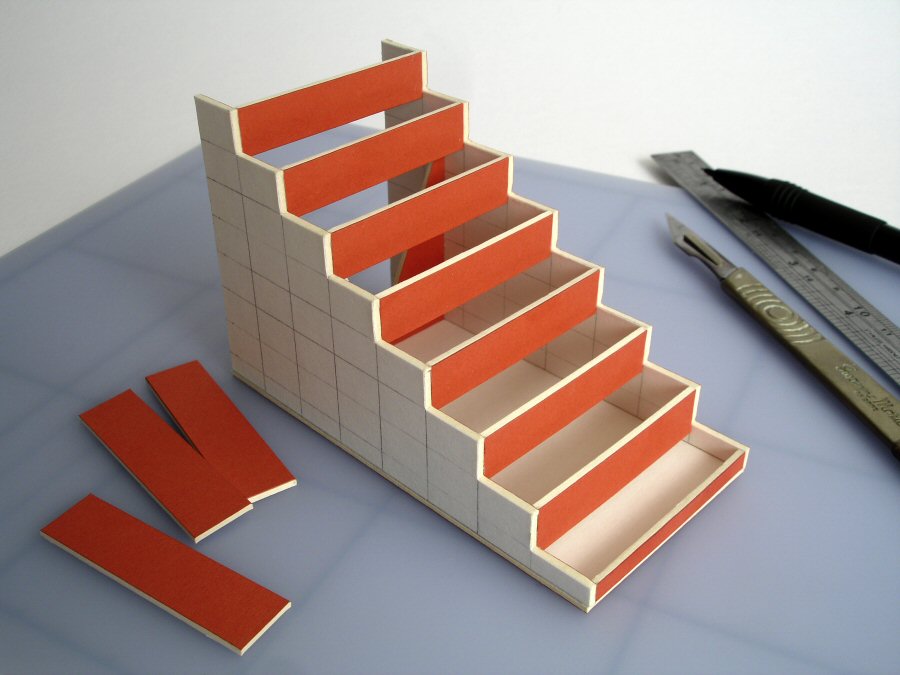
For the next stage above I’ve used coloured mountboard to make it clearer how I’ve chosen to fill in the steps because there could be a number of ways. Here I cut a strip of card exactly the right width for gluing between the uprights and cut all the riser pieces from it. I then inserted these in the right positions using Pva wood glue to allow for some repositioning. In this case the flat of a small metal ruler was useful for pressing them level.

In this example I’ve finished the unit by cutting another strip of card, this time the full width between the outer edges of the uprights, so that the treads can be cut and applied on top. It only remains to give the steps the required surface, whether that’s concrete, wood or carpet etc. Whatever goes on top needs to be kept reasonably thin, because it will change the dimensions slightly (but this difference will only be noticeable on the top and bottom steps of course because if the steps get an even treatment the proportions of the others will remain unchanged).
Speaking of that, you might have noticed that whereas I was careful before to adjust the height of the two profile pieces to allow for the extra card base, I didn’t say anything about the extra thickness of card which has been added to make the treads. Doesn’t this mean that the steps are slightly .. i.e. 1.5mm .. higher than they should be? In fact they’re not because in making this I fortunately anticipated that and sliced a total of 3mm off the bottoms of the profiles before gluing to the base piece. I left that fact out to make this point .. does it really matter? The answer is .. no, it’s not a major error if levels don’t quite match up in the model but it’s generally better if they do. Pride in getting the model right, i.e. in making it look exactly as you want the real set to be built, should extend to all details. Things like miss-matched joins, warped surfaces, ragged areas or spots of glue are only human, but even these little things can prevent a good model from being fully convincing, rather like tiny errors of continuity in a film which are enough to wake us up from the illusion.
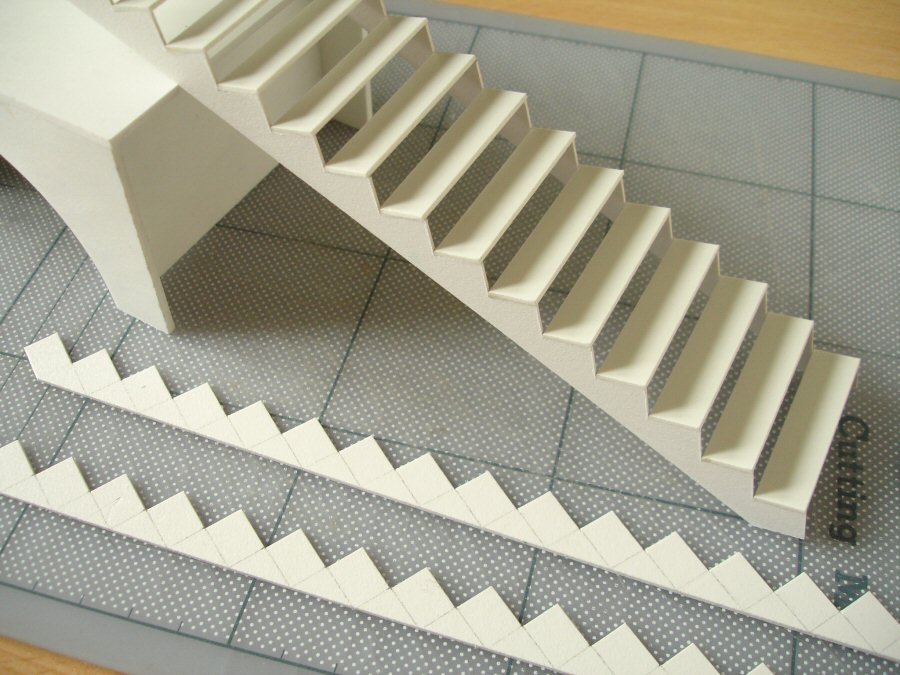
But what if one needs a run of steps which are not boxed in, for example if they’re clear underneath or as part of a metal fire-escape? The general method is fairly similar. For example the first stage is to draw up the necessary grid as before to get the right proportions and spacing.

But then instead of cutting out a profile wall one needs to cut a profile strip, as above.

The two of these then need to be temporarily secured to something so that they stay ‘upright, parallel, synced’ etc. Above, I cut a strip of 5mm foamboard to the right width, checked that this was straight, and secured the profiles to it using small strips of double-sided tape. Below this is the strip for the treads waiting to be cut. I’ve used 1mm ‘Palight’ foamed Pvc for this construction, using superglue. After all the treads are glued in place the piece can be easily loosened from the foamboard support.
I’m asked a surprising number of times, mainly by theatre or film design students, how to go about making a spiral staircase in a model. Maybe it’s not so surprising because it’s a beautiful form, and is often the only attractive solution within a confined space. But having to build it in model form with at least a semblance of its grace will tax ingenuity and patience to the limit! I’ve been quoting the spiral staircase from the beginning of my teaching, as an example of instances where model-making interferes with design. So often spiral staircases are ditched in favour of something easier to make!
What follows is a very basic ‘schema’ for a generalised look .. it doesn’t answer every detail or for every type but may provide a framework method to build upon or adjust.

The drawing above represents what one has to do first, that is, to draw up a groundplan view to scale, establishing the size of the staircase and the shape of the treads. As for the question of size, and especially if this is a design intended to be built and used, one must take into account the building regulations which, in the case of spiral staircases, advise that treads must be at least 26inches (c. 66cm) in width. The same regulations advise on how deep (horizontally) the treads should be at their middle point and I won’t go into detail here but good advice can be found on sites such as
http://www.accentironwork.com/building%20code.html
This drawing can form the template for cutting out the individual treads later (if copied and tacked on with repositionable spraymount), but it is also essential for working out how many steps will be needed for the height required. For example if the staircase needs to reach an upper level of 3 metres, 14 steps will be required assuming that (as I have done here) that each step rises 200mm and that the last step is to the platform. By starting at the top step (aligned as it will be with the platform edge) and counting the progresssion of steps downwards on this plan you can find out how the spiral ends (or rather how the staircase begins). The direction of entry onto a staircase is something that can’t just be left to chance (it has to be appropriate to the way it’s going to be used)and if it needs changing there are two things that can be done. The penultimate step (i.e. the last tread of the staircase itself, before the step up to the platform) can be extended if there’s a gap and usually it won’t be noticeable. Alternatively (although not so usual) the rise of all the steps can be adjusted, because there’s a reasonable leeway from 15cm minimum to 23cm maximum.


What staircases of this more contemporary type have in common (i.e. those usually made of metal, often with open steps) is a round central pole, as above, and this is the starting point for construction. This needs to be found first, so that its diameter can be entered on the drawing. If you’re fortunate enough to live within reasonable distance of a materials shop such as 4D modelshop in London there is such a range of dowels and tubes that one can usually find exactly the diameter one wants either in styrene, acrylic or wood. Otherwise you might have to make do with the more limited choice of wooden dowel from the nearest timber merchant or hardware store, or failing that really ‘making do’ with something you have around such as a thin cardboard tube. It’s important though that whatever you use has a firm surface and that superglue sets well on it i.e. a balsawood dowel may not be strong enough.
I am, as always, using 1mm Palight foamed Pvc to solve the problem of needing something that is thin and easy to cut with accuracy, but still having a firm surface, straightness and resilience. Above, I’ve started to cut out some of the treads. I’ve been careful to give each a little bit of the curve of the pole diameter at the centre so that they glue better to it, but the outer edge could either be curved or straight.

Above I am dividing up a strip measured the full length of the steps to make the risers. Since each riser will be glued along the underside of each tread but the preceding tread glued against the bottom of its face, each riser is the proper height i.e. in this case 200mm in scale.

The best way to start constructing is, as I say, to superglue pairs of tread and riser together first, trying to keep to right-angles. Here I haven’t cut all the treads out yet but have fixed the pole (with a spot of glue) in the centre so that the sheet serves as a base and helps to check the positions of the steps as they’re added upwards. This can easily be sliced off later (I haven’t glued the bottom step to the base!).

If this positioning is followed it shouldn’t be necessary to mark the correct heights of steps on the pole itself. In any case there will be some slight variation however exact one tries to be; the overall effect will look right!

Often it’s not the steps that present so much of a problem, it’s the balustrade. One solution for achieving this is to cut it as a flat piece which can then be glued and wrapped around in one piece. Again, foamed Pvc is ideal for this because it is flexible but thin styrene sheet or even stencil card would also be suitable.


The positioning needs to be checked and then fixed in stages since this is not possible in one go. I’ve only made a portion here to show the principle.


I started renovating a dollhouse and I’ve been making much of the furniture with 1/8″ foam core. I’m having so much fun that I’m thinking of moving on to just building miniature furniture. Your article is the most informative that I’ve found and then some.
Thank you David!
Thanks! That’s nice to hear.
I am new to the world of building Barbie sized dioramas for my daughter. She loves them and I am having such a fun time. I am not sure that I can manage even windows, let alone stairs… But I’m learning as I go, and definitely a quality blade helps. Thanks
Pingback: ‘Model-making Basics’ – main construction – Luxury Life Healt
I like that you mentioned scale models need to be as exact as you can manage, even in a sketch model, otherwise, nothing specific can be learned from it. I am currently studying architecture, so I’m no professional yet, but I’m always interested in learning more on my own. I could imagine that if I needed to build my first building it will be easier to hire an architectural sketch model maker so I can focus on other important things.
Not sure that it would make your relationship with the space easier, to be honest. There’s so much that can be learnt from experiencing how spaces can be put together, even in a basic way. Usually I’d recommend that professional model-makers could be brought in to make a final, presentation model once all questions have been answered, rather than before.
Pingback: davidneat - Outdoor Kitchen Bars | Models, Designs, Plans and How To's
Pingback: davidneat - The Best of Minecraft Skins, Buildings and Houses
Pingback: davidneat - Miniature Dolls
Pingback: ‘Model-making Basics’ – main construction – My Blog
Pingback: ‘Model-making Basics’ – main construction – Decor is art
Pingback: ‘Model-making Basics’ – main construction - Ultimate Blogging Championship
Pingback: ‘Model-making Basics’ – main construction – Dollhouse Furnitures
Pingback: ‘Model-making Basics’ – main construction – Haus Desing
Pingback: ‘Model-making Basics’ – main construction – Dollhouse Furnitures – Crafts
Pingback: ‘Model-making Basics’ – main construction – Art
Pingback: ‘Model-making Basics’ – main construction – Milley is Home
Pingback: ‘Model-making Basics’ – main construction - sb2
Pingback: ‘Model-making Basics’ – main construction - anika
Pingback: ‘Model-making Basics’ – main construction – Stairs
Pingback: how to build a roombox, how to build stairs, + more, scroll way down the page di… – wp
Pingback: ‘Model-making Basics’ – main construction - miniature dolls
Pingback: davidneat - Leonie
Pingback: davidneat
Pingback: davidneat - MADİTA
Pingback: davidneat - MADELEİNE
Pingback: davidneat - ELİANA
Pingback: Davidneat – Whatzername ;-) – join in the world of pin
Pingback: davidneat - anika
Pingback: ‘Model-making Basics’ – main construction - Michele Gislason Blogs
Pingback: ‘Model-making Basics’ – main construction - Marlen Spinka Blogs
Pingback: how to build a roombox, how to build stairs, + more, scroll way down the page di… – host
Pingback: how to build a roombox, how to build stairs, + more, scroll way down the page di... - Discover Pins And Pinterest Blog
Pingback: easy methods to construct a roombox, find out how to construct stairs, + extra, scroll means down the web page di… | Best Hosting Review
Pingback: how to build a roombox, how to build stairs, + more, scroll way down the page di... - เราให้บริการ IT Outsource ที่ดีที่สุด
Pingback: how to build a roombox, how to build stairs, + more, scroll way down the page di... - How to do it?
Incredible!
TEŞEKKÜR EDERİM
Thanks a lot
Very good step by step instructions. It was really easy to follow along and I loved it!
Glad!
Working on a designing a miniature project and this had a lot of very helpful info.. Thanks so much for providing this…
Pingback: MODELLO di Borgo Rossini scala 1:500 – Atelier storia & progetto 17-18
Maravilha! Obrigada!
Muito Obrigado
Dica super legal, desta forma foi mais fácil de executar.
Pingback: Prossime tappe del lavoro – Atelier storia & progetto 16-17
I am a second year architecture student in Kenya.Previously, I made very bad models and even paid to be modelled for. Our lecturers advise us to use a glue called Uhu for gluing everything. It is so thick and so messy. But thanks to you now I can make excellent models. You are so awesome
I’m very glad to hear it has helped Sharon! Yes, UHU is only any good for things which aren’t going to be seen. I’m afraid I haven’t met an architecture or design lecturer yet who’s known enough about practical model-making to really help people .. that was part of the reason for this site.
Wow! Just wow! And I found this (on Pinterest) at exactly the right time because I am at the initial planning stage for a project to repair and restore a damaged 1/12 scale dolls house. I have just spent the entire morning reading this, despite (so I am firmly informed) having “more important” things to do. So many new techniques, new ways of thinking and planning – and materials that are new to me too. Thank you so much for all of it. May I ask you a couple of questions?
How strong is the Palight sheet compared with 5mm MDF? We need to replace the roof on our dolls house and it would be helpful to lose some weight. It will eventually be sold to raise money for the RNLI and Cancer Research so the house must be solid. The roof will be hinged to open too.
Somewhere you mention your book. What is the title? I want to order it right now.
Thank you again.
Hello Pat,
Interesting question .. worth dealing with .. even though ‘strength’ is a very relative term. In general terms I’d say yes, if you used 5mm Palight (proper ‘Palight’ rather than ‘Palfoam’ which is very similar but softer) in place of 5mm MDF it would last longer partly because the reduced weight of the material reduces the stress on it. It is also pretty much guaranteed not to warp or lose it’s straightness over time. I can’t tell you how much lighter it would be because I haven’t seen weights for these materials given but I’d guess it may be a third of the weight. But is the surface of Palight more resistant to damage from, say a toddler attacking it with a fork? .. definitely not, it would suffer if it were just painted, better if it were covered with something else. Similarly, exposed edges would not be as resilient as MDF. The other thing is, if hinges need to be attached to it these would have to be both glued and screwed down because Palight wouldn’t hold just screws firmly enough over time, whereas also gluing using a gel superglue would considerably help with this. Don’t forget that re gluing, superglue is the only option. Hope this helps making a decision .. maybe not!
best,
David
Great stuff here. really helped me a lot.
Looks great
Excellent SbS!!! congrats!!
Dear David, just one word: BRAVO!
Good stuff!
awesome man!!! just awesome.. thank you for such a great article..please make more of this..you are too good in this.
Also very useful to dolls’ house makers. Thank you for such detailed descriptions and pictures.
que material usas? Cartón pluma? Un trabajo perfecto el que haces. saludos
No. If you mean the material that I’m using most in this article it’s ‘Palight’ foamed Pvc plastic.
Thanks for freely sharing your expertise! This is a superb article, and very helpful.
Many thanks Anita! I feel now that I’m maybe being a bit too ‘cerebral’ about it. If there are important practical areas I’ve missed, please let me know!
I work in 1/6th scale and this is very helpful. I’m in Australia.
I’m glad you find it so. Although theatre models are commonly 1:25 scale, many of the methods and the materials themselves are applicable.
Hello David!
Stumbled upon your blog, and wow! there is just so much information here, and me as a doll fashion designer and enthusiast Im always compelled to do the sets, but im always eyeballing everything but this posts goes into details which i know i could use. i posted this on my FB page so my dolly friends could have free lessons on the basics. Its such a very helpful article for all of us.
Thanks Cholo! Most people imply that they’ve ‘stumbled’ across this unexpectedly. My aim however is that more people already ‘know it’s there’ so .. thank you! .. links or referrals are much appreciated!
Reblogged this on Across the Pond and Back Again and commented:
I had the great privilege of studying with David while I was at the Royal Central School of Speech and Drama in London. This is the first of 5 of his posts on basic Model-Making techniques.
Thanks again Meagan!
Thanks for the fantastic “class” on line. They are really useful and practise all your explanations. It would be a pleasure to be present at your classes in person! Your pupils are very lucky!. Kind regards
Thank you Maria!
Great stuff David. I feel like I have sat in on one of your classes !! Thanks for all the tips,info, and sharing your expertise.
Many thanks! Yes, the article probably feels as long as one of my classes!