
I’ve been asked this question a number of times now .. whether regular plaster can be used as a filler for resin, in place of the other ‘white’ powders more commonly used such as talc, chalk dust, marble dust etc. Don’t forget that these are all versions of calcium carbonate and are chemically inert, whereas plaster is calcium sulphate and certainly not as ‘inert’ since it reacts so strongly with water. I hadn’t ever considered it as a filler, and hadn’t heard of any cases of it being used in regular practice. My advice up to now had therefore been to avoid it, because I assumed that it could affect the curing of resins. Plaster is hygroscopic meaning that it will readily absorb moisture from the atmosphere however well it might be stored. Powder pigments are the same, and I have found that the slight moisture in them will cause polyurethane to foam and expand a little even when just a little pigment .. i.e. up to 10% by weight of resin .. is added. So I always assumed that adding a more substantial amount of plaster would cause bigger problems .. not only affecting cure but probably also thickening the resin too much to pour properly. Yesterday I finally found the time to do some tests using a couple of regular plasters with polyurethane resin and discovered that although there are some adverse effects these could also be turned into benefits.

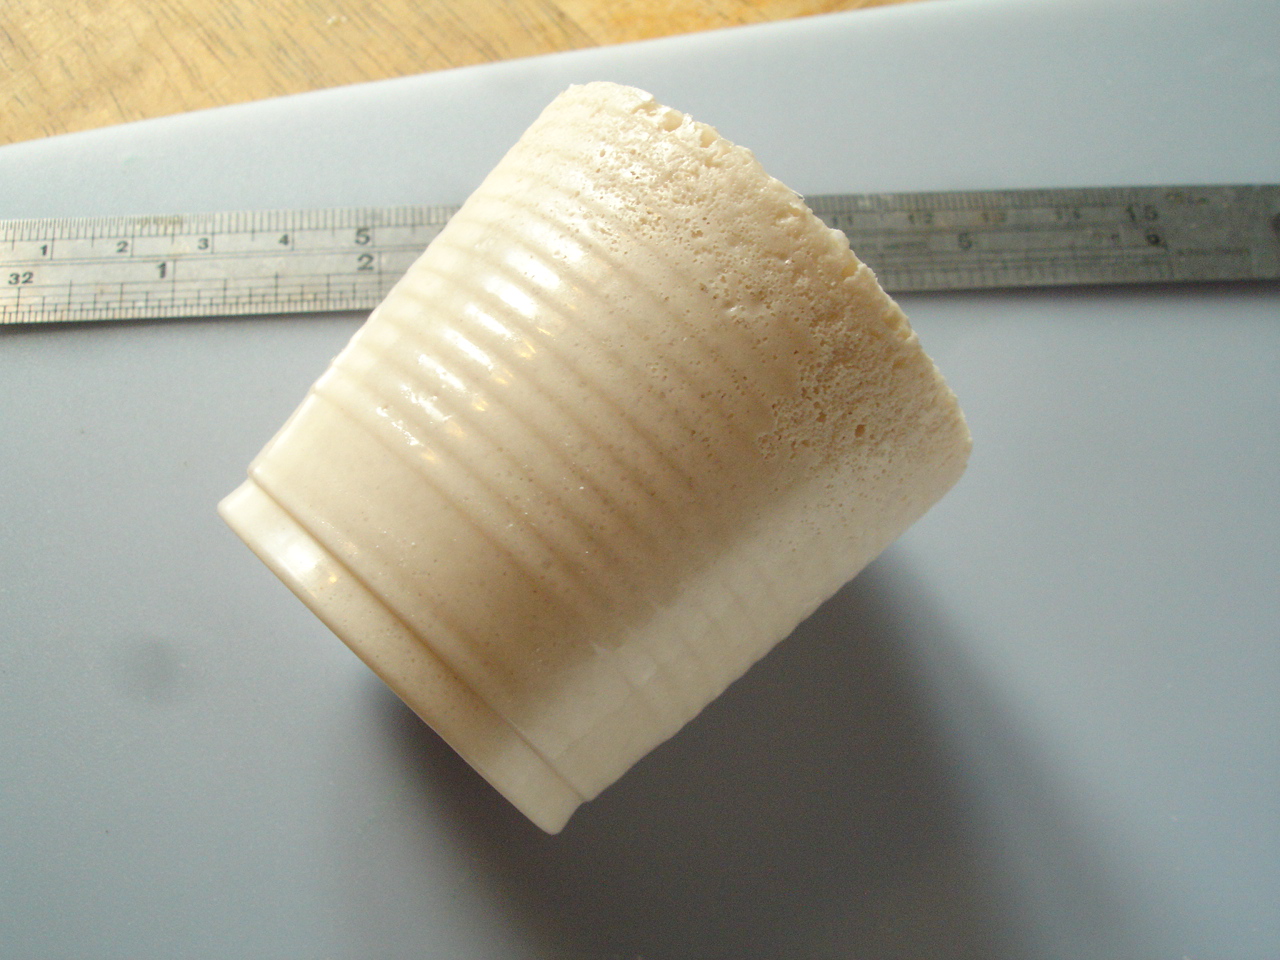
For the first test above I made a control mix of Tomps Fast Cast polyurethane resin without any filler .. 15g of each part, so 30g total. The mix set touch-hard in just a few minutes as normal, becoming a pale ivory solid (the cup on the left). I then did the same but added an equal weight (30g) of Crystacal R which is a fine, hard, ‘alpha’ casting plaster. As per usual with polyurethane resin, the whole amount of filler has to be mixed thoroughly with Part A before adding the hardener Part B.
Whereas mixing is usually very smooth using conventional fillers such as Fillite, the plaster/resin needed a lot more stirring before the lumps disappeared. But after some effort the two combined making a smooth but thick liquid .. like treacle. As usual though, this thins down quite a bit once Part B is added, and the resultant mix was still very pourable. Far from the reaction being slowed down by the plaster I found that the cup started to get warm very quickly, and then the liquid started to expand. Once it had set touch-hard it had practically doubled its volume, as shown by the initial mark I’d made on the cup. The mass was solid, hard and ‘dry’ within 30mins .. there was no under-curing, failure to mix or greasiness on the surface .. all the indications of a good cure!

What was completely unexpected was the change in tone .. from the normal clean, pale ivory to something slightly darker, dirtier as shown here .. and I can’t really explain that yet! The test piece detached cleanly from the cup and the surface was smooth as shown below. The only indication of foaming was minute but noticeable pocking of the surface towards the top, none at the bottom.
I measured the volume increase compared to the control pour, both before and after foaming. The control pour measured 30ml in volume once solid, roughly consistent with the SG (‘specific gravity’ or weight per ml) of the combined resin parts given by the manufacturer as 1.1g. The volume of the same amount of resin with 30g of Crystacal R added .. before expansion .. was just 40ml. This is also consistent with the way plaster behaves in water, absorbing much of the liquid volume. The volume of the expanded mass once set touch-hard was 70ml.

I expected a roughly similar result when I repeated the test using the same proportions with pottery plaster in place of Crystacal R .. but the result was more dramatic! Pottery plaster is a coarser, softer-setting ‘beta’ plaster, called ‘pottery’ plaster because it’s designed for making the absorbent plaster moulds ideal for slip casting. In the first place whereas the 30g Crystacal had combined with the 15g Part A resin eventually as a smooth liquid, the same amount of pottery plaster became a thixotropic paste rather like car body filler. Addition of Part B thinned it considerably but it was still a significantly thicker liquid than that obtained using the Crystacal.

But more importantly, foaming was more ‘aggressive’ producing larger bubbles and until it set hard the mixture expanded to almost three times its original volume. As before though the mass became solid and hard within 30mins with no tackiness or other evidence of failing to cure.

However, as shown below there was more noticeable damage to the cast surface in the topmost area because the bubbles here had become much larger. As with the Crystacal the volume of 30g resin combined with 30g pottery plaster prior to reaction was 40ml, but this expanded to 115ml before setting firm.
I made a sectional cut through the upper parts of both test pieces and sanded the surface .. the fine casting plaster to the left and the pottery plaster to the right below.
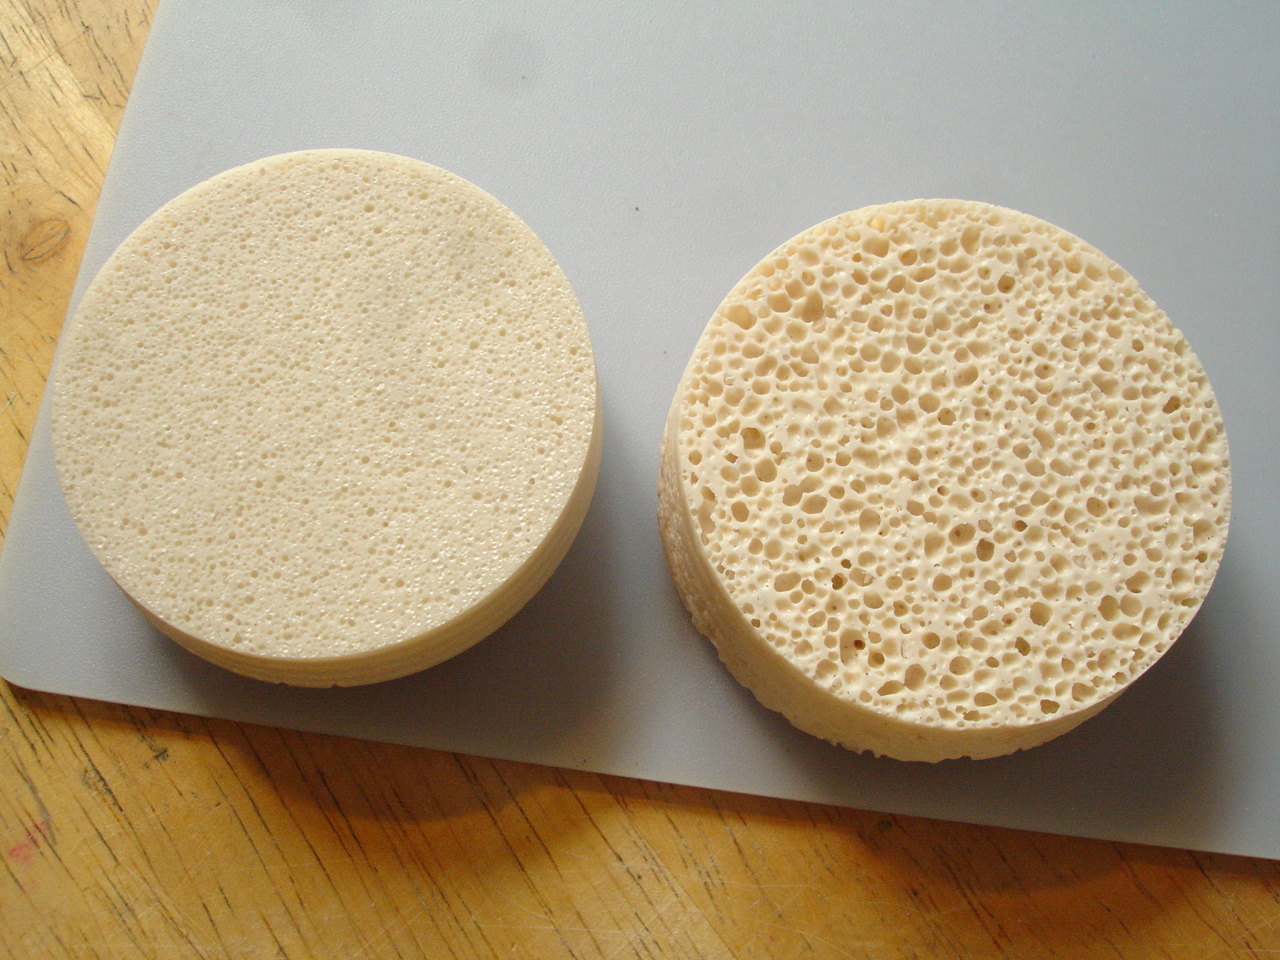
I can only account for some of this marked difference in behaviour. The fact that the pottery plaster appeared to thicken the mix more is predictable .. it is because of the shape of the particles. Commercial fillers such as Fillite are composed of minute microspheres which roll over each other meaning that quite a lot can be added to a liquid without affecting its flow too much. The particles of pottery plaster must be jagged, causing them to clump together whereas those of the Crystacal must be finer and smoother. As for the stronger foaming reaction and increased expansion .. the pottery plaster was older than the Crystacal and may have acquired more moisture; it may also contain an additive; or it could have something to do with the particle size. I’m not entirely sure!
I imagined though that whereas plaster would never be a sensible option for flawless casting, these results could have some uses. At the moment I’m making cast versions of pieces of driftwood to use as components in a sculptural project. So far I’ve been hollow-casting these in polyurethane resin, but using Fillite as a thickener. I’ve described this casting process in my article Making hollow casts in open or closed moulds in the ‘Methods’ section under ‘Mouldmaking and casting’. One difficulty with this technique is getting a thick enough build-up, especially on vertical surfaces, when using polyurethane resin because there is no way of making it truly thixotropic. I tried the pottery plaster/resin mix for coating these moulds below, with a little black pigment added. I found that because of the swelling it was much easier and quicker to build up a thick shell, even on the vertical parts.

I also found, as I’d observed from the cup tests, that since the foaming is largely directed upwards there was no damage or loss of detail on the cast surfaces. The intricate patterns of weathered wood have reproduced perfectly here!


Thank you for sharing, David. I have a few more questions regarding process and US available products. Could you email me? It would be much appreciated!!
Thanks in advance 😊
Katie
Hi Katie, You can email me if you like with questions .. davneat’at’aol.com .. but I don’t think I can add anything I haven’t put there already, having only done it a few times.
this was fun 🙂 enjoyed and saved me some work!
David: many thanks for this really useful site.
I’m new to casting and am learning by trial and error. I make moulds of stone sculptures I’ve made and then cast them in bronze resin.
Rather than use plaster as a filler mixed with the resin, as described above, Tiranti suggested I should line the mould with normal bronze resin, let it set and then fill it with builders plaster to pack it out, before sealing the base with a further resin layer. I’ve tried it and it seems to work, as long as you let the plaster dry thoroughly, but I wonder about long-term durability out of doors.
Any advice, please?
John Nicholls
Yes, I’ve heard about this being done .. haven’t myself. I don’t think these would have very long-term durability though. I think the surface would deteriorate fairly quickly, compared to stone or real bronze.
Thank you for this and for the excellent site. I have been making a pure bronze resin shell and then not quite filling it with plaster. When the plaster is completely dry I can then add a final layer of resin to the base, so the piece is entirely enclosed in resin. My question was about the durability of that arrangement rather than leaving an area of plaster exposed, which I think was the basis of your reply and which clearly would be vulnerable.
Thanks, I understood what you meant though. I meant that resin surfaces outside (whether polyester or polyurethane, with polyurethane more vulnerable I think) will suffer degradation over time, especially filled bronze effects. It may help to use a tough polyurethane varnish designed for exterior use.
Thank you – will take your advice.
Hi David, I was happy to read and reread this posting of yours once I found it. I have been toying with finding something to approximate marrow in old bones, as I work at times with making casts of fossils. The effect the pottery plaster has in the urethane is remarkable. Nice work!
Mike
Hello Mike,
I thought so myself, when I first found this effect .. that it would make a pretty good bone-core simulation. If it can be controlled enough. Introducing a little bit of added moisture can make the bubbles bigger, but then it gets more difficult to predict. If you try the technique and get good results it would be great to see photos!
Highly interesting read for me adn as usual well written and illustrated. Thank you for this comparison and I am now eyeballing my pot of Hydrocal…could be interesting to give it a go.
awesome stuff…never would have thought of trying that, may come in very handy some day….suppose one Q to ask, what about the strength of it? are the hollow/ thin casts prone to snap/ break more easily?
Hello Jake,
Fillers will always affect the strength of polyurethane and some make it more brittle. I tried not to go thinner than about 3mm and this seemed very strong .. but you’re right, I did notice when peeling the waste from the mixing cups that it was much more brittle than resin alone.
Thanks David…all my projects on hold at the minute so will be long time best case scenario before i try this…..was under the impression that fillite actually strengthened the resin, although i wdn’t expect plaster to…..maybe 50% fillite and 50% plaster wd be soemthing to try….not great deal experience with PU resin….but it does certainly strengthen polyester resin quite a bit, and less shrinkage with it as well….so win win on that i find 😉
Thank you for doing these experiments! It’s heartening to learn that we are able to make use of both type A & B plasters as fillers in resin casting, while being aware of the advantages and disadvantages. Very exciting…I appreciate the time you invested in this process, and your willingness to share the results with us. Take care.
Thanks!