
Please note before you start reading this older post that I have long since included a version in the Methods section, under Making realistic models, which can be accessed above. That version may have been updated or expanded since.
This is the third of five outline accounts dealing with what I consider to be the five defining areas of model-making work; main construction, fine construction, modelling/shaping, creating surfaces and painting. I’ve written these overviews in preparation for teaching sessions at RADA ( Royal Academy of Dramatic Art ) in London. So they’re tuned towards the specialities of theatre design model work, but most of the points will be relevant in general terms to model work in other disciplines. I’ve started with the general ‘themes’ or requirements of the subject .. in other words the ‘ways of thinking’ behind the practical work .. and this is followed by a selection of ‘ways of doing’ giving more specific and practical guidance on the materials and methods used.
As I see it, ‘modelling and shaping’ encompasses the making of any element in the model that cannot be achieved by methods of construction. That is, if a form or part of a form cannot be achieved by cutting sheets or strips of bought material and assembling the pieces, it means that it has to be either shaped or modelled. So for example this would include model figures and trees; forms of relief decoration which are more than just cut outs; the making of specialized forms such as globes, domes, bowls, niches; soft furniture such as armchairs, sofas .. I’m sure you get the idea! Some of these things can be bought, including figures or trees, but usually the likelihood that these are ‘just the thing’ is slim. It’s very easy to persuade oneself that it’s a good move if it will save hours or even days of time, so one should guard against ‘cheating’ oneself by compromising on what one really wants. Nevertheless it is worth knowing what the options are for a number of difficult forms, such as transparent globes or domes for example, because believe me unless you are a highly experienced maker there’s no easy way of making such things oneself. 1:25 scale figures can be bought and are often used, but again I’ve seen too many examples of their careless use in theatre design models to want to recommend this solution.
It’s expecting rather a lot of a theatre designer to be a good sculptor too, especially a good sculptor of miniatures! .. and modelling is traditionally the province of the sculptor. For this reason ways have to be found of keeping within one’s ‘comfort zone’ in terms of knowledge and skills. You can’t know and be able to do everything! There’s no such thing as ‘cheating’ here (except in the case of cheating yourself, as above). What counts is that you’ve done what you can to make the model look as you want it to look, and it conveys your design intentions, regardless of the means you’ve employed. Most ‘serious’ sculptors have tricks which they don’t like admitting to for whatever reason and a number of those are included here. But any method of getting the job done which you imagine a serious sculptor may frown on .. is in this context probably worth a try!
GENERAL APPROACH
The difference between ‘modelling’ and ‘shaping’
The main thing is .. ‘organic’ shapes with little geometric regularity such as human figures or trees are more easily modelled, whereas more streamlined forms such as domes or niches are more easily achieved by controlled shaping. Modelling is generally additive, usually starting with a support then adding an amount of soft material, then adding more, etc. .. modelling is ‘pushing a soft material around’ until it’s where you want it to be. Shaping, at least the kind I do with the materials I’ve chosen, is generally subtractive .. the form usually starting as a block which then has successive parts taken away from it until the intended form is all that’s left. One major consequence of this difference is that modelling can usually be back-tracked if a mistake is made whereas shaping usually cannot. If too much modelling material is added or if it ends up in the wrong place it can be removed or moved, whereas if too much is taken away when shaping wood or foam it can’t be put back. For this reason modelling feels more free, there’s room for improvisation and chance, and there’s room for taking risks and making mistakes because these can be smoothed away if they don’t work. In fact modelling has to progress in this manner. Shaping on the other hand needs a different ‘mindset’ .. it needs to be more anticipated and must be quite tightly planned, leaving little room for chance or experiment.
Choices of modelling material
Of all the materials for modelling available now, natural clay remains the most reliable and versatile, in addition to being the cheapest by far. In its fresh state it is one of the softest, smoothest, and can be made more ‘liquid’ very easily, so it can be almost ‘smeared’ on when fresh, and successive layers fuse with each other readily. As it loses water it firms up, allowing more detailed modelling, and even fine carving at the so-called ‘leather hard’ stage. But as it dries it also shrinks and cracks, small forms are very fragile when dry if left un-fired, and larger forms are heavy .. so unfortunately it’s not suitable for model-making. But a number of different modelling materials have been developed which either remain in a soft, workable state for much longer or harden by themselves.These have a range of different properties, but they can basically be grouped into three categories (though some overlap more than one). Incidentally, I’m just going to say ‘clay’ from now on in place of ‘modelling material’ as a general term.
There are the plasticine clays which remain soft and workable almost indefinitely, even after long exposure to the air. Most of them cannot be made hard and durable. Their basis is usually an oil or wax (at least something other than water) and a filler, such as finely powdered natural clay or talc. Examples modelling wax, plasticine, Chavant, plastilene, etc. Polymer clays such as Super Sculpey can be hardened and more properly belong to the third group, but if they’re not baked they will remain workable for as long, at least as long as plasticine. In my experience modelling wax is the leader of this group .. at room temp firm but softens quickly, does not stick to fingers, can be smoothed with hot tools. Many waxes can be melted to a liquid state in order to be poured into a shape (only some ‘plasticines’ can, such as the American Van Arken brand). Here in the UK the ‘Newplast’ type of plasticine in long blocks is probably the easiest clay to obtain, and relatively cheap at an average of £1.80 for 500g. It is easy to model with, although when very soft I find it too sticky .. it gunges up finger-tips and is not ideal when impressing with texturing tools etc. Importantly though, plasticine will accept coats of Pva wood glue, which toughen the surface and allow it to be painted. Pva wood glue contracts a great deal as it dries so there is usually no danger of losing detail in the modelling, even after more than one coat.
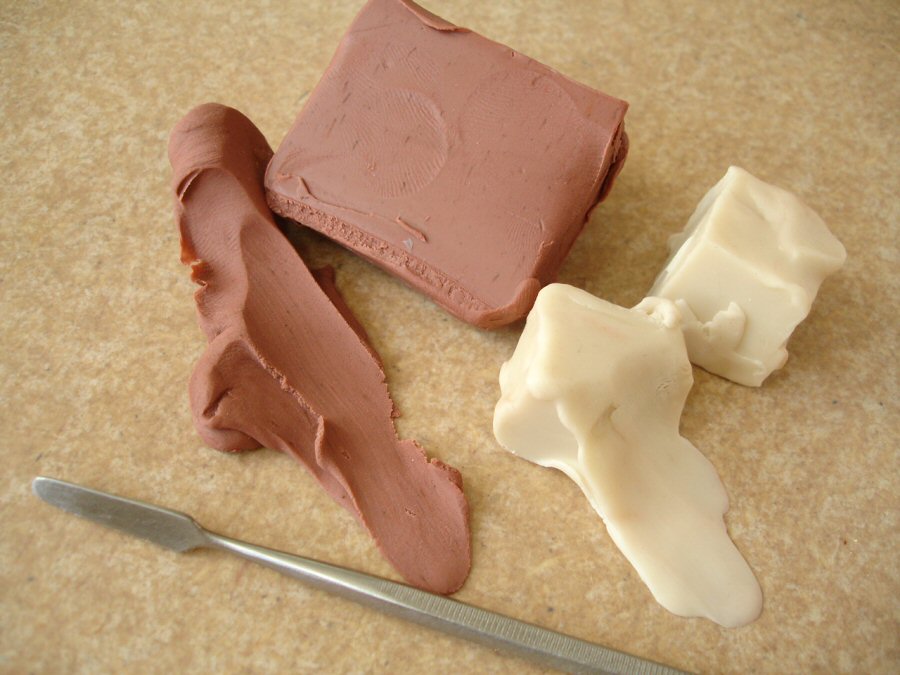
Modelling waxes, plasticines and polymer clays all come in different hardnesses .. at least, certain brands do. Above are two types of modelling wax, the brown one very soft like natural clay and the white one much firmer. For more on working with these see Modelling wax in the Materials /- modelling section.
There is a significant, but subtle, difference between modelling waxes and plasticines in terms of their surface behaviour when being modelled, which some may find fairly crucial but others may not. It’s a bit difficult to describe, but on the whole modelling waxes have less elasticity meaning for example that if you impress a cocktail stick against the surface you will get an exact groove with quite hard edges. If you do the same with plasticine (and particularly Super Sculpey, which is even more elastic) you will also get an exact groove but the edges will be more rounded because the material there has been pulled down a bit. In other words, plasticines and polymer clays are a little more rubbery, and this can save time if you’re going for smoothness. But on the other hand it means that these materials have a significant ‘push-back’, a little resistance to being pushed around, which can make very fine and sharp detail a bit more difficult. Generally the softer modelling waxes are similar to natural clay in having really no ‘push-back’ at all.
To get back to the three basic types of clay .. the second category is the air-drying materials which all share having water, in the place of oil, as a carrier and these will harden as the water evaporates. Since some of their content is lost in this way they will shrink .. and some of them will shrink and crack badly! Examples natural clay, Paperclay, Newclay, Claydium, Das, etc. Many have a fibrous texture which helps in holding them together but often makes fine detail difficult. Some are light, some are quite heavy. Pricewise they are very good; after natural clay some are the cheapest clays around! I usually only use the air-drying, pulp-based clays if I want to built up a rough core modelling shape easily and cheaply, but only if I’m not bothered about cracking or the time it will then take to dry.
The final category includes those clays which will set or ‘cure’ as the result of a chemical reaction, brought about either by two reactive parts being mixed together or by heating. Examples Milliput (2-part epoxy putty), Green Stuff, polymer clays. My firm preferences from this group are two, Super Sculpey and Milliput. They are very different materials to model with and I use them for very different purposes.
Super Sculpey (that’s the full brand name for this type unfortunately, not just me being enthusiastic!) is almost as soft and ‘pushable’ to model with as a soft modelling wax and just as non-sticky ‘finger friendly’. It doesn’t stick to itself as readily as soft modelling wax or natural clay but it will with just a little extra coaxing. I prefer it for modelling medium-sized forms which need a combination of surface detail and smoothness .. a puppet head with sculpted hair for example .. because I find smooth contours much easier to achieve with it than wax, but at the same time very detailed textures can be achieved by imprinting with texturing tools. Super Sculpey can be easily modelled up in layers, heated in between. More on this is included later when discussing model figures. The only characteristic of Super Sculpey that I don’t like is it’s very slight translucency which sometimes makes it difficult to judge surface detail. There is more on Sculpey in the summary page I’ve included in the Materials /- modelling section. Below is an example of a small fish form I had to make in Sculpey which needed to be baked and fitted into a curve, so I had to rig up a curved cardboard support for modelling it on. Small forms don’t take so long to bake so in this case the cardboard survived the hot-air gun.

Milliput’s main distinction is it’s hardness once fully cured, much harder than a polymer clay. I use it for small or delicate forms which I really want to last .. small, because Milliput is more expensive than Super Sculpey. It is much more difficult to model freely with, having far too much ‘push-back’. The two component parts of Milliput need to be mixed together in equal amounts and the window for modelling before Milliput becomes too hard is 1 – 1.5 hours. For more information on Milliput, there is quite a long entry in the alphabetical Lexicon.
Just for the heck of it, out of interest and for those of you who are really price-conscious here is a comparison I put together earlier this year. I have taken prices from the sculptor’s shop Tiranti in London, which I know are fairly average or ‘reasonable’ .. not the cheapest but certainly not the highest! I have compared the price per kilo even if the materials are not normally packaged in this amount and where there is a price range it reflects the cheaper price for larger amounts:
Natural clay £0.47-£1.27 per kg £11.88 per 25kg, £6.37 per 5kg
Newclay £1.19-£1.96 per kg £15.08 per 12.6kg, £8.83 per 4.5kg
Newplast £3.56 per kg £1.78 per 500g 10% off 20
Claydium £3.94 per kg £1.97 per 500g.
Plastilin (Flints) £5.10 per kg
Modelling wax Terracotta Wax or Scopas White Modelling Wax £9.29-£12.72 per kg £46.45 per 5kg, £6.36 per 500g
Chavant £10.45 per kg £9.48 per 907g
Milliput Standard £20.10 per kg £2.28 per 113.4g
Super Sculpey £20.64 per kg £9.37 per 454g
Milliput Fine White £44.62 per kg £5.06 per 113.4g
Green Stuff £156.33-£240.50 per kg £4.81 per 20g, £9.38 per 90cm
The principle of ‘controlled limitation’
This is not an ‘official’ phrase but one I have assembled myself to help me to think about it. It is a principle behind all successful making but applies particularly to modelling and shaping. It makes me think of ‘damage limitation’ and conjures up a film scene of soldiers building a strong barrier around a bomb to contain the blast. Perhaps ‘containment’ would express it just as well.
I remember always being very impressed, and equally relieved, hearing about the ways sculptors make their lives easier! For example making a block of wood firstly into a rough profile shape of the whole head, to define the limits .. or rather to remove what one was certain one didn’t want first .. before going further. Working in the other direction (i.e. building up rather than removing), I was impressed when I saw the method of sticking long nails into an emerging clay head to set the positions of key points on the eventual surface.
But put sculptors aside for the moment .. without doubt, craftspeople are better at coming up with ingenious ways of making their lives easier! The photo below illustrates a delightful technique called sledging which is still known to some traditional plasterers, used to create profile shapes particularly for wall cornices. After some basic volume has been roughed in using coarse plaster, a layer of finer plaster is shaped by dragging a cut metal profile along it which collects and removes the excess.

Another example for a more complex form is provided by the schoolmaster/model-maker Thomas Bayley in his truly precious book The Craft of Model Making, last published in the 1970s. Here he shows how to tackle interior alcoves and domes by first making a positive shape from which a shell cast can be taken. He recommends making the main shape of the positive by means of, what he terms, ‘running with a template’.

These methods may offer a manageable solution if one has time and patience, but they are by no means simple to achieve, even the first example! One does also need quite a bit of skill and practise. I include them here because they are more important as examples of the type of thinking that one should do .. thinking in terms of templates which control the material and limit the ‘damage’, but also ‘thinking in negative’ which there will be more about later.
These methods of control all apply to making larger-scale forms and are designed for precision .. whether of line, smoothness or detail. When it comes to modelling on a smaller scale a lot less precision is needed .. one can often get away with good ‘suggestion’ rather than realistic depiction. This, together with the fact that things like weight and structural integrity are not such issues at a smaller scale, means that the solutions for modelling forms or creating shapes can be more free and varied, that is .. not tied to conventional sculptural methods.
For example below I am modelling a figure directly onto a drawing, without using an armature. The idea with this is that the complete front half is modelled, the material is then hardened, after which the back half can be continued directly onto it. The big advantage here is that the drawing imposes clear limits i.e. it is almost impossible not to get the general proportions and shape of the figure right if one keeps to the drawing.

I’m using Super Sculpey here, a flesh-coloured polymer clay which, as I’ve said, is one of the softest and most malleable. It hardens with heat, which means that the usual way is to bake it in a normal oven (130 degrees centigrade, c.15 mins for each 6mm of thickness used), but it can also be hardened quite well using a hot-air gun, which is better for the task here. One needs to be careful though, when heating the figure up, that the paper template doesn’t start buckling too much with the heat. Normally I’d suggest having the paper glued down to a board, but it’s better if the paper is not because then it’s easier to peel away from the baked first half without damaging it.
The disadvantage of this method of ‘modelling flat on a template’ is that obviously it works better for forms which keep mainly to one plane, as with this figure ‘standing to attention’. It helps a lot to have copies of the drawing close to the modelling, as below, and it’s pretty essential to work out a clear side-view to be able to check the thickness being built up. As I mentioned, a conventional sculptor would not work this way, arguing that one can’t get the same sense of the overall three-dimensionality and poise of the figure while working. But for the purposes of suggesting figures in a model, whether they’re there as characters in the drama or features of the architecture, I think the benefits of being able to keep to a template outweigh the shortcomings.

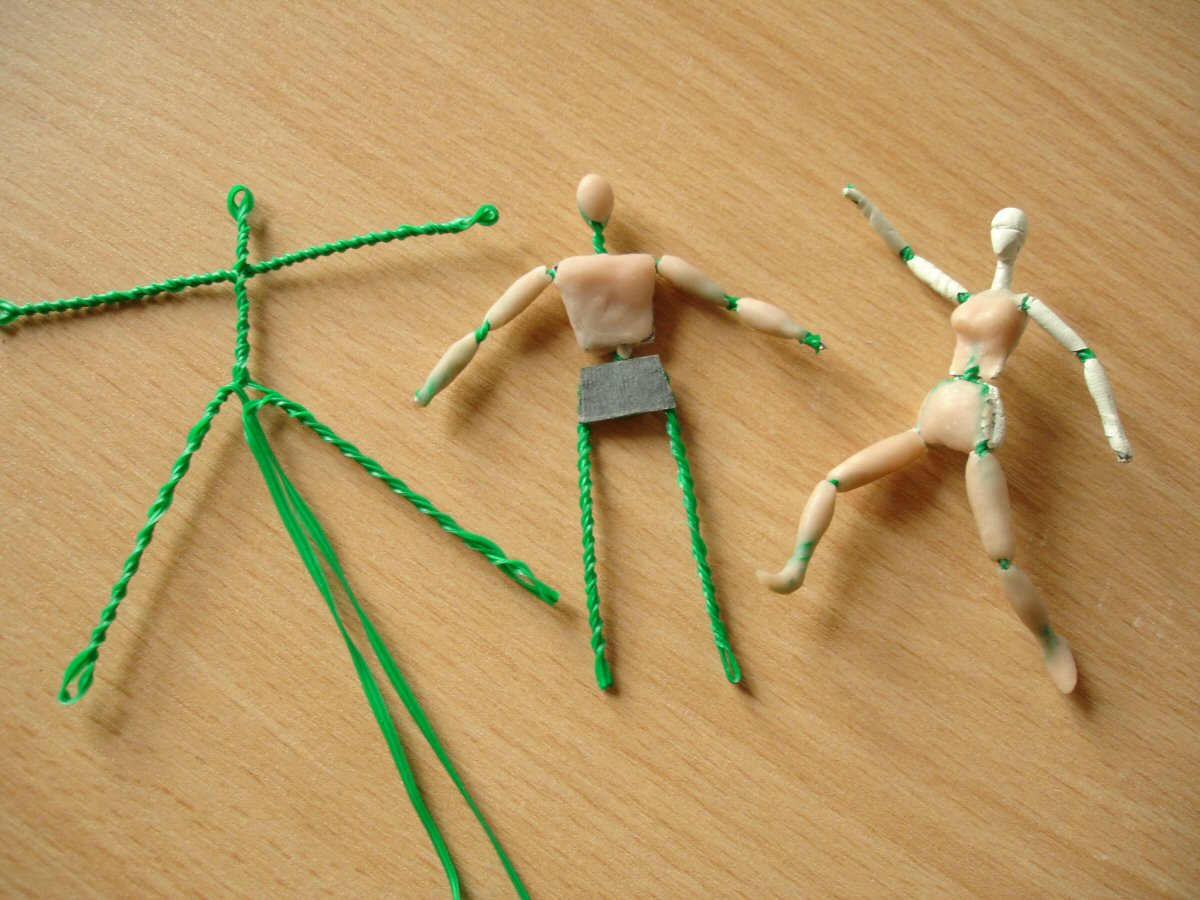
I’m not suggesting that all model figure work can be done this way. Normally a sculptor builds up a modelled figure on an armature, which is a skeletal support for the figure usually out of wire, and it makes sense to do that even at this small scale. Getting the armature right is more than half of the task, at least in terms of importance. A good armature is not only there for structural support, it should also be as far as possible a guide as to where to put the clay .. it should impose some control. The small figure armatures below are ones I’ve featured in my book, but I describe a quicker method later when we look more closely at figures. The ones below are made of soldered brass and they include double thicknesses of brass on the legs and arms but broken at the joints so that these can be bent at the correct points. They also include flat plates (in brass shim) representing torso and pelvis, which although not strictly necessary for support, are invaluable for keeping the sense of the shape of torso and pelvis while modelling.

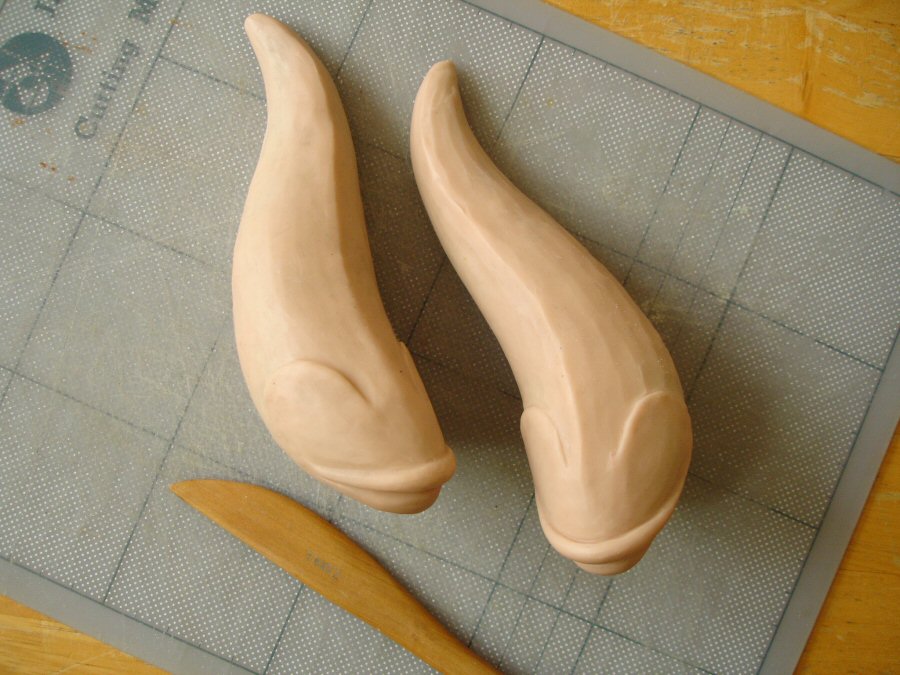
Below is a fuller sequence of photos which illustrate the use of ‘controls’ when shaping soft foam and the usefulness sometimes of having a harder ‘core’ shape to model on. For this task I had to make a 1:6 scale model of an ornamented fireplace, including two large fish sculptures either side. This was for a film still in production, so unfortunately copyright prevents me from showing the completed fish forms until the film comes out, but I can show enough to illustrate the modelling process. Because the fish needed to be symmetrical I decided to make the same basis shape for both out of styrofoam, cutting a template shape first out of Pvc for one and using it flipped over for the other. Below, I have secured the template shape to a block of styrofoam using double-sided tape, which holds it firmly while shaping but which can be easily detached afterwards.

Knives and wood rasping tools can be used to get close to the edge of the template shape ..

.. but I prefer to use a sanding block and more ‘control’ to reach the line. I’ve made a round sanding block from a cut piece of thick cardboard tube (the kind used for rolls of carpet or upholstery fabric) with 60-grit coarse sandpaper attached.

The sides of the sanding block are at a right-angle, so if both the form and the sander are kept against the work surface while sanding, at least the basis blocks for each shape will come out the same.

I then sanded (or rasped) these freehand, but both at the same time .. i.e. a little off one, then the same off the other .. until I reached the right shape below. Unfortunately I didn’t take a photo in between the two here in this case, but the best next step would be to shape down the top surface on each block first before doing anything else, because this slope can be easily compared. After mostly using a coarse wood-file, I finished off the form below using a small piece of coarse sandpaper. I’ve begun to press the first layer of clay (in this case I’m using Super Sculpey) onto the styrofoam. Because Sculpey really doesn’t want to stick to styrofoam, it was important to work it in thinly at first to ensure a stable coating before adding more.

Below, I have built up a good, even layer ready for the modelling of the surface details. Making a block styrofoam core-shape like this has a number of advantages .. it means that the modelled shape has a more controlled basis as I’ve said, just like the wire armatures; it gives a firm basis for pushing against, particularly if surface details are achieved by pressing or imprinting, without the fear of pushing the overall form out of shape; it economises on modelling material (some, like Sculpey or Milliput, are expensive compared to natural clay); and it reduces weight, without making the form itself much weaker.
A note of caution though! .. I modelled these fish in Super Sculpey and didn’t need to harden them because I was making moulds and casts from these prototypes. Heating a very thin layer of Super Sculpey on styrofoam (using a hot-air gun) can distort the styrofoam shape if it gets too hot. If you’re using this method for a one-off where you need a permanently hard surface a thicker Sculpey layer (i.e. c. 5-6mm) would most probably be ok, because the styrofoam would be partially insulated. Otherwise you have to use Milliput or another self-hardening clay.
In the section ‘Making curved shapes in styrofoam’ later on I demonstrate another method of controlling a shape using specially shaped sanders. These are not things one can buy but they can be easily made. I found that only a thin strip of sandpaper was necessary to sand styrofoam (or the polyurethane foam from Kapa-line foamboard you will see later). If this strip is supported on a shape it means that the area of foam sanded will gradually take that shape and this will work for convex as well as concave shapes.

Developing the ‘scanner eye’
Some people are good at looking at a subject, whether it’s standing before them or recorded in a photo, then looking at the copy they’re making and recognizing how the two differ .. i.e. what exactly needs to be added to or subtracted from their copy and where. Usually it’s something they’ve acquired and developed through a lot of practise at looking at things, so it’s a skill that theatre designers in particular should have already and be particularly disposed to developing. It’s a fundamental of being able to model a likeness! I believe that simply improving your ability to look at and compare things objectively is the most important step towards acquiring skill in sculpting. For example, next time you’re on a train compare the shapes of the heads you see around you. Try to estimate how big people’s foreheads are in relation to their heads as a whole. Are hands bigger than faces, is the length of a nose roughly the same as the distance from it to the bottom of the face, is the space between the eyes the same as the length of an eye? These are simple things to try, you can devise your own questions, and this type of conscious looking won’t fail to improve your abilities if you practise it whenever you have a spare moment.
‘Thinking in negative’ or approaching the form as a void to be filled
Up to now I haven’t included the methods of mouldmaking and casting within this series because they’re more specialised, a whole other subject in itself, and I’ve already written a general summary of it Beginner’s Basics – Mouldmaking and casting explained which can be found under Methods /- Mouldmaking and casting. But I’m including this brief example here because it illustrates a different approach to making a form. It is a method of form-making which goes back a long way and is now an integral part of our technology. I’m sure most people are aware of the principles of it, but almost exclusively in the context of ‘making many copies of something’, which somehow prevents the recognition of it as a solution to making single forms.
The challenge of making a model of a bath is a very good example of what I’m talking about! Most often we only need one, and we know that ideally it should be as thin as possible, so our thinking is automatically channelled in the direction of trying to construct the shape in a thin but bendable material. This would be fine if the curves and slopes of the shape were that simple. If however we think of the essential shape as a solid one first, so that we start with a three-dimensional form template in other words, a lot more is achievable.

These two photos are enough to illustrate the method. I’ve made the ‘prototype’ bath shape using the foam from Kapa-line foamboard (which I’ll say more about later) but styrofoam would also have done. For the fish shape previously I used one shape template to guide the sanding block, whereas this needs two to establish the limits of the top and bottom of the shape. These just need to be fixed in the right positions either side of a rough block of foam and the excess foam is then sanded away down to the edges of both templates. Finding the right positions for the templates, either side of a block, is not that simple though! The best way is to fix the larger template to the foam first and sand down to that using a right-angled sanding block (just like the fish). This will give a much clearer indication of where the smaller template should be positioned on the other side. The sanding can then be completed.

I coated the foam shape with polyfilla and sanded it smooth, then made a plaster mould from it. In this case I made the hollow bath shape using a fairly simple process known as absorption casting. The principle behind this is that the plaster mould will absorb water from a liquid material filling it, meaning that the material gradually forms a tougher skin next to the plaster. The remaining still-liquid material can be poured out of the mould leaving a thin shell which is left to dry. This contracts a little as it does so it can be taken out easily. It’s the method used, on an industrial scale, for casting crockery using clay slip. I’ve used a special form of liquid papier-mache called Liquache which is not so available in the UK (but I’ve included one source in my Suppliers list). An alternative would be to use the more familiar method .. the beloved ‘balloon pasting’ one .. of papering the inside of the mould with small pieces of newspaper and glue. The mould surface would need to be Vaselined first though. In actual fact, if the thin shell is built up this way there’s no need to make the negative mould at all .. it could be built up on the prototype form, as long as it’s strong enough.
PRACTICAL GUIDANCE
Making model figures
Let’s just assume for the moment that making three-dimensional scale figures to inhabit a three-dimensional scale model is a good thing, before arguing the pros and cons of having to do them! The first thing that’s needed is information. We need to know what the human figure looks like and, just as importantly, what it looks like at 1:25 scale. When I’m modelling in 1:25 scale I work from visual cue sheets such as these ones. For these I’ve taking the trouble, not only to find the clearest, most authentic looking and most general models for the proportions and details of the human figure but I’ve also adjusted them all in size to fit the 1:25 scale. It doesn’t mean that every bit of visual reference I have needs to be in scale as long as I’ve got this basis.

For these I’ve looked at various sources .. anatomy books for artists, figure reference websites, medical books .. but the visual references I’ve found most helpful have come from reliable digital artists such as www.selwy.com One can usually tell at a glance whether the artist really understands figures, and the neutral grey or brown surface of a digital sculpt is much easier to read than even the best real-figure photos.

Before one can begin modelling though, an armature is needed. As explained above the armature supports the material but it should also serve as a modelling guide. In my post from March 2013 Modelling small-scale figures I provide a step-by-step account of making the simple armature out of twisted garden wire below.

The template which is useful as a size guide during the process is also included in the post. The twisted surface of the wire has an added usefulness in that it gives more ‘tooth’ for the clay to attach itself to.

In my opinion it’s much easier to model a figure at this scale when it’s ‘spreadeagle’ i.e. laid out flat like a five-pointed star, keeping the joint areas free almost until the last. This way it’s easier to portion out and balance body and limb masses, getting a symmetry first. Super Sculpey lends itself in particular to this because very small amounts can be applied first of all just to put some mass on the skeleton, and these can be quickly fixed with the hot-air gun before putting another layer on top. It doesn’t matter how many times the same portion of figure is subjected to the hot-air gun for successive layers as long as it’s not too close (i.e. not nearer than about 5cm) or dwelling too long on one point. Either the figure or the heat gun needs to be kept moving .. but slowly, not agitated.
Milliput is the next best alternative material to use, and some might prefer it. I’ve used it on part of the figure above right and for the whole of the middle stage below. Milliput is a 2-part epoxy putty, and the parts need to be mixed in equal amounts before use. After thorough mixing one has between 1-1.5 hours to work with it before it becomes too tough to model. An advantage over Sculpey is that it’s much stronger, especially when making very slender forms and it’s much stickier. But for this reason I don’t like it as much as it sticks to the fingers and makes detail modelling sometimes difficult. It has much more ‘push back’ than Sculpey, especially so after just half an hour. It also makes the process of building up in stages quite a lengthy one because a few hours are needed before it’s safe to model the next layer.

Modelling tools
For modelling figures at this scale the question of tools is hardly important .. in fact I often just use a cocktail stick and a Starbucks coffee stirrer! Basically it’s enough just to have something finely pointed and something flattish.

But if you find that you are doing a fair amount in the way of modelling, and larger things, here is a selection of the most useful bought tools. The four on the left are standard ones for clay modelling and one can get them in plastic or wood. In the centre are two made from walnut strip wood and to the right of these is an embossing tool. This is useful because it has two rounded points of different gauge. The metal dental modelling tool to the right of it is an example of a range of fine-modelling tools one can pick up quite cheaply (even in £shops sometimes). To make modelling easier it can be quite important to have at least one of the ‘loop’ tools shown next to it. These make it possible to remove material rather than just displacing it.

But just as much can be achieved using tools which are not meant for modelling, especially when it comes to surfacing effects. Below is the fire part for the fireplace mentioned earlier, modelled in Super Sculpey. A plastic bristle brush and a hogshair painting brush were perfect for giving the burnt wood and coals a suitable surface texture.

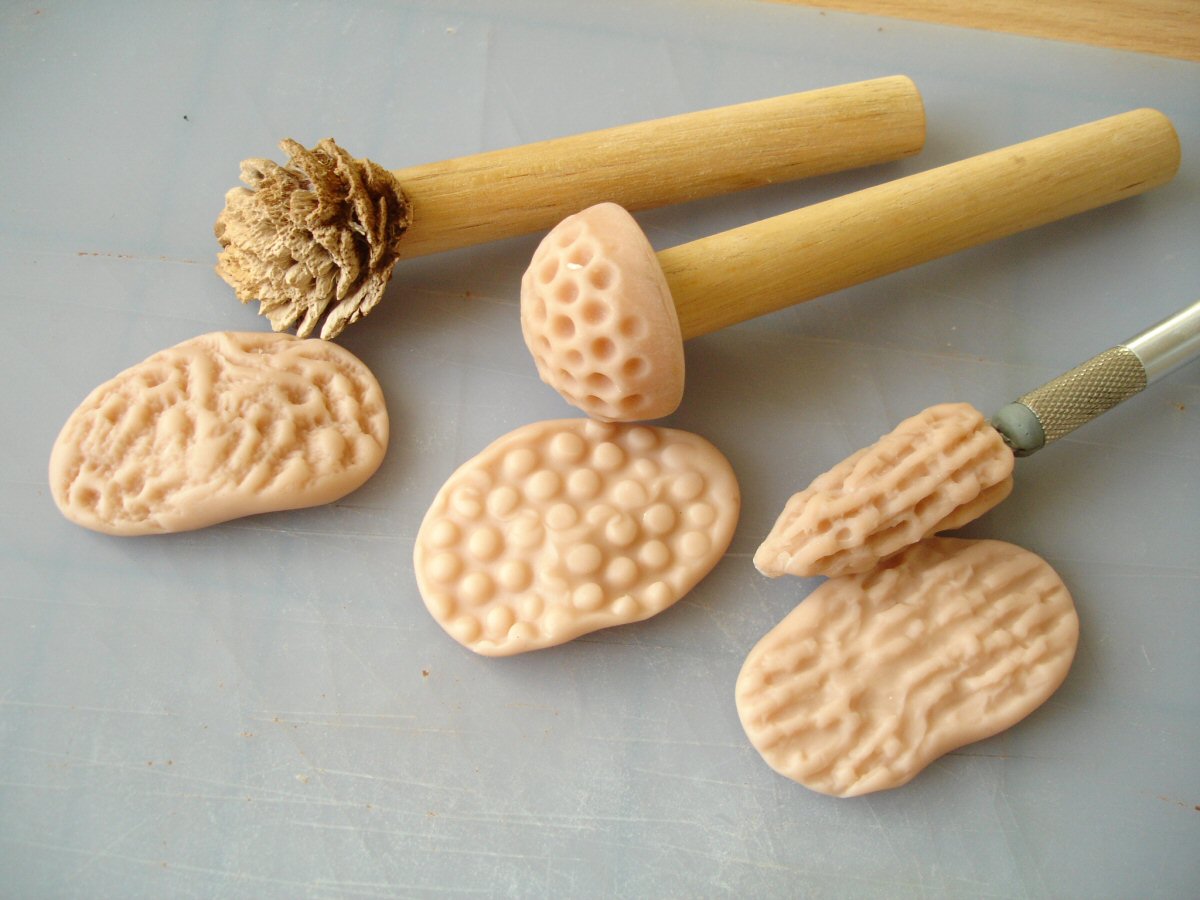
Other useful texturing tools can be made either from natural forms such as this portion of nectarine stone or modelled and baked in Sculpey itself. The form to the right, which was designed to imprint a tree-bark pattern was modelled on a cutting-knife blade so that it could be fitted into the handle.
Soft furniture
Rather than modelling the form of an armchair or a sofa out of clay .. this is possible, especially for broken down old things which are any shape except ‘streamlined’, but they can end up rather heavy .. I use soft sheet foam to make them. Take this old leather Chesterfield as an example of perhaps the most ambitious, alongside something simpler. Kapa-line foamboard has a polyurethane foam inside which is quite dense and fine compared to the polystyrene foam in regular foamboard and the covering paper can be quite easily peeled away without damaging the foam surface. The foam can therefore be used as a versatile sheet material in its own right.
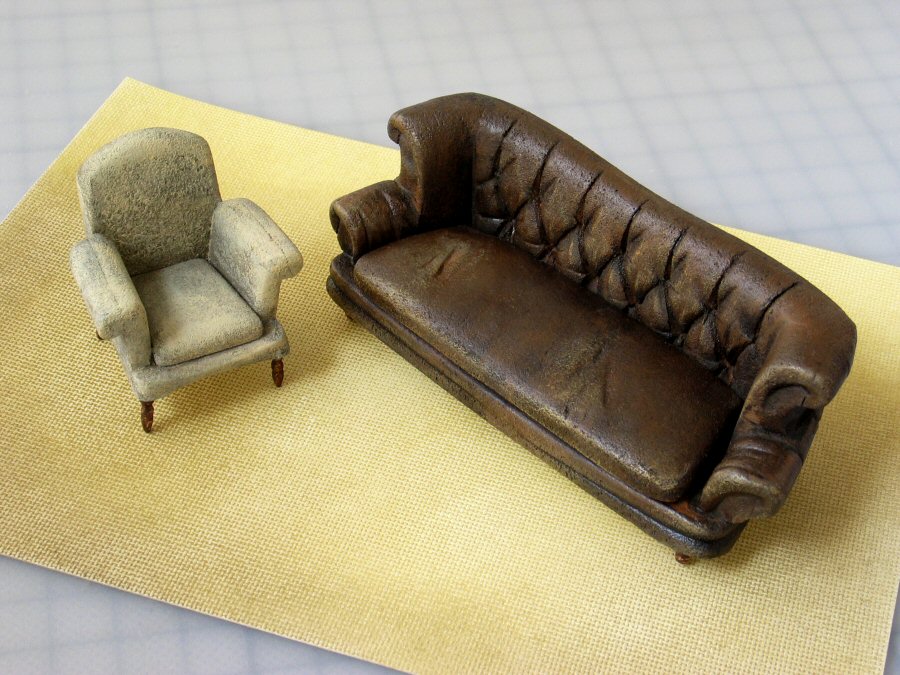

Unfortunately I don’t have ‘making of’ photos for these ones, but the process is simply one of cutting the constituent pieces (seat, back and arm shapes) as flat foam cut-out shapes first, then shaping parts of them either before or after they’re all put together. To give a better idea here is the drawing I use as a scale guide for making the small armchair

Both pieces of furniture were made entirely out of foam except for the legs. Apart from the advantage that Kapa-line foam sands easily and smoothly, it bonds very well with superglue and because of its porous surface accepts any type of paint very well .. including even ink or watercolour! If painted with these or very thin acrylic the surface will look matt, even velvety, with a slight tooth to it like upholstery fabric. But it’s easy to make it smoother, as I’ve done with the leather Chesterfield, by giving it more than one basecoat of acrylic and finishing off with some liquid shoe polish.

Here again are the chairs made from styrene strip plastic from the previous article on Fine construction. The chair cushions are Kapa-line foam and I’ve incised very slight lines with a pencil.

Below are foam cut-outs glued to Pvc furniture pieces ready to be sanded down into more rounded upholstery shapes (it’s easier to sand them after they’re fixed down).

For the characteristic ‘quilting’ effect on the Chesterfield, more properly referred to as buttoning I think, I just marked out the pattern before gluing the pieces together and made the indentations by pressing in the corner of a small metal ruler. For the larger- scale pieces below I marked out the pattern, carved into it partly with a scalpel and rounded with a sanding board.


If the surface is coated with thinned Pva glue tissue paper or even soft kitchen roll can be laid on top and pushed into the pattern for more of a fabric effect.

Making curved shapes in styrofoam
I normally use the most common blue form of styrofoam which comes in sheets 2.5cm thick (although thicker sheets can also be found). There are also other types of styrofoam, differentiated by colour. The pink one here is finer and the green one is coarser.

I’ve chosen one of the simplest examples first to underline the basic principle of using template cut-outs to control the shaping of the foam. This is just a little step up from the previous example of the fish shape, and it’s much the same as the example of the bath shape, but I think it will help to make the more involved example of the ‘dome’ shape which follows a little clearer.
This sequence is taken from another article Shaping styrofoam in the Methods section. In it I describe the making of simple ‘half-column’ shapes as part of a composite structure, and below is one of the end results.

The first step in making this was to cut a piece of Pvc representing the base dimensions of the half-column (I use Pvc out of habit but cardboard can also be used as long as it’s more resilient than the styrofoam when it’s sanded). I’ve fixed the base templates firmly to the foam with double-sided tape, but they can be easily detached. Next I sanded down to the template using the right-angle sanding block shown above.

After this I attached a Pvc semicircle either end, again with double-sided tape. Most of the part that needs to go can be sliced down with a knife if one’s careful, but then it’s straightforward using the sanding block to sand down to the curve, provided it’s longer than the piece itself so that it’s ‘stopped’ by the two semicircles.

The principle behind making a regular dome in foam is similar in that it involves setting up template shapes, but this time they remain inside the form rather than attached temporarily outside. The method is suitable for any number of form variations. The faint lines of the plastic inserts are just about noticeable under the surface of the finished dome below.

The following photo sequence shows a form with a slight variation on the regular dome shape but will serve to illustrate. The first step is to cut the Pvc shapes which will provide the ‘control edges’ or limits of the form. As I’ve said, these parts will stay within the form.
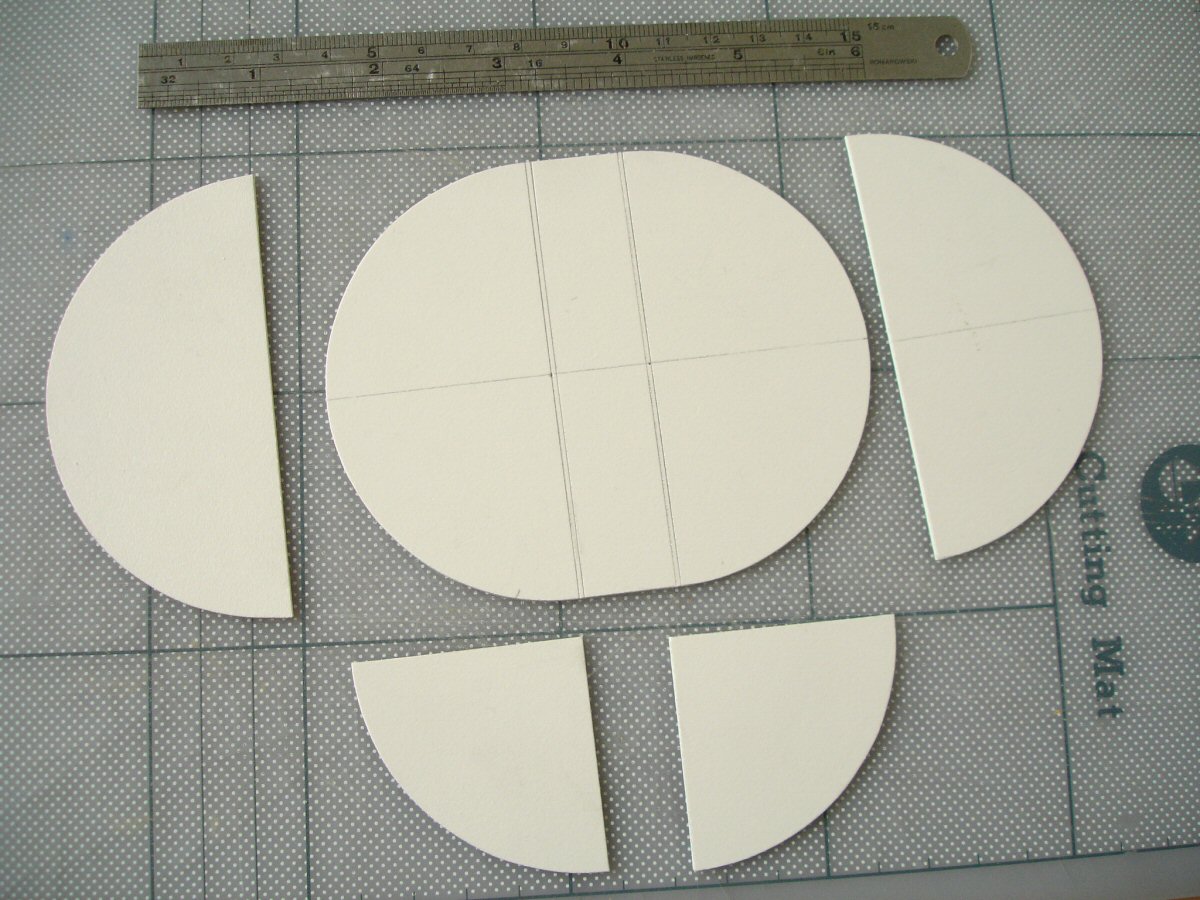
This particular shape needed to be more ‘pill’ like i.e. a little longer than a sphere, so I had to make a flat section in the middle first, shown below. For this I used some layers of Kapa-line foam sandwiched between the two plastic templates (made in much the same way as the bath shape earlier on except that the two template shapes are the same).

Each quadrant of the form is then built up in layers of styrofoam, fixed down with double-sided tape.

I’d advise building in layers rather than a thicker block because a Pvc template can be included on the top of each layer, to further control the shaping as shown below. Here I’ve started to remove the excess with a coarse wood file, judging by eye. But I made a

couple of curved sanders (shown in the last photo), to the same curve as the principle semicircle, in order to sand the foam down to the template ‘stops’ smoothly. As I said at the beginning, shaping certainly needs to be thought about beforehand and thoroughly planned. The thinking may be involved but the doing of it is relatively easy, and once

one’s practised a little it opens up many form-making possibilities.

Perfect ‘bowl’ or concave shapes are much easier, again making use of the fact that a thin strip of coarse sandpaper suffices to sand through styrofoam. The photo below is also taken from the article Shaping styrofoam in the Methods section, and shows the shape near completion. I first inscribed the size of the circle needed as a guide while sanding. I made the sanding tool to the same diameter, with a c.6mm strip of coarse black sandpaper attached. When the tool is pressed against the foam and revolved it will make a rough depression at first but this will get smoother as it continues. For more on this and how to make a round-topped alcove shape as an extension of this method see the article mentioned.

Liquid modelling
Again this is my term of convenience for the technique of ‘piping’ a liquid material onto a surface, as one might do when decorating a cake, to create the effect of relief decoration without the effort that more conventional modelling or carving would involve.

Here I am using a relief medium I have prepared myself .. Polycell ‘Fine Surface’ Polyfilla .. with a little water added to make it just a little more liquid. It should be mixed as-and-when needed because the consistency is perfect for piping evenly when fresh but after a while (i.e. after a few days) it starts to become a little lumpy.

The main trick is getting it into a suitable, squeezable, small plastic bottle with a fine nozzle. It isn’t difficult to find these. The one above was from a £shop and contained glitter-glue and so were the pen-like ones below. I’ve had to mix the polyfilla thoroughly with a little water first in a small container, then fill a plastic syringe and use this to transfer it into the bottles. If not applied too thickly the polyfilla takes 1-2 hours on average to dry. I prefer using this polyfilla mix because it shrinks the least of the various materials I’ve tried. It also dries the quickest and if deeper relief is needed a second layer can be applied, as I’ve done with the portion of picture frame in the top photo.

Idenden Brush-coat, which is a texturing compound commonly used in the theatre here, also works very well. An advantage of this is that it can be used as it comes without dilution and will consequently keep its consistency much longer. But unless you have access to a friendly scenic workshop, Idenden will be expensive because it only comes in 10litre buckets.
Other possibilities are offered by various fabric relief paints or glass-painting relief outliner shown below. The Pebeo ‘Touch’ relief paints are more like a liquid plastic, so one can ‘draw’ with them very evenly, and there are various colours including good metallic such as gold or pewter. It is a little disappointing that they shrink quite significantly, so they don’t manage something like the picture frame, but are perfect for the suggestion of a relief surface. The Pebeo ‘Cerne Relief’ glass-painting outliner is a thicker medium and the small tube comes with a much finer nozzle, so very detailed effects are possible.

Working with wire mesh
I usually categorise my use of metal mesh as a method of shaping .. if not modelling even, because it’s also ‘pushing a soft material around’ in a way. I work mainly with ‘welded wire mesh’ which is welded firmly at each intersection, so that different forms can be produced according to where the mesh is snipped and how the free pieces are bent. It’s ideal for small tree forms, for example.


I’m sure many other structures can be made in this way .. but that’s something for another day ..

Incredible, so much talent! Thank you for sharing with us🌺
Thanks!
Pingback: 2020 Transition – poradora
I just wanted to thank you for sharing your talent . It’s someone like you that keeps me going and to never give up. I can do it !!!!
Thanks Marie! Yes you can! As most people who achieve things would say .. it’s almost all about the WANTING TO!
Pingback: Textur-Werkzeug – unikatissimas
Nicley done! Looking forward to seeing more of your work.
Perfect bravo
What a thorough & fascinating explanation of modelling materials & techniques. I am a cake decorator who is used to modelling in gumpaste & having little to nothing in the way of inner support, but am branching out into inedible materials so I can create permanent memories of the cake requiring event (starting with cold porcelain). Thanks for the tips.
Reblogged this on talesfromthemancave and commented:
Some excellent ideas and goes for modeling 25mm scale items and armatures for sculpting your own minis from a recently followed blog by David Neat.
I’ve even spotted something in here to make my life easier and I’m not sure David intended it as such. Hopefully he’ll have more ideas I can borrow for my modelling projects!
Cheers David.
Jason
DAVID! Du bist wahnsinnig – einfach genial! Liebe Gr��e, Birgit
Birgit Voss Koppel 102 20099 Hamburg birgit.voss@gmx.net Mobile: +49 173 9801095
Hallo Birgit! Danke,danke! Und viele Gruesse! Was machts Du momentan? .. hast Du neulich irgendwelche Traumwelten konzeptiert? x