Please note before you start reading this older post that I have long since included a version in the Methods section, under Making realistic models, which can be accessed above. That version may have been updated or expanded since.
This is the second of five instalments, looking in turn at what I consider the five defining areas within model-making; main construction, fine construction, modelling/shaping, creating surfaces and painting. The only difference between ‘fine’ and ‘main’ construction is relative size. The structures involve the same methods but they are smaller, more delicate and therefore much more ‘fiddly’ to achieve. Being able to cut, shape and assemble the appropriate materials with accuracy becomes much more of an issue at this smaller size. I’m referring to such elements as window structures, stair banisters and railings, or period furniture .. including chandeliers!
A very slight difference in overall measurement may not be noticeable on a long wall but it does make a difference to the appearance of, for example, a fine window strut! However on the other hand, whereas the principle structures in a model can’t be just ‘suggested’, some aspects of the finer details can be, without losing their realism. My aim in this article is not only to suggest ways of achieving intricacy, but also to consider ways of simulating it. This article also illustrates how the choice of material can be 90% of the solution .. my own choices of ‘Palight’ foamed Pvc and stencil card tend to dominate here!
I’ve written these overviews in preparation for teaching sessions at RADA (Royal Academy of Dramatic Art) in London. So they’re tuned towards the specialities of theatre design model work, but most of the points will be relevant in general terms to model work in other disciplines.
As with the previous post I’ve divided the content into general ‘themes’ or requirements of the subject, followed by more specific and practical guidance and ending with a couple of more closely observed examples.
GENERAL APPROACH
The importance of details
One has to accept the fact that these smaller things often take much longer to achieve than the elements of main construction (at least in relation to their size). Although one would never have to say this to a practiced model-maker, it’s important to reassure beginners that these will ‘take as long as they take’ and that one shouldn’t feel they’re less important just because they seem like small details of the visual concept. In fact it’s usually quite the opposite! For example in a theatre design concept the ‘details’ in terms of furniture style and small elements of decoration may constitute most of ‘the design’ if the budget is minimal or if a minimalist approach has been chosen. Moreover, even if a setting is lavish or architecturally bold, when the play’s action is underway and the lighting settles to focus on the actors, it is the furniture and other elements of detail that stay within that small area of focus rather than the set as a whole. These details of the setting, especially furniture, have a more intimate and ‘telling’ relationship with actors and their characters in the way that they’re used. For example broader playing areas, entrance and exit points, and different levels don’t necessarily need to be understood in terms of real architecture but furniture usually demands more. It’s rare that furniture can be rendered ‘abstract’.
Often the defining elements of a ‘look’, or a period style, or a social status, are contained as much in the details as in the more general proportions, materials and colours of the set. In particular historical periods furniture and interior decoration styles develop their distinctiveness side-by-side .. they are designed to fit .. and one can see the same decorative motifs, basic shapes or general proportions in both. When working through a design in the model, spending what may seem like a very disproportionate amount of time on a single chair (it could easily take the best part of a day) can be a very important step in discovering and defining that ‘look’. It took me a while to appreciate what was meant when as theatre design students we were often advised to start with one well chosen and closely observed chair, but I think now that this was part of it.
The demands of scale
I think the underlying point of this whole area of model-making (and of this article) which I’ve termed ‘fine construction’ is.. ‘What are the best materials and methods to help with the challenge of achieving a reasonable and convincing scale with delicate structures at this small-size level and in the time available?’ It should be clear that getting the scale right is of fundamental importance, but of course it gets harder the smaller you go .. as I have said, a fraction of a millimetre out can make a big difference! But I’ve underlined ‘reasonable’ because there’s a limit to how fine one can and should work; compromises need to be made, and one of the most interesting and creative journeys a designer will make in terms of their model-making throughout their career is developing a sense for the right ones. Models in this context should always be convincing that is, they should keep us thinking about the real thing rather than the model itself, but there’s a big difference between this and fooling the eye. There’s a lot that we can forgive, and forget, when looking at a model as long as enough essentials are there to ‘suspend our disbelief’.
It’s not just size than determines delicacy .. i.e. it’s not that the thinnest will automatically give the most delicate or elegant look .. it’s also what happens on the surface, how the light falling on it is manipulated or broken up. This is the reason why, traditionally, wall mouldings and window frames are composed of ‘stepped’ or shaped strips of wood, not flat and block-like, so that the light forms shadows that are soft or varied.
I think this is illustrated, coincidentally, by the photo below which I took just to show stages in building up a window structure. Each of the successive stages has the same underlying basis cut from stencil card and shown on the far left, so each has the same ‘silhouette’ but the ones progressing to the right look finer and somehow thinner (despite the addition of white!). It is because the flat planes are broken up, the edges are softened, and the shadows give more contrast.
Continued practise with cutting always improves one’s ability, even if the improvements take a while and are too small to appreciate .. as long as one perseveres, and as long as one has understood and accepted the value of it! But if cutting material to make a structure of the required scale intricacy proves too arduous, it’s good to know that one can fall back on the ‘shadow principle’ and that, if need be, this can be faked i.e. by carefully drawing or penning lines on the surface instead of having to apply yet more intricate strips.
The value of proper visual research
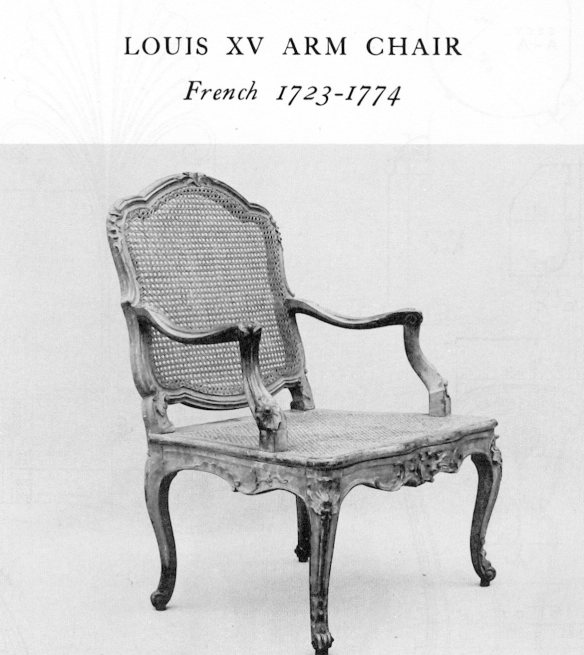
I must have encountered this hundreds of times as a teacher .. when someone is having difficulties at the model-making stage, which are easy to attribute to the challenges of model-making in general, but are actually because they haven’t got a clear enough picture of what they’re trying to do. I don’t imagine that anyone would try to make a convincing model version of a Louis XV chair without finding visual reference first (at least I would hope not), but I know that a lot of people might assume they can get by without checking on the concept of ‘a simple, basic, nondescript chair’. The fact is there’s no such thing, and although it sounds like a paradox one first has to choose what particular type of ‘nondescript chair’! Unless you’re an expert on the history of furniture, you’ll have to look at chairs to get some help. At the very least you need to have, preferably already absorbed, certain facts about the standard dimensions of chairs, such as the average seat height and size, or the common height for chair backs etc.
Nowadays there’s really no excuse for not knowing even the detailed particulars of real objects or settings because so much can be accessed quickly over the internet. For example, there are countless antique dealer websites and the good ones offer all-round views of pieces of furniture including close-ups on details and lists of principle measurements. Even the less specialist, more style-led outlets can be quite informative, as below. For more on this, including suggestions for the best sources, see my article Common sizes of things in the Methods section.
So here below is a Louis XV chair! You would need to look at a lot of pictures of Louis XV chairs to decide whether this is an average or representative one. In the days before the internet it could take a long time for designers and artists to acquire a true sense of what was common or representative. These expert notions needed to be culled from books, or the work of other designers, or visits to museums, or by browsing in antique shops. Now it’s easy to get an instant and fairly reliable notion of what’s average, or representative, or popular, by examining the results of an image search.
But it’s also fair and balanced to say that the regular internet won’t provide the full picture .. for a start there’s a vast amount in the form of specialist image databases that the search engines can’t penetrate. You won’t get much like the following on the internet .. not only the Louis XV chair but a full measured drawing!
These can be found in a book by Verna Cook Salomonsky entitled Masterpieces of Furniture published in 1931. It was re-published by Dover in 1953, even so it is not so easy to find. It’s an ironic counterpoint that, although books (and especially older ones) will often provide more specific, detailed and reliable information than the internet, with many of the older books which have been archived the most efficient way of accessing their information is .. on the internet!
My point in all this is that the internet can often provide you with all the information you can carry, and somewhere within that mass may be all the information that you need .. but it puts the responsibility on you of becoming the expert. You have to search thoroughly and responsibly, you have to filter and organize (i.e. rather like an academic might in recording sources, questioning and checking information).
Where can compromises be made?
It’s clear that compromises do need to be made in the model, because the time the designer has for making it is not unlimited. It’s mainly about available time, so if ways are found to speed up the making process, to make it easier or less involved, without altering the resultant appearance of the model … this is not compromise, this is advancement! Getting into the habit of thinking in this way, of continually keeping an eye open for possible improvements to the process, is beneficial in more than just practical ways. It exercises inventive or creative thinking!
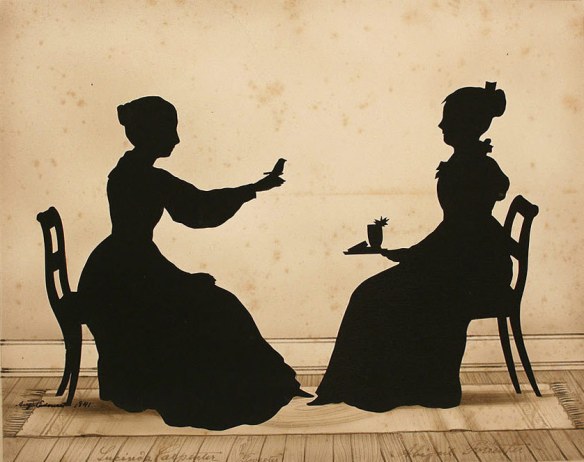
But if those ways of saving time cannot not found, however hard one tries, what simplifications in appearance are acceptable? This is a difficult question to answer, because it .. just depends! I’ve mentioned one possibility already, with the case of drawing in highlights or shadow lines on window struts to make them appear finer. I would say this is on the whole perfectly acceptable, because the fine additions that are being feigned are not going to cause anyone to misunderstand the real appearance, structure or space intended. It’s not altering the most significant proportions of the whole. To illustrate another example I was drawn to thinking about the craft of paper-cuts which was developed to quite a ‘high art’ in the Victorian era. This one below is from the 1840s, courtesy of the Columbus Museum in Ohio, US.
What’s so significant about this and many others like it is that it’s so convincing .. in spite of being so artificial! What I mean is that although we’re very familiar with shadows, or seeing silhouettes of real things when lit from behind, as a real occurrence in daily life (and this certainly helps with our acceptance of this form) .. there’s really nothing more unreal than forms reduced to 2 dimensions with no hint of colour or volume. Yet I for one feel totally drawn into accepting this as the representation of a real moment .. I’m transported to the place in my imagination where I’m more conscious of what is being represented than how it is represented.
How is this accomplished .. when the only means used to convince me is the simplest line? It is achieved through a very exact understanding of overall and believable proportions, together with a clever choice of which details will count!
PRACTICAL GUIDANCE
Building up on ‘cut-outs’
When I was training as a theatre designer and had to tackle making model chairs I can’t remember specifics of the guidance we were given but I think it was assumed, like most people do, that one approaches it much as a carpenter would except 25-times too small to do proper joints. That is, that one starts with cutting very thin strips of wood which are cut to specific lengths and glued together to make the construction. I’m sure we were encouraged to make scale drawings first so that we at least had guides for placing these minute pieces while gluing and I’m sure it was also common to make the whole of the back of the chair including the legs as a flat piece against the drawing. It was incredibly fiddly, virtually impossible not to glue these pieces firmly to the drawing instead and difficult to coax these tiny components into lying straight and level. Even if one could get a reasonable result, it would remain very fragile. Also, one of the main reasons for using wood was that it would convey the ‘real’ material, with a pleasing suggestion of grain which could be stained to any shade. But any vestige of glue visible around the joints would not stain, and given the size this was impossible to avoid so often much of the painstaking effort could be negated by ugly patches.
After a while I gave up on this and looked around for other methods. About the same time a friend introduced me to a soft sheet plastic called foamed Pvc which came in thicknesses of 1mm upwards. It offered the possibility of cutting small and intricate shapes easily with a scalpel. Although soft to cut the material is resilient, retains its straightness and is easy to paint especially if primed. The brand I use is Palight which seems to be softer than the others.
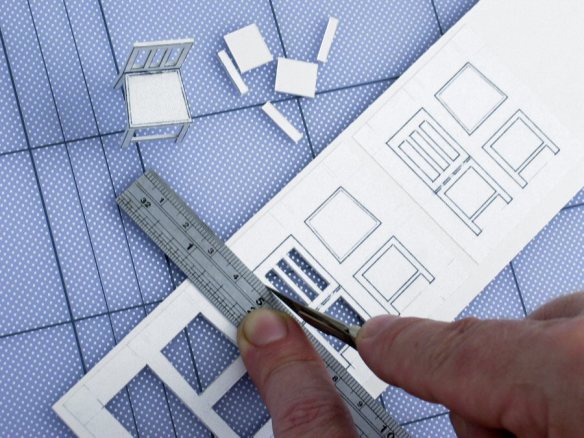
Foamed Pvc can be drawn on with a pencil but I usually prefer to spraymount a printed drawing and cut through that, because it saves time if I need more. It’s also much easier to draw up the original at a larger scale such as 1:10 (shown below) and reduce to 1:25 (40%). I use a very minimal amount of repositionable spraymount (3M blue can) so that in the end the paper can be peeled off the plastic. The photo above shows the three chair parts .. back, seat and front legs .. being cut out. It is worthwhile to note that I am cutting the inside parts of the form out first i.e. working from the centre outwards. Keeping the form in the sheet until the last cut means that you always have more to hold onto while cutting. One drawback perhaps is that Pvc can only be glued with superglue, which is not everyone’s favourite and doesn’t allow much repositioning.
The chair assembled above may serve quite well as a good mock-up, after all the overall dimensions and proportions are exact, and it can look much more convincing if properly painted. I left the paper drawing on for this photo but normally I would peel it off before gluing the parts together. Palight foamed Pvc can even be scraped with coarse sandpaper to create a fake ‘grain’ which looks very like real wood when washed with colour (this will be illustrated in the later post on ‘Painting’). But it’s certainly lacking in the proper visual weight because parts of it, particularly the legs, don’t have a believable thickness if left at 1mm (which is 2.5cm, or 1 inch at 1:25 scale). What I usually do is
apply further strips to these cut-outs, sanding the joins as flush as possible, before gluing the chair pieces together. These strips can either be more Pvc or thin wood such as obeche. For these chairs, enlarged below for more detail, I’ve applied 0.8mm sheet obeche strips to the chair-back surround, the legs and the whole of the seat. The grain is visible, even though the whole chair needs to be painted to unify wood with plastic. The joins between the layers are just about visible in the photo, but I think this hardly matters.
I’ve also tried this ‘add on’ or layer method just using stencil card. The chairs below are actually pretty strong, even though only a thin card is being used. A double layer of stencil card would itself be quite tough to cut through, so I’ve made these by cutting out pieces in one layer, gluing those down on another piece (as shown in the bottom left corner), and then cutting out again around them. For more on these methods look at my article Working with stencil card in the Materials section.
Gluing on paper templates
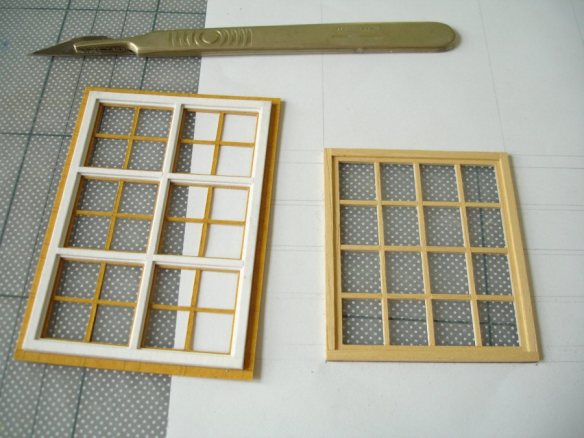
Another method, particularly if you prefer to use real wood, is to build up structures by purposely gluing down to the drawn paper template. I thought of this because of the difficulty of separating glued work from the drawn guide in the past .. why not glue it all down to the paper? This can work for furniture, but it can be especially ideal for building up window frames because in this case the back surface is not usually seen.
Here thin obeche wood (0.8mm thickness) has been glued completely to the paper using Pva wood glue, with further strips built up on the outer frame. After gluing is finished the structure should ideally be left for a couple of hours for the glue to strengthen and paper to dry. Then using a sharp blade-point the paper can be cut away, leaving just the wood form visible at the front but still backed with a thin layer of glued paper. This makes it surprisingly stable. The technique is most suited to working with wood and Pva glue, because the glue can be thinly applied and leaves little residue (Pva glue contracts to almost nothing around the edges).
Some general tips for cutting
See the section on cutting in the previous post ‘Main construction’ because all of that applies equally here .. especially the choice of knife and general approach to cutting .. but there are some additional tips to remember when it comes to working at a finer level.
Small curves may be the trickiest to manage, even with a fine blade and a relatively soft material such as foamed Pvc. Something which makes this a lot easier is making a rough-cut around the shape very close to the intended line before starting to cut it. The reason this helps is that as the intended line is cut the friction on the blade is lessened because the surplus material (often referred to as the waste ) now has somewhere to move to, as illustrated below. One can make it even easier sometimes by ‘shaving down’ to the line in small stages, more like carving than cutting. Although this is of more help when cutting a pliable material such as plastic, the difference is noticeable when cutting cardboard or even thin wood.
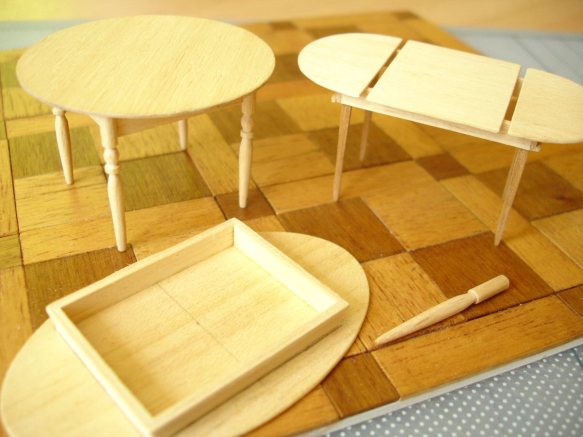
But extra care needs to be taken when cutting fine pieces out of wood for two main reasons. Firstly the wood may be a little brittle, meaning that it has a tendency to split along the grain when the scalpel blade is forced too firmly into it. Secondly the grain will often divert the scalpel blade, particularly when trying to cut straight lines along its direction. In each case cutting needs to proceed in gentle, successive strokes. But there are other precautions that can be taken. Although not shown in the next-but-one photo, I have covered the underside of a piece of wood with masking tape before cutting a circular table-top. This will help in preventing the wood from splitting.
As for cutting the line, I have traced it carefully with the scalpel first to establish a more definite guiding line but then (as in the previous example in plastic) I am shaving down to the line first. When close to the line the rest can be smoothed off using a sanding block (cardboard nail-files, shown above, can also be useful for very small work).
It is very easy when cutting a grid of window struts to accidently cut through them. Often this is a momentary lack of concentration .. the work is repetitive and can feel pretty mindless, so one goes into ‘coasting mode’. But it isn’t helped by the fact that whereas we can always see where to begin a line, it’s more difficult to see where to end because the scalpel blade is in the way. The method of avoiding this is to cut each line only so far, stopping purposely near to but not quite to the end, turn the work around and complete the line from the other direction. I always cut lines like these in groups, for example, cutting all the lines along the same edge for each square first, then completing all of them, then doing the same for the next edge etc.
Lastly, I always find I can be more accurate if I keep to the same orientation of drawn line, guiding ruler and scalpel each time. This is a bit difficult to describe, but what I mean by the ‘same orientation’ is, for example .. always cutting against the far side of the ruler, always placing the ruler over the part that’s going to be kept (as opposed to the ‘waste’), etc. This means that my physical relationship to the line I’m trying to get is, as far as possible, always the same and that helps greatly in terms of control!
Setting up for gluing
As I’ve said, the methods for ‘main construction’ and making the finer constructions here are pretty much the same, so it is worth referring back to the examples looked at in the previous post. Even though small, it is still sometimes necessary to construct a special support structure to glue them together. Below is one that I made quickly to help gluing a small park bench together.
The leg units are meant to appear free-standing without an obvious connecting structure. In full-size reality there would be a metal connecting structure underneath the wooden planks and these would be bolted to the wrought-iron units. The problem here was just setting up the three leg units so that they were already in the right position and perpendicular (90degrees upright) and this cardboard ‘construction jig’ was the most reliable way I could think of for doing that. Above I’ve secured the legs (cut from 1mm foamed Pvc) to cardboard uprights with thin strips of masking tape. I decided to paint after assembly in this case so that nothing would interfere with the glue. The planks can then be glued in place on top individually and again, I decided to stain these after assembly (not yet done in the photo below).
As I said, this was my preferred method but one of the RADA students suggested that it could work just by drawing groundplan positions on a piece of paper and propping the leg units into position using Blu tack (or possibly plasticine) which I think is also a good solution. My method would perhaps be preferable if one had to assemble a number of benches rather than just one.
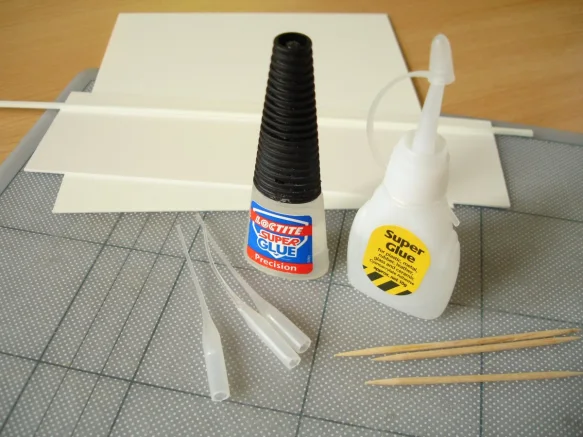
It’s worth saying a few things about superglue at this point, because it can be fairly indispensable, even if you’re not working with plastic. The first thing is of course that one usually needs very little at a time ( meaning, per making session) but superglue starts to set in the tube or bottle as soon as it is opened for the first time. The moisture in the air acts as a catalyst. So buying a ‘large’ bottle is senseless unless you’re working with it 24/7 for a number of days in a row! What remains in the bottle, even if you seal it tightly, may only last for another few weeks before thickening and setting solid. Partly for this reason I prefer to use the small tubes, because any wastage doesn’t matter so much. I’ve found that the small tubes or bottles from Poundland work better than many other more expensive brands I’ve tried i.e. some superglues tend to work well with certain materials and not so well with others, and the Poundland brand works very well with foamed Pvc, stencil card, obeche wood or Super Sculpey (as examples of the main materials I want it to work on).
One of the challenges that people have with superglue is being able to dose it, or apply it delicately without squeezing out too much .. which can often result in a mess and glued fingers, as most people who’ve tried will know! I often squeeze out a little puddle of superglue onto a piece of plastic and apply it using the end of a cocktail stick. The puddle will remain fluid for quite a while before it starts gelling. Incidentally, I work almost totally with thin superglue rather than the gel type, because I usually rely a lot on being able to introduce superglue into a joint ‘from the outside’ where it can travel into the joint and set. This can’t be done with the gel type. An alternative to help with controlled dosing is attaching an even finer tube to the nozzle supplied. Poundland sell packs of superglue bottles in which a few tapered tubes are included. If you’re feeling particularly adventurous or dedicated (and if you have a hot-air gun), you can make your own fine-dosing tubes by finding some transparent ‘shrink-wrap’ tubing in Maplin or another electronics outlet. This is tubing that shrinks when heated to fit tightly around wires. The end of this needs to be heated and pulled to create a minute nozzle, similar to those above.
I’ve said that atmospheric moisture causes superglue to set. This also means that it is more effective if the materials being glued together also have a bit of that atmospheric moisture, and one of the reasons incidentally why fingers glue so well! There may be occasions when superglue appears not to take, and one remedy is to brush surfaces with the fingers beforehand or even breathe on them, to introduce a bit more moisture. There are also accelerator liquids available for superglue to make it set even faster (so called ‘zip-kicker’ and a sure way of gluing two parts together instantly is to put superglue on one part as one normally would but apply not glue but accelerator to the other before bringing them together.
One last tip here is that if you’re using the thin type of superglue but you want to make it both more gap-filling and quick setting, the joint can be sprinkled with common baking soda (sodium bicarbonate) either before or after applying the glue. This solidifies on contact and forms a very strong bond. I’ve demonstrated the uses of this in my post Modelling small-scale figures from March 2013.
Is it worth knowing how to solder?
I’d like to say yes, because the work and the results can be very satisfying when all is going well and proper scale can be achieved with thin brass wire as opposed to some other options, but to be honest I prefer to avoid it unless it’s the only practical solution. Consider this challenge, for example. Imagine that you have planned an elegantly curving staircase and that you would like to create a balustrade for it that is suitably delicate in keeping with the style, perhaps just composed of thin uprights joining a simple, curving handrail. Years ago when the world was still largely ‘traditionalist’ and the material options for model-making seemed to begin and end with .. cardboard, wood or metal (with perhaps some plaster, and some organza thrown in) .. those ‘in the know’ would certainly have suggested soldering with thin brass rod. But now consider what you have to do to achieve that! You can’t solder your pieces of brass onto your cardboard construction and you can’t really glue metal to it with any security either. So in order to secure the uprights to the construction you’d have to drill tiny holes in the right place at the edge of every step. Those holes would have to be deep enough to hold the uprights in position and of course they’d all have to be perfectly perpendicular. This may just about be possible if your construction were made of solid wood but doubtful with cardboard. Now there’s the question of how all those uprights, even if one did manage to fix them and they are all exactly the right height, join with the handrail. It would be most logical to make the handrail also out of brass rod so that the uprights could be soldered to it. But this would mean that the piece of rod would firstly need to be bent to exactly the right smooth curve with no allowance for even slight departures from it. I don’t think I need to go on! I’ve seen these marvels of craftsmanship and dedication in the past, but I pale to think how much time they must have taken or what specialist skills they involved. I have very mixed feelings about these things .. for me they’re reminiscences of a different age when craftspeople could dedicate a whole year of their lives to the meticulous decoration of an egg!
Even though I actually love soldering I’m presenting it in this cautionary way because I think the alternatives should perhaps be considered first. For example, I feel the way I’ve chosen to make the scaffolding structure in the previous post is better .. it’s cheaper, quicker, more achievable and, actually, stronger because it’s not labouring under its own weight, as brass of this thickness would do. But on the other hand I don’t think I would be able to get the clean, precise and properly scaled result I wanted for this brass bed frame if I hadn’t taken the trouble to solder it in brass.
In particular the curved elements wouldn’t have worked using plastic because only metal keeps that kind of shape. Below are balustrades being made as cut-outs from 1mm Pvc with strips of wood added to give them some dimension. I would think that this is the quickest way if one can cut the Pvc uprights thinly and cleanly enough and if square-section uprights are acceptable. But if round-section and more delicate rods are necessary for the look, brass is perhaps a better option especially if the structure is staying flat.
I would probably have solved the curving balustrade problem we began with here by cutting the whole thing on-the-flat in Pvc (or even stencil card) and then wrapping and gluing it to the curved surface, as in the example of the spiral staircase below and featured in the previous post.
It is certainly not my intention to put you off soldering, and if you want to know more about exactly how its done look at my article A quick guide to soldering in the Methods section.
Shaving legs or modelling legs
This is bound to get me a lot of search engine hits! But I’m referring to two fairly easy ways of creating a ‘turned’ (i.e. done on a lathe) look which is such a common feature of period furniture, particularly table legs and balusters. This is the kind of thing that strongly defines or greatly enhances the ‘look’ by fairly achievable means.
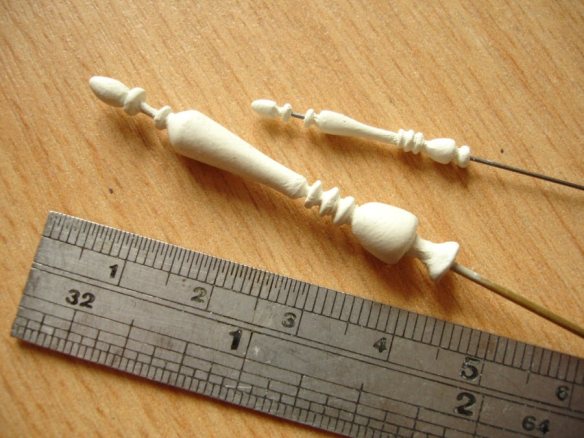
For the first method thin wooden dowel, wooden skewers or cocktail sticks .. any forms of thin, round, smooth wood .. are most suitable, but it can also be done with round-section styrene strip, as in the close-up below. Divisions are made on the dowel surface by rolling and pressing the scalpel blade to make a significant but small cut. These divisions correspond to the intervals in the decoration intended. Then the scalpel blade is used at a fairly oblique (flat) angle to shave or carve slivers of wood down to the cut keeping the dowel turning between the fingers. Although it needs care and control, the method can be surprisingly quick.
Below are chairs made from styrene strip, ready to be painted.
The other method of achieving the same shapes involves applying a modelling material over strong metal rod, such as brass, and shaping it by pressing with formers such as a cocktail stick or even a comb. The ideal material to use is Milliput, which is a very fine 2-part epoxy putty. Milliput is very sticky, so it will stay put on the metal while being modelled, and it sets very hard. Once set it can also be shaved or sanded to improve the look without crumbling off as some softer modelling compounds might.
WORKING EXAMPLES
Constructing a chandelier
When making this test subject I was thinking of the heavy brass chandeliers which look as if they’re made from brass piping, full of curves and arabesques. I didn’t have a particular one in mind, just the sense or essence of the type.
I felt it was far more important to get the overall symmetry and balance of the shape, together with the sense of fine, tight and flowing curves, rather than worry too much about the sleekness of round brass in the originals. If I’d wanted that I would have to have used brass wire bent into shapes, but I knew I wouldn’t be able to bend wire finely enough to achieve all these matching segments!
The first task was to design it, by drawing up a segment shape that was sufficiently curvaceous and full-looking but also kept as simple as possible beyond that. I could have made it simpler still, but every element of the drawing below is chosen to convey not only the desired look but also something which will stay together structurally when made.
I then made a scan of the drawing (which I’d drawn at 1:10 for convenience), reduced the image file to 40% to make it 1:25 scale, and printed out a sheet of copies. Incidentally, it’s generally harder for people to wrap their heads round percentages or conversions than I’d imagined! If you need help on the subject read my post Working in Scale from June 9 2013.
In this case I used Photo Mount, which is the permanent type of spraymount from 3M, to fix the drawings to stencil card since it would not be necessary to remove the paper from the cut forms. This type of intricate cutting does take practise, and a lot of patience, but if successful it is still a great deal easier than by any other hand-making method.
A central support was needed because this is always a feature of the real chandelier designs and it also helps in spacing the segments evenly. The central rod here is styrene plastic, shaved with the scalpel to suggest a turned element. The cut-outs were glued on with superglue and I used a gold Edding marker pen to paint once assembled. The sequins used as candle saucers were a final touch, also quite effective in introducing a bit more ‘bling’ to the whole thing.
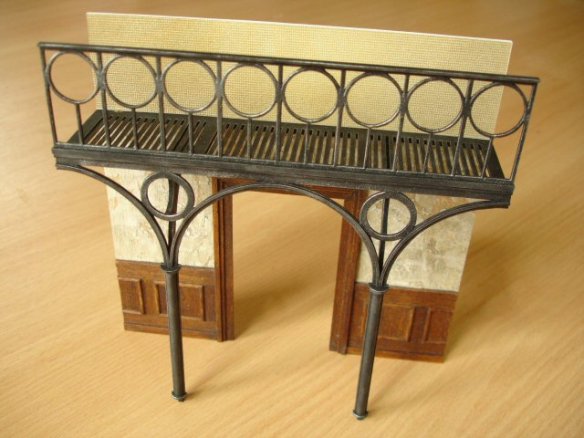
Making ‘ironwork’ arches
This is also something I’ve featured elsewhere, in ‘Working with Palight foamed Pvc’ in the ‘Materials’ section, but I have to appropriate it because it’s so relevant here.
Although it’s much easier to draw on foamed Pvc with a pencil (unlike styrene or ABS) I prefer to work out a design on paper and spraymount a copy on the plastic. In the photo below I have started cutting out the ironwork shape through the paper. Curves are much easier with Pvc than cardboard because the composition is much smoother, with no particles or fibres to affect the passage of the blade. Cutting is easier also because it is more porous (foamed) on the inside and will ‘give’ a little under the blade causing much less friction.
If the paper cutting template is lightly fixed with spraymount (especially the repositionable type) it can be easily peeled off the form once cut.
In this case the Pvc cut-out serves as a firm, cleanly cut basis upon which more detail, profiling or strengthening can be added on top. It’s a constructional principle of ‘building in layers’ which I’ve developed for myself over the years and try to follow most of the time. Below I’m adding a strip of styrene (a harder plastic which can be bought in a wide variety of pre-made strip formats) to make a thicker top rail. The easiest way to glue this on in exactly the right place first time is to position a guide-block (in this case a metal block) against the top, press the cut length of styrene against it and run a little thin superglue (using a plastic gluing brush or cocktail stick if preferred) along the join. The thin type of superglue will travel into the join and set immediately.
Below, I am doing similar but this time with a very thin (c. 1mm) cut strip of the same Pvc to give the arches more substance. Pvc is nicely bendable, especially in thin strips. The trick with bonding a strip in an exact curve is to fix the strip with a spot of glue at one end first, then curve and position the rest, spot-gluing at intervals to the other end. I’ve cut the strip a little longer, to be trimmed off when the end is reached.
The columns were completed by adding half-round styrene strips, which can also be bought in various thicknesses.


