
Here is the page on Milliput I’ve just completed for the Modelling part of the Materials section. It’s a summary of all you’ll need to know about this modelling material, together with a few suggestions re. similar products. I only discovered recently that Milliput can be pushed .. if heated carefully with a heat gun .. to cure rock-hard within minutes.
My page entries are usually meant to be added to and often start with general outline information, price guidance, suppliers and useful links followed by my worklog where I can put further info and photos when I have them.
Definition
Milliput is a 2-part, very hard-setting epoxy modelling putty, available in two fineness grades and a few different colours. It is most suitable for small, delicate work. ‘Standard’ Milliput is a light yellow/grey colour when mixed while the extra-fine grade is white. When equal amounts of both parts are thoroughly blended together (until the colour is uniform) the putty begins to harden, not requiring additional heat to cure. It remains easy to model for around 40-60mins, after which it gets gradually more ‘rubbery’ (but see below for making use of these changes while modelling).

Advantages of using it
It sets much harder and stronger than most other modelling materials .. stronger than fully baked Sculpey for example .. and this final hardness is not dependent on bulk i.e. very small forms will cure just as hard as larger ones. This makes Milliput (more especially the fine white version) more ideal for delicate forms.

The 1:25 figures above were modelled with a blend of ‘Terracotta’ and fine white Milliput. They represent the first modelling stage after completion of the wire armatures described in the post Modelling small-scale figures – Part 1: ‘twisted wire’ armature from March 2013.
Milliput sticks very well to a variety of materials, again unlike Sculpey, and is often used for repairs or as a gap-filling cement. It is commonly used in the restoration of antiques and art objects because of it’s high adherence and its strength when cured.
Once it has hardened it can be easily sanded and tooled (i.e. sawn, drilled), even carved with a scalpel. Scraping with the scalpel can work particularly well for fine smoothing once fully cured.
There is no noticeable shrinkage, and that coupled with its strength means that it’s very unlikely to crack.
Unlike most 2-part epoxy materials it can be used with water! This can be used to help smooth the surface while modelling, or water can even be mixed in to make a softer paste i.e. to use as a gap-filling cement or to join Milliput parts while working. But Vaseline on the fingers can also be effective for fine smoothing, as is methylated spirits.
When used as directed and left to cure on its own it will harden more quickly than air-drying modelling materials, reaching an apparent full hardness in 3-4 hours (though full curing will continue for a few more). However, this can also be accelerated by using heat and, with care, Milliput can be rendered rock-hard in a matter of minutes (see .. below). Even if the advantage of heating is not taken up, benefit should be made of the fact that it will start to become firmer after about 40mins .. so for example basic modelling could be done first and then later, when this becomes a firmer support and the surface less sticky, detail modelling can be easier.
What it can’t do
It is very sticky when first mixed, noted above as an advantage, but this also means that it can clog the fingers annoyingly while modelling .. when I’m working with it I need to have a moistened flannel on hand to keep them clean.
Even in its freshly mixed state, Milliput has more ‘push-back’ than modelling wax or Super Sculpey .. i.e. it is slightly rubbery. This increases as it cures and starts to get firmer, so for example after a full hour impressions can still be made with modelling tools but they will diminish a little as the material springs back.
Because of the cost relative to other modelling materials Milliput is not a viable option for large work (see cost comparison of different modelling materials in Modelling and shaping, part of the Making realistic models series in the Methods section).
What it costs and where to get it
Milliput is sold in most good art or hobby shops such as Tiranti, 4D Price (2014) c.£2.28-£5.06 (Tiranti) per 113g packet dependant on type (ranging from standard to fine grade and colours e.g. terracotta, black). See ‘Quick view materials info’ for ‘modelling’ in the ‘Materials’ section for current suppliers and prices.
Working life
According to the manufacturer it has a shelf life of c. 2yrs if stored cool, dry, sealed in polythene bags provided.. but see notes below.
Further info sources
http://www.mbfgfiles.co.uk/docs/milliput_tech.pdforklog
Worklog
July 2013
At the time of writing I have not found any other epoxy putty to compare with it. You may come across similar looking 2-part epoxy putties in DIY shops but these are not marketed as ‘modelling’ material and tend to be even more expensive. An exception may be Magic Sculp which looks promising but I’ve yet to try it .. see below July 2014.
Apparently the setting of Milliput can be speeded to just a few minutes by applying heat (Tiranti website) .. but see June 2014 below. Best method of mixing; portion equal amounts and press these together, then roll this into a long ‘string’, gather up and twist together then roll long string again .. repeat etc. After 3-4 hrs hardening, it needs at least the same amount of time to fully cure. Heat resistant up to 130C. Can be coloured by blending in powder pigment (or even oil paint, or spirit-based colourants) while mixing. Different Milliput versions are intermixable but also resin or hardener parts between them (as long as one knows which is which) are interchangeable. The ‘hardener’ is usually the darker of the two and will develop a resinous crust over time. If used as a press-casting material, ‘talc or a light oil’ can be used as a releasing agent according to the Milliput website. Another tip from this website is that, if you have to interrupt work during modelling, it will keep in its uncured state for up to 36hrs if put in the freezer.
How to model with Milliput Use should be made of the fact that Milliput will change in consistency as it cures i.e. for the first 30mins rough build-up when at it’s softest, after which fine detail especially imprinting and smoothing are easier once its getting firm. Carving can be done after c. 2-3 hrs when almost set, then sanding/filing after 3-4hrs.
Accelerating hardening 7/2013 ‘Tips’ found (not yet verified) include: baking in oven (max 50C) for 30mins. Since cured Milliput is heat-resistant up to 130C successive adding/baking is possible (but see later addition June 2014 below).
How long will Milliput remain usable? I recently made a test of some Milliput I’ve had for at least 10 years. In fact, I was going to throw it away because it had become rock-hard and the darker ‘hardener’ part (as I assume it to be) had developed a tough, resinous skin. I was surprised though that after managing to chop off two equal pieces and starting to squeeze them between the fingers they became softer and eventually soft enough to start mixing together. For this first test I left the tough skin on, believing that it might still blend, but it remained as small hard granules.
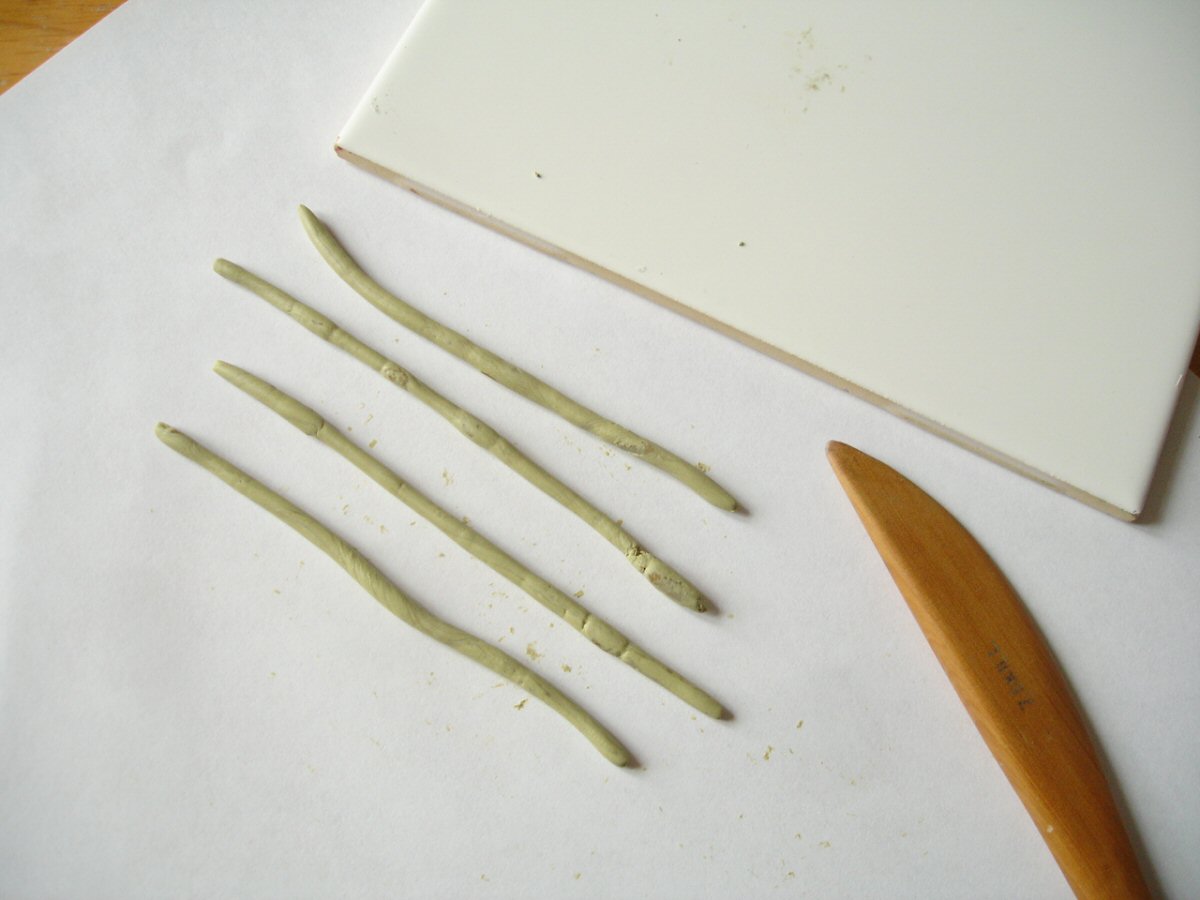
Above, my usual method of mixing Milliput is first to combine the two parts roughly and then start rolling the mass into a long thin string, which I then divide, twist the strands together and then repeat a few times until the colour is even. The hard fragments of skin remained so I tried chopping and pressing the mixture on a tile in case that got rid of them.

It didn’t help much, so I stopped blending (it had taking altogether about 20 minutes) and left the piece to harden, below. The consistency was not good (compared to fresh Milliput), ok perhaps for rough work but rather fibrous and prone to fissuring when stretched.

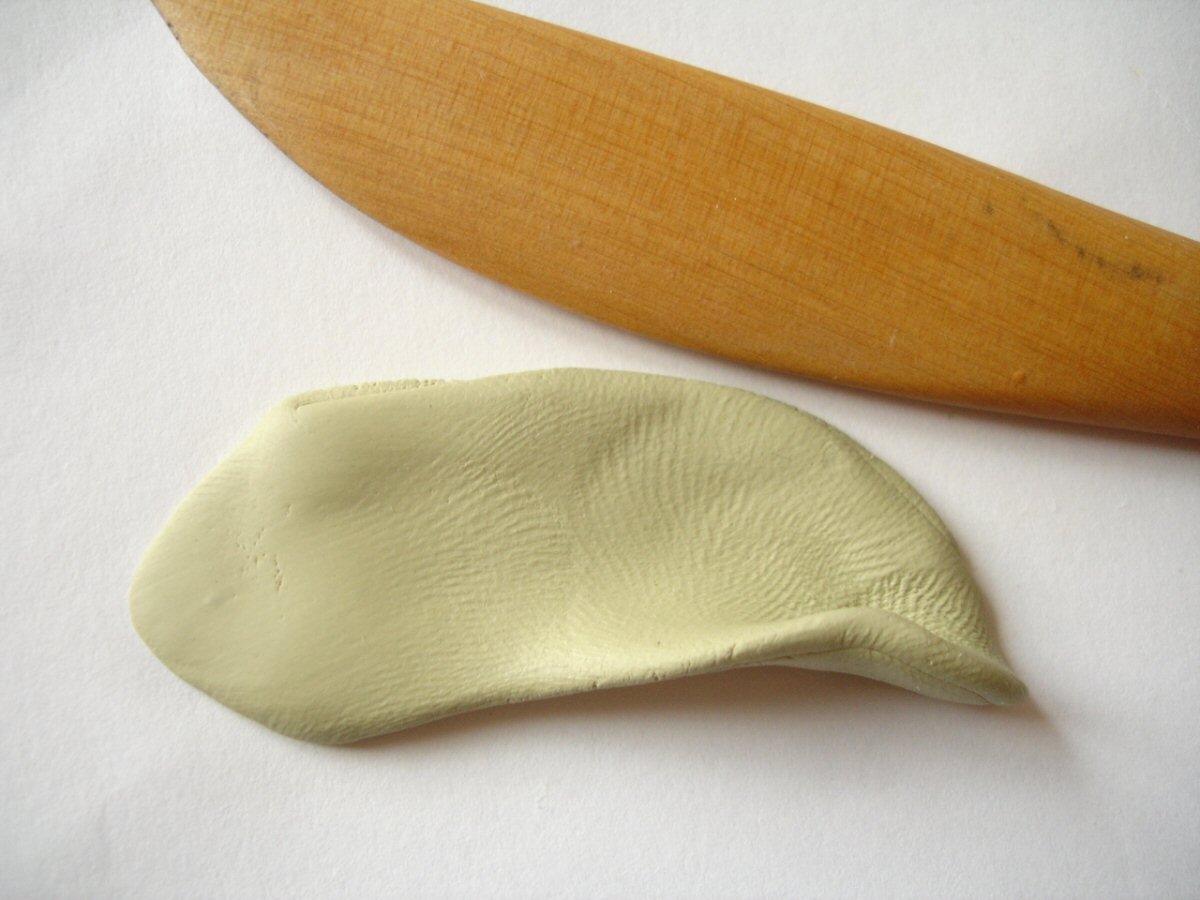
I did another test but this time peeling off the crust from the darker Milliput stick, just using what remained. This mixed very smoothly, a little harder than new Milliput but still a good, smooth consistency, below. I needed 10 minutes to mix it thoroughly.
I’ve never properly timed the setting of Milliput up to now and I’m glad I did that with these tests because I’ve generally been telling people that they have about an hour to model with it. In fact it’s much longer .. if one can make use of the changes to model differently (and later carve) as it toughens. I made a further control test using new Milliput in addition to the two above.
10 year old Milliput with ‘skin’ included After 1 hour firmer but still could be kneeded and modelled; less sticky, and ideal in this state for impressing with tools; little rubbery ‘springback’ as yet i.e. marks made with tools stay as made. After 2 hours no longer easily kneeded or modelled, but still very flexible; still easily cutable with a knife; still good for impressing though slight ‘springback’ i.e. marks made with tools fill in a little; easier to smooth the surface without distorting the form.
10 year old Milliput with ‘skin’ discarded After 1 hour same as above. After 2 hours same as above, though a little firmer and impressions spring back more
Both tests After 3 hours still cutable with a knife; still bendable, but no longer mouldable; can be squeezed but springs back like rubber and impressions do not hold; very good for carving. After 4.5 hours like tire rubber; ideal state for carving
New Milliput thorough blending took 10 minutes. After 1 hour still very soft, a little firmer, a little less sticky. After 2 hours still mouldable and very flexible; cutable with a knife; still takes impressions well with minimal springback, but fissures occur when trying to ‘smear’. After 3 hours no longer mouldable; still flexible and cutable but impressions do not hold.
7/2013 the nationwide £shop chain ’99p Stores’ now stock a form of mixable epoxy putty from the ‘Do It Right’ brand. This is packaged in small, pre-portioned pellets which one just has to blend together. Each pellet is c. 4g and there are 8 to a pack so this doesn’t work out any cheaper than standard Milliput.. just could be easier to get hold of on the ‘high street’. It has different properties though, as one can guess from the smell which is more like regular epoxy glue than Milliput. For a start it’s much softer and stickier when first mixed (so much so that using one’s fingers becomes rather difficult) and there’s a graininess that doesn’t really disappear. The only other possible advantage (depending on what you use it for) is that it sets up much quicker than Milliput; in my test it was a bit too firm to model with after 15 minutes and had reached almost complete hardness after 2 hours. When fully cured it was also very strong. It may be ideal as a gap-filling glue or repair medium, but not so good for modelling.

The mixed test piece above was gently flattened and pulled out in the same way as the Milliput tests but the graininess and fissuring are apparent here.
Heating Milliput
June 22 2014
The Milliput website (address in the main text above) mentions that the curing of Milliput can be accelerated with heat but goes no further in explaining how much heat or how much quicker this can be. I recently did my own test .. mixing up a little standard (yellow-grey) Milliput and quickly modelling a basic head, torso and arms on a very small (1:25) figure armature of twisted garden wire (see Modelling and shaping in the Making realistic models series in the Methods section). I used brand new Milliput, which was particularly soft. For a heat source I used a Wagner brand ‘Heat Tool 400’ which is a hand-sized heat gun, not so available in the UK anymore but a similar type can be found in Hobbycraft. This type has only one heat setting and will deliver a temperature of up to 400 degrees C, but this represents the local temperature reached if it is focused on a spot for a length of time, and it is normal to keep the heat gun and/or the victim moving, when baking Super Sculpey for example, because otherwise it will quickly burn!
I held the heat gun at a careful distance of c.20cm from the figure parts and moved it back and forth while also rotating the figure slowly. I estimated that it had been about 15-20mins since the Milliput had been mixed. I noticed after about 10secs that the Milliput surface was starting to ‘bubble’ very slightly and appeared to expand a little, but when I took the heat gun away the bubbles disappeared. From that point I was very careful, heating very slowly and I noticed that gradually I could move the heat gun closer without the surface blistering. I gave it around 5mins heat gun treatment all over, then left it to cool down. On cooling the figure was rock-hard, just as if left to cure normally and carving with the scalpel showed no weaknesses in the surface.
The hardened Milliput showed no signs of the earlier blistering. Gentle, more gradual heating may have solved this; or starting with a lower temperature then building up. It may also be prevented if the material is allowed to cure a little more first i.e. 30mins after mixing rather than 20, or older Milliput may even react better .. I’m guessing now, it’s something I intend to test so if you want to try this method it would be worth doing the same first.
July 2 2014
From what I’ve recently read Magic Sculp may be well worth trying! It sounds identical to Milliput in all respects .. working/hardening time, water-solubility, toughness when cured, effect of heat etc. .. but with better price options. For example, when ordering from the UK website, a 200g packet will cost £8.40 inc. VAT and standard 3-4 day delivery is also free. This is more expensive than the best shop price (Tiranti) for the standard grade but cheaper than the other white or coloured types. Magic Sculp is available in natural/grey, white, flesh colour or black .. all the same grade. The natural/grey is perhaps a comfort for those who may be slightly sickened by the ‘yellow/grey’ weirdness of standard Milliput. But the advantages over Milliput may increase if one needs larger amounts. For example 1.6kg will cost £34.99 including VAT and delivery, giving a price of £2.47 per weight of a Milliput pack, for a product which is, according to others .. finer, softer and in colours!
Magic Sculp like Milliput, is a UK product. I rang the manufacturer and I was told that the reason why there’s a ‘Magic Sculp’ here and a ‘Magic Sculpt’ in the US .. with a ‘t’ added, if you didn’t spot it! .. is that the US firm copied the UK product and the agreement was reached that ‘Magic Sculpt’ would only be sold in the US. I was also told that Magic Sculp is softer to work with than Milliput because it contains less clay filler. As I’ve said, I haven’t worked with it yet, though I certainly intend to .. so you’ll have to judge for yourself how it compares. If there’s anything you think I should know, I’d be happy to hear it!

I should like to add my thanks and express my appreciation for all your careful research, David. Also, for taking the trouble to inform others about what you discovered. Stan, UK
Many thanks!
I’m just curious as my Milliput must be 5 years old by now, did the 10 year old Milliput ever get as hard as the new one does?
Yes it did. It may have taken a little longer. Proper blending is important, and more difficult because of the hardness .. but one must persevere! If for any reason it remains soft for too long i.e. more than a few hours, maybe gentle heating will help.
Great review and info on this product, thanks!
I have used most of the versions of Milliput and it is still one of my favourite hard epoxy putties. There are other very similar putties that are good to, as you say Magic Sculp and also Sylmasta A+B.
I sculpt for the wargaming figure industry and Milliput is generally frowned upon as it is so hard and brittle. It ususally wont survive the heat/pressure of vulcanised mould making. The standard putty used in my business is either Kneadatite Blue/Yellow or ProCreate, both of which have a more flexible, plastic property once set. However I still use a little Milliput to mix with the the Kneadatite, if I am planning on sanding straight edges etc.
Another thing worth mentioning is the health and safety issues with Milliput and similar putties. For many years now I have had to wear gloves when working with Milliput as it brings my hands out in an itchy rash as soon as I touch it.
Many thanks, David, for some helpful information!