

I’ve finally managed to update this guide and I’ve now included photos. Some of these come from my book Model-making: Materials and Methods from 2008 and were taken by Astrid Baerndal. This guide focuses on soldering small constructions, rather than the more common electrical soldering which almost all of the info you’ll find on the subject deals with. As you will see, ‘constructional’ soldering involves some differences in method; the materials are different and quite often stronger tools are needed. For the moment I’ve confined this guide to simple soldering ‘on the flat’ and more advanced methods of assembling 3D constructions will follow.
What is soldering useful for?
For model forms which are too thin to make to proper scale in other materials such as card, wood or plastic .. for example metal bed frames or railings. Occasionally, for bendable metal armatures ..e.g. for figures or trees .. allowing for some careful repositioning. Soldering does not give nearly as strong a bond as welding, and the joints can’t be put under much stress, but there is no reason why properly soldered items shouldn’t last for a long time if cared for.
Most of my teaching work focuses on making 1:25 scale models .. so 0.8mm round brass rod is a convenient thickness for representing slender railings or special items such as the brass bed frame shown below. This bed frame is mainly 0.8mm, but with 1mm at the corners. Most of the 40W soldering irons I’ve tried have had just enough heat output to manage thicker rods .. up to 2mm, the size of standard scaffolding at 1:25 scale.

What metals can be soldered?
One of the reasons why I’m updating my soldering info now is that I’ve discovered some new things which call into question what I’ve always been told .. that brass is the only easy option, or at least the most reliable one. I still agree that brass could be the most consistent and the least complicated .. followed by copper, if it’s thin. These are also the two most available from craft or hobby shops in wire, rod or thin sheet form. But I have found ‘gold’ paperclips to be just as easy and I always assumed this was due to a brass coating ..now I’m not so sure that’s the reason. For example I recently tried silver paperclips, with the same results! I’m looking into other possibilities at the moment and I will update the info here once I’m sure of it. I also found that the ‘welded wire mesh’ commonly available nowadays solders very well .. when I know I tried it years ago with little success! This common mesh is galvanised steel i.e. steel which has been coated with zinc. Apparently paperclips are also made of galvanised steel as a rule, so there may be a connection here.
The simple answer for the moment is that brass is guaranteed to work well, it’s available and reasonably cheap. Other metals such as aluminium or regular steel can be soldered, but require special solder and flux and may need stronger equipment. But if you really want to know what else is possible, just give it a go ..and let me know what you find out!
How soldering works
The metal parts to be joined are heated with the tip of the iron so that they will be hot enough to melt the soft metal solder applied to them. It is important for a lasting joint that the metal itself melts the solder in this way rather than melting solder onto the iron tip and transferring to the joint because this will achieve only a very weak attachment. One could think of it as a form of ‘hot-melt’ gluing, but using a low-melt metal in place of glue sticks and where the material itself has to melt the glue.

In the photo above I’ve placed the tip of the soldering iron so that it’s touching both pieces of brass rod and as close to the joint as possible. Once this area is hot enough the end of the solder wire just needs to be touched into the joint and a little of it should instantly melt. The iron should be kept in place just long enough to allow the now liquid solder to infiltrate the joint properly .. i.e. not just covering the top but also running to the other side.
If you’re familiar with ‘constructional’ soldering you may ask why there’s something important missing from the above setup .. there’s no sign of any flux applied to the joint. This was purely a demonstration setup and the iron wasn’t even on .. I wanted the joints and the position of the soldering tip to show as clearly as possible. I’ll explain the importance of flux a little further on.
What is needed to do it?
See the end section for recommendations on specific makes, suppliers and price-guidance for the following list:
A soldering iron of at least 30W strength .. 40W better! .. preferably with a flat ‘chisel’ like tip, known as the bit. This means one can press down for maximum contact with the metal surfaces. However, the majority of soldering irons available are supplied with round ‘pencil’ like bits. As some of the older photos here will show, a standard ‘pencil’ bit will work if the iron has a strong enough wattage to generate enough heat, but over the years I’ve found that a flat bit can help a lot more especially when soldering thicker rods! You will also find that the majority of soldering irons on offer are too weak to tackle metal of any thickness beyond a small fraction of a millimetre .. because most are designed for soldering fine circuit connections. These don’t need to be strong .. they’re commonly around 18-25W. A higher wattage such as 40W doesn’t necessarily mean that the iron will reach higher temperatures .. just that it will have more strength to sustain the heat needed for longer. This is important since thicker pieces of metal will conduct the heat away very quickly.
All this makes the search for the right soldering iron and the price options just a little more involved .. but unfortunately there are further things to look out for. Look at the three irons compared below:
At the top is my old Draper model K40P .. 40W/240V .. which came with a ‘chisel’ bit and has worked very reliably for many years now. Notice the screw head at the end of the shaft which means that the soldering bit can be easily extended or removed just by loosening it. The bit supplied with the Draper is about twice as long as what you can see sticking out, which means that there’s plenty to extend as it wears away. Underneath is the iron from the ‘Parkside Soldering Station’, a cheap offer from Lidl a couple of years ago and a peculiar 48W! This iron works reasonably well in terms of heat output and the integrated stand makes it comfortable to use .. but .. the soldering bit is the ‘screw in’ type, and very short .. so short that it’s impossible to press the bit flat against metal without the shaft getting in the way. Unfortunately a rather careless design .. making it useless if you need any control! The third iron shown is a 40W/220V from Silverline, who make fairly inexpensive but often reliable tools. This comes with a ‘pencil’ bit, which is not the best to have .. but the heat output is good, the shaft is slender, and the bit supplied can be extended (the locking screw is not visible in this photo) for more control. This has worked reasonably well so far during our soldering workshops.

The type below could also be a good option .. although angled bits are not very common. I found this ‘unbranded’ iron in a £-shop and it has worked very well for a number of years. Perhaps it goes without saying though .. one does need to be extra cautious when using cheap, unbranded electrical goods! Really, if you don’t know how to test the electrical safety or know someone who can, it’s safer to leave well alone!

To sum up .. get a recognised brand 40W iron with a relatively slender shaft, a ‘chisel’ bit and/or the option of changing easily by means of a simple screw-locking mechanism, and you can’t go wrong! If possible check that the bit provided is long enough to be extended if need be.
A stand (sometimes supplied with the iron) is essential, both to hold the hot point off the work surface when not in use and to secure the tool in one position on the table. Unfortunately the flimsy sheet-metal ‘stands’ most often supplied never manage the latter! There seems to have been a fairly universal agreement that soldering irons should all have just a little over 1.3 metres of rather inflexible cord . This is not long enough to allow the soldering iron to stay on a work-table without some pull from the cord, unless one has a handy power socket ‘kitchen style’ at worktop height. In short .. the iron will move around a lot, independent of one’s awareness or control, which is worrying considering it can inflict a lot of pain! There’s a cheap solution, shown below, which is to tape whatever ‘stand’ you have to the table. Here I’ve improvised a perfectly adequate stand out of welded wire mesh.

Or a more elegant solution is to buy a separate stand unit. This one below is from Antex and costs around £6 .. more on prices later. These stands are weighted, and usually have a sponge attached which must be dampened if used for wiping the iron while working.

Solder A soft metal alloy wire which melts on contact with heat to form the ‘glue’ which makes the bond. Up to recent times the standard type was 60%tin-40%lead but now there are many lead-free alloys available. Also common now are ‘multicore’ solders with built-in flux. But I have to say honestly that I’ve had consistently better results over the years using an old-fashioned tin/lead solder and a separate flux.
Flux A liquid or paste which is applied to the joint just prior to soldering and which assists the solder to fuse properly with the metal by preventing the metal surface from oxidising. The flux evaporates as soon as the metal gets hot.
Steel wool or fine emery paper/cloth to clean the metal before soldering. It will be easier to wipe rods clean with fine-gauge steel wool but emery or ‘wet/dry’ paper will also work.
A damp sponge, steel wool or metal files to clean the soldering bit while working. This needs to be done once the iron is hot, but it is not enough just to do it once at the beginning of a session. The hot bit of the iron will blacken again within a minute, so to prevent build-up of this oxidation the cleaning needs to be repeated at least each time the iron is picked up again. This has nothing to do with cleanliness! .. a thick layer of oxidation will prevent much of the heat transferring from the bit to the brass.
Kapa-line foamboard or heavy card on which to mount the template drawing
Caution note: Kapa-line (polyurethane) foamboard is suggested because it is a perfect insulator (will not conduct heat away from the metal) and polyurethane foam resists heat to an extent. Standard (polystyrene) foamboard is not suitable .. this melts too easily! If soldering is done properly the paper covering on the Kapa-line foamboard will scorch but there is little danger of fire or burning of the foam. However, proper care must always be taken! Over almost 10 years of conducting workshops we have experienced nothing more than routine paper scorching .. but this is partly because we, and the people taking part, have always been vigilant! Soldering irons must never be left on when not in use for long periods and must be kept well away from flammable materials.
Spraymount for mounting the drawn template onto the foamboard. I normally use the permanent ‘PhotoMount’ version from 3M.
Masking tape for fixing cut metal to template. The tape will normally resist the heat sufficiently to secure pieces while soldering but the glue softens and in cases where extra time is taken or areas redone these fixings can become very loose and may need to be replaced. Understandably ‘Sellotape’ is not an option because it will melt!
Scalpel (adequate to nick a groove thin brass) or hacksaw for thicker rods. I keep some old scalpel blades for this and I’ve found nicking/snapping brass rod up to 2mm diameter fairly easy.
Also pliers, wire snippers and metal files .. as/when needed.
A workplace with good ventilation! This is essential if you are using a traditional tin/lead solder. In addition, flux will burn off in the process and the fumes can be harmful if allowed to build up or stay around.
Detergent to thoroughly clean work afterwards. The flux component is corrosive and it will continue to eat the metal away if left.
Step-by-step
Draw up the form to be soldered on paper ( I recommend drawing 1:10 first then reducing 40% for 1:25 if working in this small scale ). Copy this and spraymount to foamboard or flat card. This will be the soldering template. I’ve designed the one below so that I can make use of the curved parts of paper clips.

Clean metal thoroughly with steel wool before cutting small lengths, even if the rod is newly-bought. Brass rod is given a coating to stop it tarnishing too quickly, and this will interfere with the adhesion of the solder if it’s left on. Rubbing with a fine steel wool is the most convenient method, though ‘wet/dry’ or emery cloth will also work.

Cut metal pieces to fit and use thin strips of masking tape to secure them in place on the template. Metal edges must fit to touch, so that heat travels. Luckily thin brass rod is surprisingly easy to cut with a scalpel .. just by carefully rolling the blade across it to make a fine groove and then snapping! With this method one can be very precise as to where one cuts. A small metal file such as the one below will be useful for making fine adjustments to the lengths if need be.

Usually, and especially in the case of railings, quite a number of pieces are needed which have to be precisely the same length .. because most often they have to fit between two horizontals. The best method of achieving this is to make a ‘cutting jig’ .. an ‘L’ shaped piece of card or plastic which serves as a guide for the scalpel blade as shown below.

Switch the iron on and allow to heat up for a few minutes. Make sure that the iron ‘bit’ (the tip that gets hot) is clean. If not, wipe on damp sponge or steel wool, or use metal file. Some model-makers recommend ‘tinning’ the iron at this point (dipping the very end of the bit in flux and then applying a little solder to it). This may help the heat-flow to the metal if there are problems, but it may not be necessary.

I use a small, old paintbrush to put a little of the flux (whether paste or liquid) onto the joint. I prefer to do this one joint at a time, because if more are fluxed in close proximity the flux on these will evaporate as the first joint is being heated. It may not matter .. it’s just become a habit.
After applying the flux touch the soldering iron bit as near as possible next to the joint, trying to touch both (or at least more than one) of the metal parts. Hold there for a few seconds .. a good initial sign is if the flux immediately start to smoke, meaning that the brass is getting hot enough. If nothing appears to happen try adjusting the angle of the iron for better contact but don’t take the iron away! With the other hand gently touch the solder wire to the joint. A little solder should melt fairly instantly and hopefully run into the joint. Use as little as possible ..though this will take some practise! Some patience may be needed to hold the iron relentlessly in place, or fine-tune the angle, until the solder decides to melt. It’s actually very difficult to describe exactly what leads to a ‘successful’ soldered joint in every case. It has to be tried, and if something works, looks right and feels strong ..you’ll establish a ‘feeling’ for what you did to achieve it after some trial-and-error and a lot of repetition!

When all joints are done the work can be removed from the template almost immediately .. fine-gauge pieces like this will cool very quickly. The work should then be cleaned carefully ( either with warm running water, toothbrush and detergent .. or the dry method, using steel wool ) to remove remaining flux. If left on this will continue to eat away at the metal.

I was fairly happy with this result .. I’d managed to keep the bits of brass rod reasonably straight while soldering them. I did have to work on this piece a bit though, apart from thoroughly cleaning up with steel wool. It can often be very difficult to be as minimal as one would like with the solder, and a number of the joints were far too ‘swollen’ looking. Solder is so soft that it can be shaved away with the tip of a scalpel blade, or one can use needle files like the one above to remove the excess. Soldering ‘kits’ often have a desoldering pump thrown in, which is like a spring-loaded syringe. The idea is that excess solder can be quickly sucked away while it is still liquid. I’ve yet to try one of these myself ..mainly because at that point I don’t want to risk knocking the brass pieces out of alignment!
Why is brass the easiest to work with?
Brass is an alloy ..in this case a mixture of copper and zinc. The zinc gives brass a tougher surface and more rigidity than copper, but also makes it less malleable, more brittle. Brass rod is strong enough to maintain its shape and straightness well, but soft enough to be easily cut with hand-tools. For these reasons it is one of the most available metals in a wide variety of fine-scale forms. Copper is softer and can be worked even more easily, but rods of around 1mm thickness would deform too easily and have much less structural rigidity. In addition, copper is an excellent conductor, which means that standard soldering irons would struggle to keep up with the constant heat loss from the joint area.
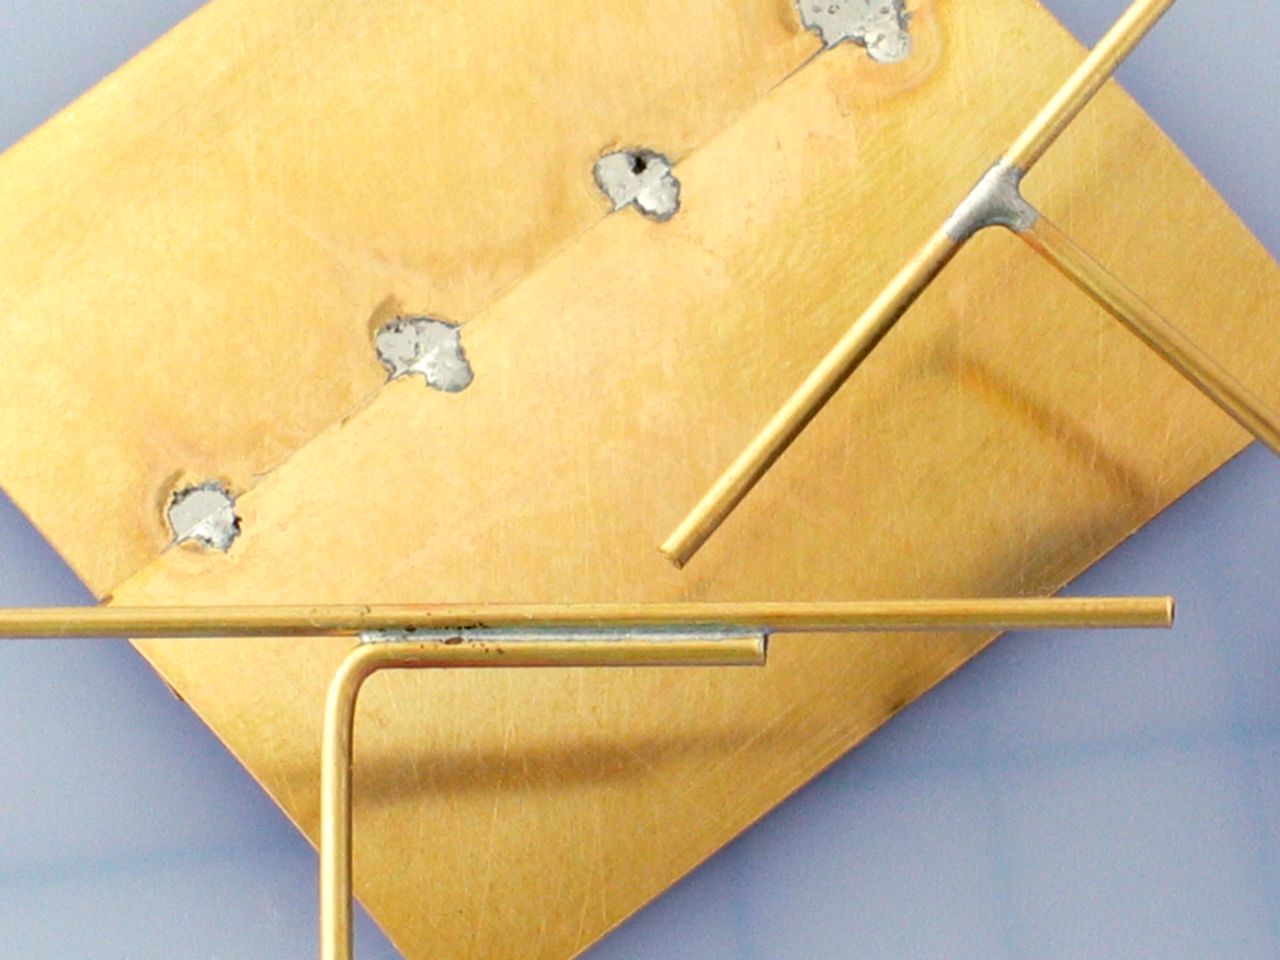
Above is a close-up showing three common types of joint. .. spot, lap and butt..! Underneath are two small pieces of very thin ..0.1mm.. brass sheet which have been attached by melting spots of solder. To the right is the simple form which I have illustrated so far, where two straight pieces just ‘butt’ against each other. Below to the left is the strongest form of joint, where a small length of one piece runs against or ‘overlaps’ the other.
Troubleshooting
If the solder is not melting freely on contact with the heated joint or running off in little beads it can mean that either: ..it may be the wrong kind of solder; the joint is not fluxed or there is not enough; the iron may not be hot enough yet, or strong enough for the work; the bit may need cleaning; the tip shape is not making enough contact or close enough to both pieces of metal …
If all else fails assist the heat-flow either by ‘tinning’ the iron as some recommend or touching the iron tip practically over the joint, melting solder directly on the tip to fall on the joint.
An alternative method
As I’ve suggested, it can be very difficult to keep the pieces of brass exactly where they should be because the masking tape loosens a little as the metal gets hot. If the solder melts and fills the joint quickly this is no problem, but for the various reasons listed this often takes longer. The photo below illustrates a method which I’m far happier with, and which produces far better looking results .. but it’s only worth spending the extra time if the set-up is to be used more than once.

For this soldering jig I’ve used some tough ‘greyboard’, a recycled cardboard, of the same thickness as the 1mm rod chosen for the ladder form. I’ve cut and glued a complete template of it onto another cardboard base so that the individual brass pieces lie snuggly in these slots. I’ve used this jig about 4 times so far and I don’t see why it shouldn’t last for more.
Selected suppliers and prices
Brass rod always in straight lengths, never as roll. Cheaper in 1m lengths rather than 300mm. e.g. 4D prices for 1m lengths (April 2015) 0.8mm £0.79, 1mm £0.98, 2mm £1.25
An alternative source is EMA Model Supplies .. for 91cm lengths 0.8mm £0.67, 1.6mm £1.27 .. but choice of thicknesses is very limited.
Solder Silverline 60:40 Tin/Lead Solder (4D £1.80 per 20g, available £4.00 per 100g) works very well! Melting point 183-190C.
Flux
The ‘grease’ type flux I always provide when teaching has always worked well, but I’ve had it for so long that the original container started to disintegrate .. so I don’t know the brand anymore! But one I’ve heard as good is La-Co Regular Soldering Flux Paste available from Screwfix £5.39 per 125g .. for use with copper, brass, lead and zinc.
Another one recognised as reliable is Fluxite Soldering Paste, suitable for copper and brass .. actually most metals other than aluminium (although other metals would require different solders) and can be used with either lead or lead-free solders.
http://www.fernox.com/products/traditional+plumbing+products/solder+and+fluxes/fluxite
On Amazon c.£10 for 100g tin and about the same from Jewson’s. Maplin just stocks the 450g tins for some reason, enough to last a few lifetimes!
Soldering Iron
SolderCraft 40W-230V (supplied with 5mm diameter chisel bit, stand and manual. 4D £20.99) Separate bits available £3.80. Around £18 on Amazon (with chisel bit) ..
From AllElectricRC http://www.allelectricrc.co.uk/ this will cost £13.59 but supplied with a pencil bit .. still worth it ordering an additional chisel bit (AllElectric doesn’t have them)
Draper 71417 40W-230V on Amazon £15.95 (picture shows chisel bit, so I hope it is)

B&Q stocks a 40W soldering iron for £12.85 which looks almost identical to the old Draper model I have, above, and has a ‘chisel’ bit according to the product photos. This should be fine if it has been assembled with enough care.
Bench Stand Silverline brand, 4D £3.65 well worth getting (Antex shown in photo around £6) £5 from Maplin ..
See also
David Neat Model-making: Materials and Methods Chapter 4: Working with Metals
C+L Finescale. – go to the ‘Knowledge Centre’ for concise notes on materials and methods, including a chart advising on what solder and flux to use for different metals
http://www.finescale.org.uk/index.php?option=com_content&view=article&id=27&Itemid=2
4D Modelshop – a basic guide to soft soldering
http://modelshop.co.uk/Content/DynamicMedia/cms-uploaded/files/4D_guide-soldering.pdf
The Basic Soldering Guide http://www.epemag.wimborne.co.uk/solderfaq.htm – this is written for its specific use in electronics but much of the advice applies.

Hello! Thank you for your information on soldering. Where I am familiar with the technique, I have never worked in this manner before. I’m currently working on a small sculpture project which requires soldering. I am in the process of purchasing equipment but am uncertain as to what I need. I am working with 3mm square brass. Is it possible to use a regular soldering iron or do I need to work with an open flame? Thanks.
Hi Justin, I’ve never tried brass this thick but I’m pretty sure that, yes, it would need a stronger heat source such as ‘blow torch’. I don’t think even 100W soldering gun would do it.
I have just used 3mm square rod. I did hold my iron on it for a long time but it did (eventually) work. It was reading David’s information that allowed me to figure out what went wrong to begin with. I only have 4 joins with 3 to 3. But where I used smaller size to the 3mm took a while as well.
Glad to read the guide of soldering here in the blog. Very helpful information . Thanks!
Just wondering if I could use a soldering gun instead of an iron?
Hi Tammy, I don’t know what you mean by that. Can you send me a link to where you got it from?
Thank you for sharing working of soldering iron. I must say this blog is very expressive and understandable to read or to understand things. Thanks !!
You can check here following blogs to learn more soldering iron! Tools Guardian Provides best value,
1. https://toolsguardian.com/types-of-soldering-iron/
2. https://toolsguardian.com/how-to-use-a-soldering-iron/
3. https://toolsguardian.com/how-to-clean-soldering-iron/
4. https://toolsguardian.com/how-to-make-soldering-iron/
Thanks, Jason, for this further info!
I need to model a four poster “iron” bed for a small polymer clay figurine that figures in a story I am illustrating. As a silversmith I usually solder with a torch and have a supply of 10 gauge copper wire on hand that patinas nicely to a darkened color with the torch application . This and others of your pages have been enormously helpful in suggesting how to go about my project and in fact it was your page on modeling small figures that showed me the possibilities of polymer clay and super sculpey in achieving the effect I want. Thank you…an amazingly informational site . I am very grateful! Pamela Spiro Wagner
Great! Thanks for posting
Pingback: a quick guide to soldering | To Thyne Ownself Bee True
Pingback: A Guide To Soldering Metals – Soldering Shop
This is so informative and useful! Thank you so much.