
Here is a quick post describing a technique I’ve been developing for creating pressed patterns in soft foam using specially modelled tools. The advantage of creating a small area of defined pattern which can be repeatedly pressed (in this case a particular type of old street cobble) apart from saving time, is that it gives the patterned area a certain regularity. The direction of the pattern or the pressure used can be varied to prevent any look of obvious repetition but there is a natural unity and a rhythm to it.
Super Sculpey is the best material I’ve found for creating these press-tools. It allows complete versatility in modelling and is strong enough when properly baked to make a lasting and, if need be, quite deep impression on soft foam. Milliput will set just as hard and durable (if not more so) for repeated use, but I find it too resistant when soft to allow enough control over detail modelling. The polyurethane foam in Kapa-line foamboard is by far the most suitable foam to use because it takes impressions minutely but black foamboard foam, styrofoam or Depron will all yield results in their different ways.

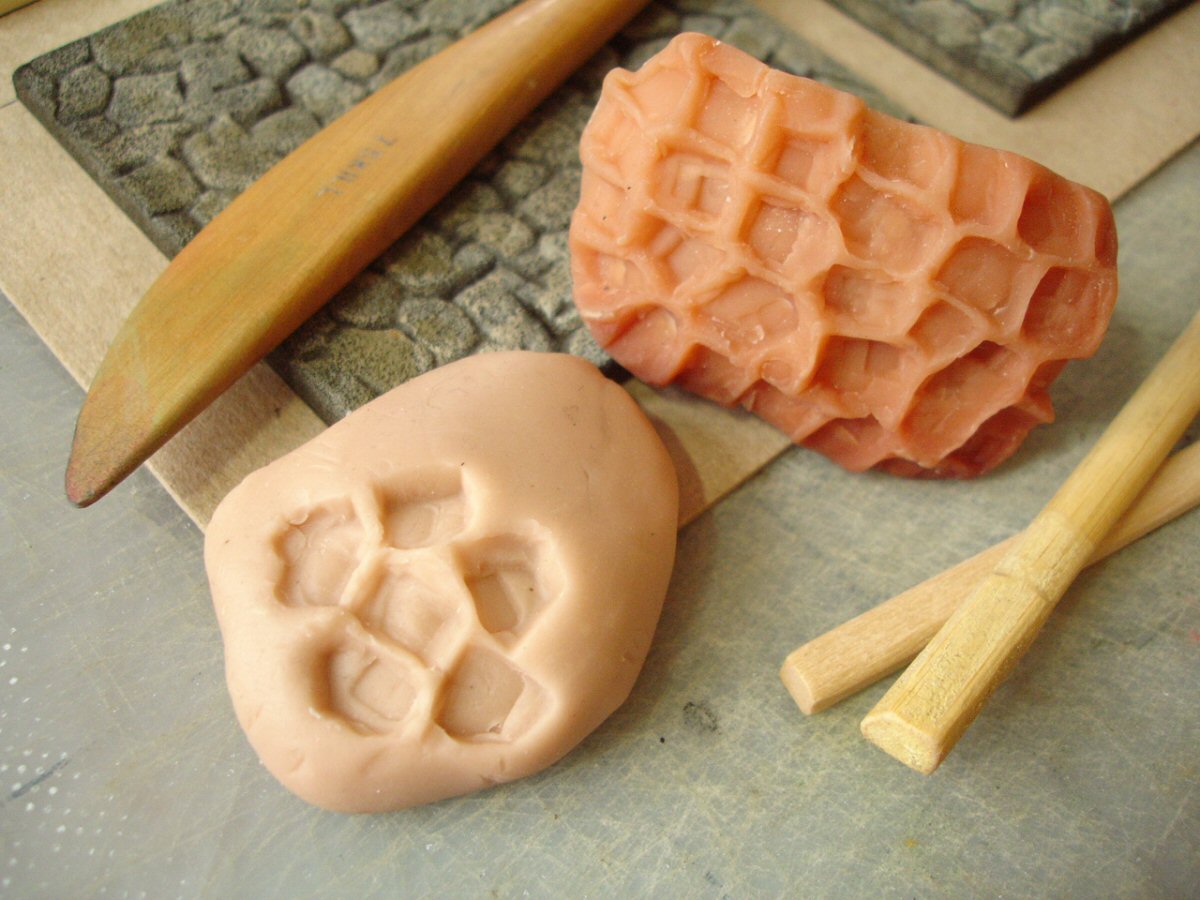
Here I’ve mainly used the blunt ends of disposable chopsticks to create the negative cobble-stone shapes in a piece of Sculpey. The walls between, which become the cracks in the positive pattern, need to be carefully pinched up, ideally tapering to sharp ridges. If not they will look too broad or not be deep enough in the positive. Even more important, the modelled pattern area should have a roughly convex shape so that it can be rocked while pressing. Usually if the press-tool is too flat it cannot be pressed firmly enough into the foam without breaking. I’ve also pinched a shape at the back for holding the tool. This block measures about 5x3cm with an average thickness of 1.5cm. The manufacturer’s directions for baking Sculpey recommend that the oven is brought to 130 degrees C and the form left there 15mins for each 6mm of thickness (i.e. average 18mm needing 45mins). This may be sufficient for forms which are not going to be subjected to much strain or when trying to preserve the flesh colour but for a full and even hardness throughout it’s usually better to leave thick forms in for longer. I prefer to leave these in the oven until they’ve darkened almost to a chestnut brown colour, then turn off the heat but allow the forms to cool down in the oven before removing them. The extra baking will not distort or shrink the forms any more than normal, but it will make them much tougher.

These surface samples represent very basic painting but show the steps, from top left to bottom right, beginning with a dark base color and gradually working from dark to light, dry- brushing successive colours. Dry-brushing is best done with a full-haired but relatively soft brush containing the minimum of paint and using a careful ‘dusting’ action similar to applying blusher. The highlights of the texture are emphasized first, while the depths remain dark. Here I’ve used a particularly opaque, matte acrylic made by Rosco for scenic painting but any opaque, matte acrylic can be used. Gouache also works well because of it’s opacity but adding a little Pva glue to it will make it more durable.


Hello. Have you decided about marketing the texture stamps? Thanks. John
Thanks John. Unfortunately not. The fact is, everything else is on hold at the moment while we deal with family health issues. I can’t even begin to say whether ‘normal’ will come again.
Totally understand. Family comes first.
Have you tried embossing this into gesso or plaster? I’m experimentating with it, but getting the right consistency of the plaster is hard – when it is still too soft the structure tool tears out the material and if you wait a bit too long it’s already too hard to emboss. I have a negative structure roll for paint applications…I might try to find some kappa foam if my plaster thing will not work but I’ll try some more – At least I got some usable results, but only for a medium sized area (40x20cm) but I want to do a whole street of ~120x40cm. Maybe I need to do it in parts and try to glue it together afterwards as such a big area of plaster is hard to emboss at once.
Nice tips of creating your own tools here!
Yes, I’ve tried .. a long time ago .. and was so frustrated with this that I took the time to experiment with other ways and discovered the Kapa-line method. Gesso will not be thick enough to give any depth, polyfilla will ..yes..either be too sticky or develop a skin. The only other way is letting a coat of polyfilla dry totally and then carve or score into it, but this is not quick!
Does it work with styrofoam?
No, Rich .. not very well. Styrofoam (if you mean the fine-celled blue, or grey, or yellow/pink stuff) is a bit too hard to take impressions as well as Kapa-line foamboard foam. I know it’s more than disappointing if you live somewhere where Kapa-line isn’t available!
I love the look you have gotten. Could I purchase the one that most resembles an Irish stacked wall as I’m an artist and this could be of great help to my work.
Please contact me James 425-308-4374
Thanks James .. but these things are not for sale. Could you let me know why you thought so? I ask just in case anything in the article is misleading. These are things I’m thinking about manufacturing though in the future.
That’s great I’m giving that a go…looks really effective brill..
David- This sculpey tool would work wonderfully to impress on clay used in pottery, right? Thanks! Fantastic Think I can wrap the sculpey around a wood dowel, then bake it so I can use it like a rolling pin?
Hello Jane, Yes it should work well with clay though I wonder if it would stick, and might need wetting. Yes, I’ve done similar, modelling sculpey onto wooden dowel and baking. No problems except the wood would need to be roughened/scratched to help the sculpey to stay on.
Found my way here through Pinterest – liking what Davidneat has done using polymer clay to make stamps. They can be used the same way in raw polymer clay, and would make a great textured sheet. But if I may add…
Having worked with polymer clay for 20 years, I suggest you not wet the wood first, but smear some white glue on it. It will help it stick. We use water as a resist, so clay DOESN’T stick. (which would be used when using the polymer clay made and cured stamps on raw polymer clay.) And wood can expand in the curing of the clay, leaving cracks in the clay (because it does not expand as much). You can prevent this by drying your wood in the oven over a good long time, so it has a little moisture in it as possible, THEN cover it with polymer clay.
davidneat – thank you for sharing these ideas, I’ll be incorporating them in my art!
Thanks Debbie! I don’t understand though .. what ‘wood’ are you referring to and where do I say I ‘wet it’?
David you said it in the reply to Jane.
Your tutorials are always so well explained and pictured. Thanks for sharing your talents 🙂
What kind of clay are you using for the tile or cobblestone?
Hello Donna,
It’s not clay, it’s soft foam from Kapa-line foamboard .. takes impressions very well! The pressing tools are made from Super Sculpey polymer clay though.
If you have foam core, put it in the shower and peel off the backing!
What kind of foam are you using? There are so many kinds, I’m confused!
I really think I’ve said that .. it’s the foam inside Kapa-line foamboard .. soft polyurethane.
Pingback: Making relief patterning tools using Sculpey – Ceramic Art
Buenas noches. Dónde o cómo puedo conseguir este artículo para crear este tipo de texturas maravillosas. Gracias
Me encuentro en Bogotá
El sculpey es plastilina que se hornea para endurecerla, solo ve a una tienda especializada en arte o en internet, arle forma, hornerla y listo.
great idea, is really going to save costs on building a fantasy castle scene.
Yes, it’s perfect for that kind of thing!
Where did find you find the stone impression sponge.?
What ‘sponge’ do you mean?
The “sponge” to which you refer is the very tool he is writing this tutorial for making. It is not sponge but actually Sculpey clay that has been impressed with chopsticks to create a cobblestone look and then baked. Once baked it is hard enough to press into the foam mat he uses, causing it to leave a cobblestone imprint that can then be painted. A truly fascinating idea and a wonderful tutorial. the wheels are turning on using this to create patterns in texture medium on paintings. Thanks for sharing David!!
This has been very helpful!
Fun and straight forward. I can see many uses for this tool-making technique in my own work. Thanks for posting.
Sonds complicating, but so cool!!!
Ah! A great aid !! Thanks
Interesting, thanks for posting this
Great
Awesome!!