Styrofoam is one of the easiest materials to shape by normal means e.g. slicing with sharp knives or a hot-wire cutter, sawing with serrated blades, rasping with files, and smoothing with sandpaper. The real challenge lies in controlling the shape and especially, in this case, how one achieves concave forms. Here are the methods I’ve employed for a particular model piece which needed a ‘bowl-like’ form and very regular curves. I’ve used the standard blue styrofoam for this, in it’s most available thickness (2.5cm). There are other styrofoams, such as orange/pink or white, which are even finer and slightly denser. Like almost everything we use, styrofoam is not made for us makers specifically .. it is a roof insulation material, hence it’s not usual to find it in thicknesses less than 25mm or more than 100mm. I assume that the standard sheet size of 600x1200mm has been worked out as the most convenient for interior cladding. Go to the end of this article for advice on where to buy it in the UK.
Note to dispel any confusion, ‘styrofoam’ is the name we use in the UK for this material, officially referred to as extruded polystyrene abbreviated to XPS. Confusingly, in the US ‘styrofoam’ is the name often used for the more familiar white, packaging polystyrene properly referred to as expanded polystyrene or EPS. Both we in the UK and our American friends .. often get it wrong! .. particularly odd for the US considering it’s an American company, Dow Chemicals, who makes the blue insulation foam and who trademarked its name! So when you are doing web searches for ‘styrofoam’ make sure you know which material is being talked about before you take any advice on board. As you probably know, the two are significantly different, even though they originate from the same material! EPS is much softer, more fragile and has coarser, larger ‘cells’. Wikipedia has it basically right, with an interesting and informative article here:
http://en.wikipedia.org/wiki/Polystyrene


I found that blue styrofoam will respond to sanding with even quite a thin strip of sandpaper if this is supported. I made a ‘sanding former’ by gluing the strip onto the edge of a prepared shape, in this case a half-circle corresponding to the diameter of the ‘bowl’ I wanted. I have used a 40 grit sandpaper for this.

First the outline of the ‘bowl’ needed to be marked on the surface. Styrofoam is too soft to hold the compass point securely so the centre area needs to be strengthened with some tape. This is then removed.

I then sanded by revolving the former on the central point. If pressed too hard while turning the former will just tear up the foam surface, but this may not matter at first. After a while sanding will get smoother as one gets used to how the material reacts to the tool.


It didn’t take long to reach the marked circle. I then extended the lines from the circle and marked the shape and depth of the concave on the edge .. because here I wanted a ‘niche’ shape rather than just a circular bowl. I started hollowing out ‘by eye’ using another ‘customised’ sanding tool .. 60 grit sandpaper fixed to a piece of wooden dowel. As I got nearer to the marked depth I returned to using the previous former to finish off (because it has the right curve) but this time dragging it straight. The finished ‘niche’ form can be seen in the last photo below.

Composite forms in styrofoam (or any rigid material for that matter) are best achieved by deconstructing the intended form into parts or layers to be worked on separately. For the ‘half-ring’ which encircles the central bowl I first cut a template shape (using plastic or cardboard) outlining the form. I secured this onto styrofoam (using double-sided tape) and cut roughly round it, being careful not to undercut at this stage. I use either sharp, thin kitchen knives (i.e. fruit knives) or thin, self-supporting saw blades (‘padsaws’) to cut styrofoam, but a hot wire will also work well with a bit of practise. To get a smooth, right-angled edge on the form I’ve fashioned yet another ‘custom’ tool .. this time sandpaper fixed to a short length of Pvc pipe which has been sliced at a right-angle. The sander can be dragged round the form, keeping it flat on the work surface, and will gradually create a smooth perpendicular edge. The template shape is left on to act as a ‘stop’ in the sanding. As long as the plastic (or cardboard) is a little more resilient than the foam the difference will be felt once the edge is reached.

The second part of creating this half-ring shape involves fixing similar ‘stops’ to the top and base of the blocked shape as shown. Between these edges I used another curved sanding former (smaller circle this time) to create the inside profile.

The other small additions are shaped using much the same methods, starting with a base template to create blocks. I then fixed profile templates either end, and used a flat sanding block to sand down to the templates. The forms need to be sanded lengthways with a longer sanding block that will be guided by the profile templates.


The rough rock texture around the outside of the bowl was created by slashing with the back of the scalpel (producing the effect seen more at the bottom here) and also breaking down using a wire brush.

The most reliable way of gluing separate styrofoam parts together is to use a special ‘foam friendly’ glue such as UHU Por. Strong double-sided tape can also fix flat surfaces together very well but is not guaranteed to be permanent. Spraymount (the permanent type) is also an option provided that the two surfaces are flat and smooth and that both are sprayed before pressing together.
More on gluing styrofoam
I’ve bonded pieces of styrofoam together with a strong, double-sided carpet tape for years and they’re actually much more permanent than I’d first imagined. I have composite forms made many years ago which have been well-used as teaching examples and show no signs of coming apart! A few observations are necessary though! .. the two surfaces have to be smooth and flat against each other; if these surfaces have been sanded to make them fit, all dust should be removed, ideally vacuumed using a brush attachment. For the same reason the best bond occurs between the slightly ‘skinned’ surfaces of the sheet as it comes. When using the tape it’s particularly important to avoid placing it too near to where the styrofoam will be carved or sanded if one wants a seamless join .. but this applies almost equally when using most glues. But if it’s impossible to predict, or avoid, gluing in an area which will later be carved through or sanded, I’ve found some of the following options most suitable because they offer the least resistance.
For example what works surprisingly well as a bond between flat styrofoam sheets is spraymount, by which I mean the permanent spray-glue types from 3M. 3M’s ‘Craft Mount’, which is the strongest of their range, is particularly suited because it has a little more body. It should be sprayed on both sides to be joined (different to how it’s normally used), and it’s best to wait a little i.e. half a minute, before the two pieces are firmly pressed together. As with all contact glues, even the ‘instant’ ones, the bond will hold straight away but needs a day or two to get stronger. But the same applies with this as with double-sided tape .. the surfaces must be completely flat against each other and dust-free to bond strongly enough! Spraymount never sets completely hard, even though it’s grip is strong. When cutting through a glued edge the glue may catch the blade a bit but one can get used to this. It will sand reasonably well, especially if the tackiness gets mixed with styrofoam dust. For the same reason, I’ve found that it can help to dust the piece with talc while sanding.
If you want to glue pieces of styrofoam together which do not lie completely flat against each other .. you will need something ‘gap-filling’. There’s hardly anything more gap-filling and instant that hot-melt glue! Contrary to what you might have read elsewhere, hot-melt glue will work reasonably well with styrofoam .. as long as it’s not too hot! One just has to know how to manipulate it. Polystyrene foam is much more heat-sensitive than polyurethane foam .. it softens already at 90°C (193°F), while the temperature of hot-melt glue is around 180°C or more. So there is bound to be some melting of the styrofoam surface, but if you experiment and are careful you can find just the right number of seconds to wait before pressing the surfaces together, cooling the glue down a little but not so much that it fails to stick. Obviously it’s not possible to cover a whole surface, even a small one, with hot glue before most of it hardens. Think of this more like ‘riveting’ .. applying very quick spots of hot glue which will secure the pieces at those points once the glue has cooled. This method is definitely not for carving into or sanding though.
Another option is provided by the ever multi-tasking polyurethane! It’s common practice in scenic work and prop-building to use a rigid-setting, 2-part polyurethane foam to bond other foams such as styrofoam together. A small amount of the two parts must be mixed together in the directed ratio and then brushed quickly onto the joint before the foam pieces are pressed together. The resulting foam will expand to fill any gaps in the joint but the pieces must be held firmly in position while this is happening, otherwise they’ll be forced apart. Often this is easier said than done because the expanding foam exerts quite a force, but generally with these polyurethane foams and glues the less gap there is the stronger the joint will be. Prop-makers and sculptors are more likely to use the foams which are supplied in two separate parts and which need to be manually mixed .. a good source is a sculptor’s supplier such as Tiranti .. but the ‘instant foam’ tube cartridges sold for wall repairs or insulation are similar.
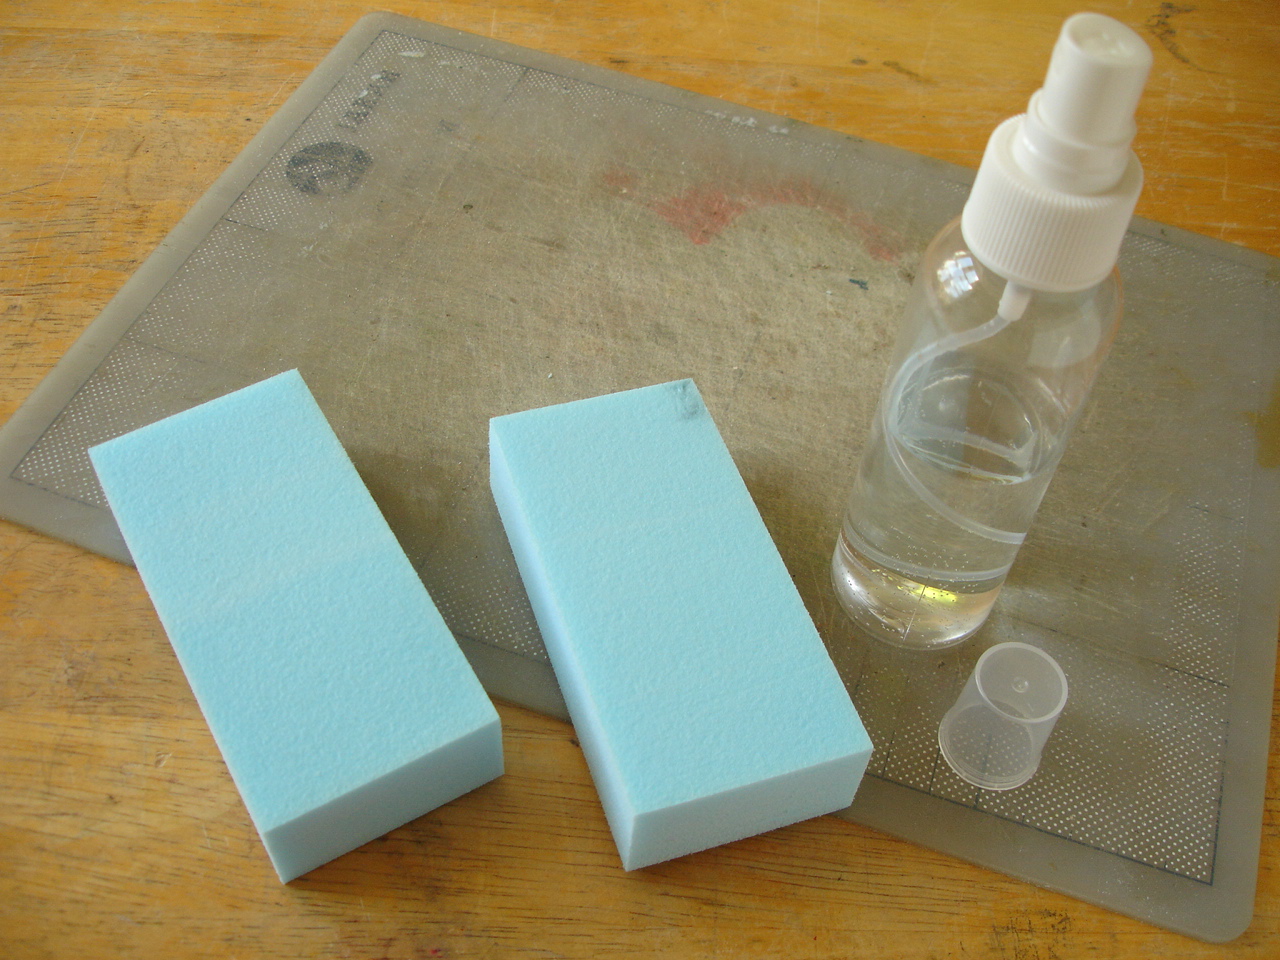
Gorilla glue is yet another option .. a polyurethane glue that comes as one part, so no mixing is necessary, and which foams while curing on contact with moisture. What this means is that both surfaces to be glued need a light misting first .. best with a small pump spray. The glue needs to be applied thinly to just one of the surfaces before the two pieces are pressed together. Below are two blocks of styrofoam already sprayed .. just enough to dampen the surface, certainly not dripping wet!
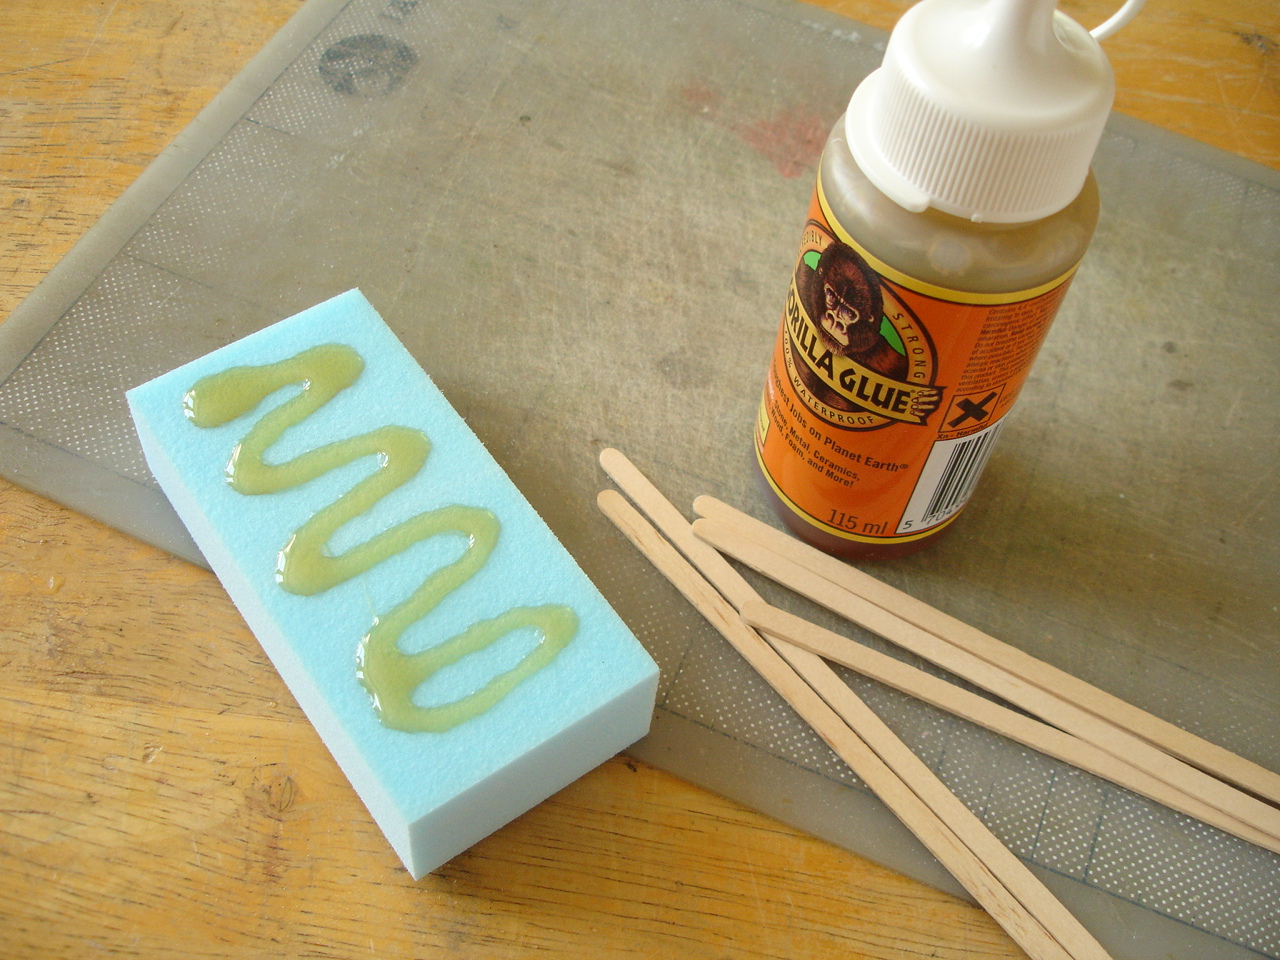
Gorilla Glue can be deposited in spots if preferred, and these will spread once the pieces are squeezed together. It is not necessary to spread the glue beforehand over the whole surface but here I used a coffee stirrer just to distribute it better. What is very important to note (and not included in the manufacturer’s directions!) is that the glue should be dropped from the nozzle without letting it touch the wet surface! If it does moisture will contaminate the bottle and some of the glue will set inside .. as I found out when I tested it for the first time!
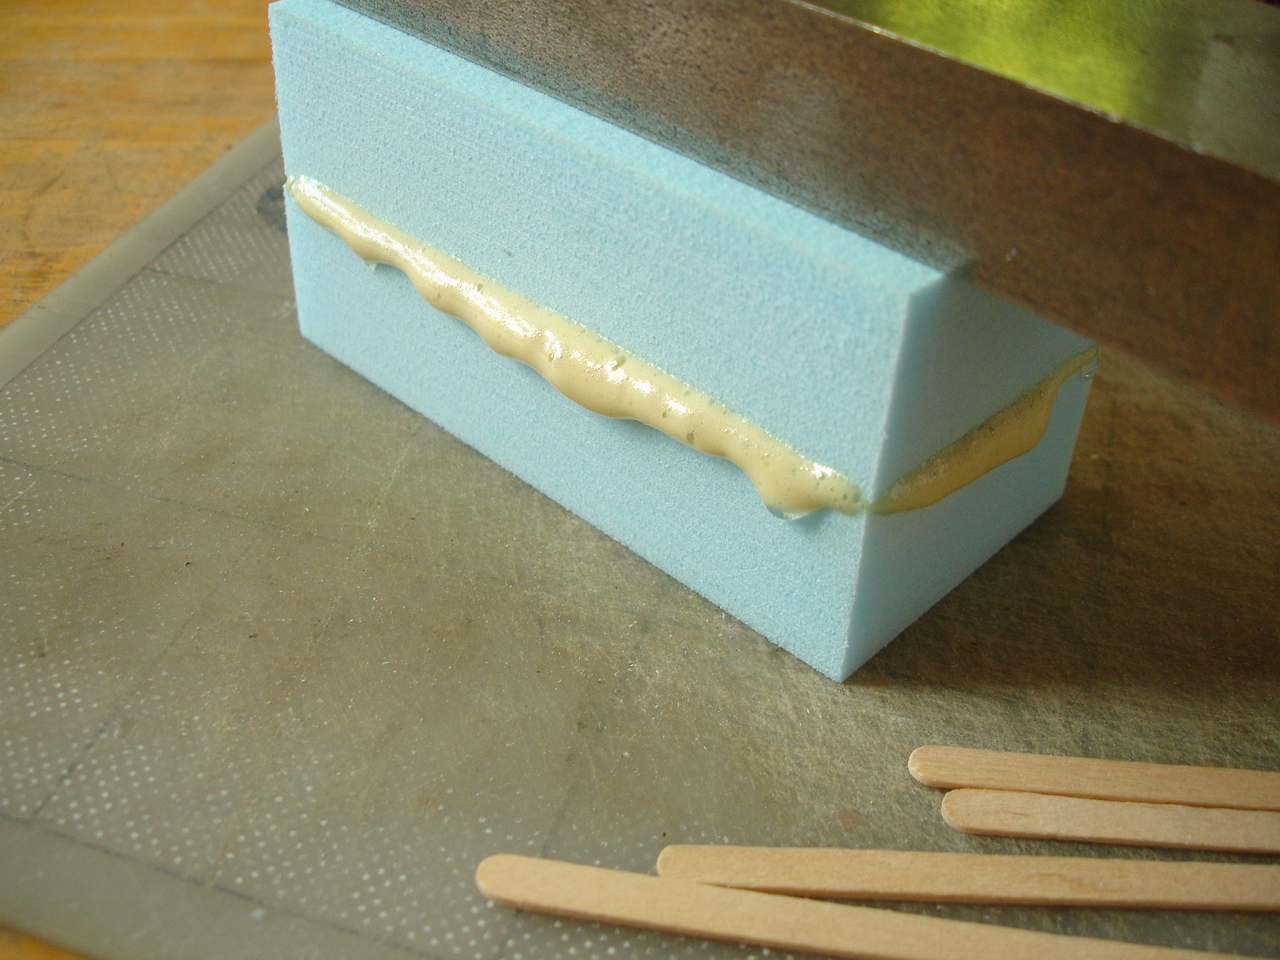
Below, I have weighted down the two pieces with a solid metal block. This was sufficient, although where possible it is always better to clamp the pieces together (sandwiched between flat pieces of wood to protect the styrofoam). The expansion occurs after a minute or so, 3-4 times in volume according to the manufacturer, and if the pieces are properly clamped the excess is forced outwards rather than upwards. If, because of the shape of the pieces, it is difficult to clamp without damaging the surface, masking tape or cling-film could be used to bind them together but these could give way a little and there may well some shifting as the foam expands. I had to correct the alignment of these blocks a few times before the foam stopped moving them.
A couple of hours are needed for the glue to cure. Here below is a section through the seam line, cut with a knife then sanded. If it is properly cured the glue sands through well …. although it is different to the styrofoam it is much more alike than other glues. Also the bond is as strong as they say it is! I think polyurethane grabs on the styrofoam particularly well .. at least, I couldn’t pull the blocks apart.

1/10/2015 I hadn’t even considered epoxy resin glue with styrofoam because I’d just assumed it would dissolve the surface as polyester resin does .. one really shouldn’t assume anything! I tried it yesterday because I’d been working with it and it works perfectly on either styrofoam or polyurethane foam .. no damage to the surface, and a very strong bond. Epoxy glue is very tough though, so it is no good in any area that needs to be cut or sanded through! I used the most basic epoxy resin glue .. the ToolBox brand from Poundland.
7/02/2018 Trylon makes a water-based adhesive for gluing their ‘modelfoam’ (just a standard extruded polystyrene, in other words .. styrofoam!). Apparently it needs to be coated on both foam surfaces then there is a little wait for the glue to firm up, then the two surfaces can be pressed together .. like a contact adhesive. I haven’t tried it yet. I saw it at the theatrical supplier Flints, costing c £9.00 per litre. Here is the link
More on surface treatments
If the surface is going to be reasonably protected .. I mean, if it’s not going to be handled and if it’s shielded from knocks etc. .. a good coat of acrylic paint may suffice. Acrylic paint will toughen the surface slightly, but by no means protect it from any handling, even if careful. Coating first with non-waterproof Pva glue and then painting will do a little more, and the same applies if coated with Pva or a water-based varnish afterwards. But the surface will still be very susceptible to scratches or dents.
If Paverpol is added to the paint mix .. more than half by volume .. greater surface strength can be achieved. Paverpol is a Pva-type medium manufactured in the US mainly for the hobby market and is intended for painting on fabrics or foams to give them a much tougher surface. For example fabric will become rigid and almost ‘resin-hard’ if soaked with it and the manufacturer recommends it for outdoor sculpture. It will not impart the same degree of toughness when painted on styrofoam because it doesn’t infiltrate far into the surface, but a couple of coats using Paverpol will be stronger than either regular Pva or acrylic alone. On its own Paverpol is quite viscous (a little more so than straight Pva glue usually is) but with careful brushing can be worked into a detailed surface without clogging it noticeably. In fact, whether applied straight or mixed with either powder pigment or acrylic paint for an opaque colour, the first coat will emphasise much of the porous foam surface and appear matt with an even roughness. If this is allowed to dry completely (needing a good few hours or preferably a whole day) and then painted again, the pores will start to be filled. Especially if combined with careful sanding between each coat using a medium grit sandpaper (for example 120-200 grit) a fairly smooth finish can be achieved. This must be applied as evenly as possible because raised streaks in the Paverpol will be tough to sand down!

The next option is either painting or coating with a ‘polyfilla’. I make this distinction between ‘painting or coating’ because certain polyfillas can be thinned with water to a gesso-like consistency without losing too much of their strength and can be smoothly painted on. Polycell Fine Surface Polyfilla is in my experience the best of these. It is bought ready-made in tubs; it’s particularly smooth; thins evenly with water; sticks very well to sanded styrofoam and is far less subject to shrinking and cracking than other types. It also retains a little flexibility when dry. To get an even, lump-free cream with water it’s best to ‘condition’ some of it first either in a bowl with a spoon or on a clean glass plate with a spatula or palette knife. As you work it around it will become more liquid and if this is continued while adding water a few drops at a time you will gradually get something like the consistency of gesso, without any lumps.
The forms below were carved/sanded in styrofoam; the sanding stage finished with a flexible foam-backed sanding pad (see below) to achieve the smoothest surface. They were then painted with a thin coat of Polycell’s Fine Surface and left to dry for a day. After this a second coat was applied and then a third, which was left as before. The final treatment before painting was a careful sanding with a very coarse (60 grit) sandpaper which imparted a visible grain, softened with an overall rub using finer (240-300 grit) sanding cloth. The surface achieved with this polyfilla is not any tougher than the Paverpol, but it is much easier to sand, making it more ideal if the aim is an even, glass-smooth one. I painted these with Humbrol matt enamel, which is thin enough not to clog surface detail or add any additional texture but opaque enough for a rich and streak-free coverage.

I waited a few days for the paint to reach maximum hardness (although thin, the enamel dries very hard and durable) then rubbed carefully with a fine sanding sponge (these look similar to kitchen washing pads) to bring out some of the grain.
But an equally smooth and even harder surface can be achieved using a more specialized material. Casting resin is not usually considered as a medium for thin coating, mainly because it’s thought that it will fail to cure properly under a certain thickness. This may be true of some, but I’ve used both general-purpose (GP) polyester resin and special types of polyurethane resin many times for this, mixing in very small amounts and applied like a varnish .. with consistently good results! Polyester resin cannot be used to coat styrofoam because the styrene part of it will eat into the surface. However, polyester resin will work perfectly on polyurethane foam and, with predictable logic, polyurethane resin works perfectly on polystyrene foams such as styrofoam!

The ‘head’ on the right above was painted with a small amount of Tomps Fast Cast polyurethane resin, first mixed together quickly and then worked with a soft brush into the styrofoam surface. I chose this brand because of its low viscosity, designed to cure even in very thin sections. After about an hour this cured enough to be sanded, just to even out the surface a little, before being coated again. More careful sanding followed, and finally one more coat. The overall coating is now akin to eggshell in thickness and hardness .. but in important respects stronger because it is supported uniformly by the rigid foam underneath. An ‘industrial’ ceramic-look smoothness can be achieved using a mixture of careful rubbing with special sanding ‘cloth’ (blue/green below) or thin layers cut from the surface of a nail parlour sanding block. These will flex with the shape, unlike sandpaper. Polyurethane resin sands surprisingly well for something so hard .. even easier to sand than some fillers!

Below I’ve included the stages in the shaping of these ‘heads’ .. starting with a block shaped on a template, then sanding away from a centre line.

The concaves for the eyes were started with a curved sanding tool, similar to the one used on the form featured above. These are easy to make, involving only a thin strip of sandpaper glued to a former.

Preparing styrofoam for mouldmaking
If a styrofoam shape is being made as a prototype form intended for casting it doesn’t need to be made particularly durable .. it only needs to withstand silicone rubber being either brushed or poured over the surface. It does however need to be sealed, because if not the silicone rubber will grab into the surface too much and become very difficult to separate. Vaseline (petroleum jelly) is an ideal temporary sealant in this case because it can be easily brushed or rubbed into the micropores without damaging the surface. If care is taken not to use too much of it the Vaseline will also even out the surface, although I’ve noticed that most of it is absorbed into the silicone anyway. The only problem is .. it’s very difficult to see where you’re applying it! The solution is to colour it.

This is one of many base unit prototypes I’m making for a sculptural work which I can only describe by its working title .. ‘the ridiculously organic construction toy’! The components of the form system will be assembled by means of holes and joining-plugs. I found an easy way to carve out clean holes in styrofoam and I will explain this method sometime soon.

The best way to colour Vaseline is to first mix a little powder pigment, in this case half a teaspoonful, with roughly the same amount of Vaseline to make a thick paste not unlike tube oil paint. I chose the ultramarine here because it’s a strong pigment and finely ground, combining smoothly with the Vaseline .. some powder pigments may be grainy or clump a bit, which is not so good! The half teaspoonful was sufficient to give a strong colour to c. 50g of Vaseline when I added this to it, but one could use far less pigment. For example, the pigment will stain a porous prototype, so you have to bear this in mind if you want to keep it or if it’s an object of value.

There were a couple of larger scratches in the surface which I needed to fill and I’ve found that soft modelling wax (this one is the Terracotta Modelling Wax from Tiranti) is the easiest to use, worked carefully in with a brush.

Major repairs or alterations to styrofoam forms
It is a long-established practice amongst carpenters and, in more recent times, restorers to neatly excise a damaged area .. i.e. to cut it neatly out .., glue a new block of the same material in its place, and then reshape this rather than ‘bodging’ with something else like a filler. Most fillers tend to shrink, to varying extent .. inevitable if they rely for hardening on the evaporation of a solvent. They usually can’t be laid on too thickly otherwise they can take an age to harden, and it may take a few goes to fill a deep repair properly. The other disadvantage of using fillers, especially to repair or alter styrofoam is that when set the filler material reacts very differently to sanding than the surrounding foam. It is usually much harder and inflexible, making a seamless transition difficult. The much better way to do it .. patching in with the same material .. is illustrated below.
This test form was made in the same way as one of the components described above .. first rough sanded and then finished with a 120 grit sanding block.

Below is some stylised ‘damage’ ..

I sanded away a broad channel, making sure that the bottom of it was flat and smooth. The side edges are not parallel but a little tapered, so that a wedge-shaped block can be slid into position. This means that the block doesn’t need to be perfectly accurate in width.

In this case I secured the block with double-sided carpet tape. I’ve found Ultratape ‘Rhino’ very reliable so far. The block needs to be slid into position, as I’ve said, but not pressed down until it’s tight against the channel edges. I also slanted the edges of the block a little i.e. making the top surface a little bigger than the bottom, so that when pressed down it squeezes even more tightly into place. Styrofoam will compress a little to make this possible.

Then it was just a matter of re-attaching the semi-circular templates either end of the form (see earlier) to protect the undamaged surface and sanding the block down to the same point.

Just out of interest I tried similar repairs using Gorilla Glue as a filler ..thinking that, since the glue takes so well to the styrofoam and cures with a similar composition it might be an ideal solution. Unfortunately not!

I made some notches with the scalpel, spray-moistened the styrofoam surface, then laid the glue into them making sure to spread it completely over the edges of the cuts. I also spray-moistened the topside of the glue after this was done.

I waited a little more than two hours, during which the glue had expanded .. as the manufacturer says .. 3-4 times in volume. The first few millimetres of the cured foam was fine-pored and sandable, ideal in fact, but deeper down the bubbles were much bigger and the consistency soft and fibrous. It was like trying to sand bread! The foam had become weaker and more irregular because it was allowed to expand too much and I’m guessing that it would work better as a sandable filler if it were more confined i.e. by wrapping a non-stick covering over the form before the expansion starts.

Where to buy styrofoam in the UK and abroad
If you just want to try it, or you just need a small amount, and especially if you want to ‘pic’n’mix’ different thicknesses or types, 4D modelshop in London or online is the best option. They offer the fullest range of thicknesses and types, including the less common dark green, orange/yellow or finer white. They stock the standard blue in a range of sheet sizes from a rare 1mm to 165mm thick. If you just need a little to try-out the methods illustrated here a piece of 25mm blue styrofoam 300x600mm costing just £2.90 (Oct2015) will be more than enough!
On the other hand if you know what you want and you want a lot of it .. you should look at Panel Systems who supply multi-sheet packs with significant savings. I’ve listed address details and a selection of comparison prices for styrofoam in Updated sources/prices of specific materials within the Suppliers section.
As I said at the start of this article the light-blue insulation foam we’re familiar with is manufactured by Dow Chemical Company who are based in Michigan .. and as far as I understand they’re the only manufacturer:
http://building.dow.com/na/en/products/insulation/rigidfoam.htm
Regardless of which country you live in you should concentrate your search on suppliers of building materials but also suppliers of fibreglass supplies i.e. resins etc. because these suppliers often stock it as what they term a ‘core’ material along with polyurethane foam sheet. I’ve noticed here that it’s sometimes cheaper and there are likely to be more choices from these suppliers than from builder’s merchants. The type of insulation material available varies a lot from country to country, as one would expect even in these ‘global’ times. It’s a matter of luck whether you live in a region where the Dow product is preferred or those from the other big manufacturer of insulation foam Owens Corning .. but there are also a host of others! Foamular is the name of the extruded polystyrene Owens Corning produces and, for all I know, it may be just as good for sculptural purposes as blue styrofoam .. except that it’s a shocking mauve-pink, by the looks of it! .. but I can’t test it because we don’t have it here. I find it odd though that I can find this more readily when searching US sites but the blue stuff so rarely .. as if Dow manufactures its blue styrofoam exclusively for export rather than the home market?
‘Foamular’ is available from Home Depot in the US, in ¼ “ ½ “ ¾ “ and 1” thicknesses for large sheets, or in this format:
I would like to hear from anyone who finds a good and reliable source for the blue styrofoam, wherever you are, because I can then include this in my articles or lists for others to see.
28/2/2015 thanks to Nathan for the info that Lowes Home Improvement in the US does stock the blue styrofoam as an insulation material

Pingback: PROTOTYPING – Foam Modelling – MICHAEL WALKER PRODUCTS
David, is the Vaseline supposed to be dry before applying the silicone rubber? I don’t see it drying on its own. I just spread silicone rubber on top as is?
Hi Sean, No it doesn’t dry .. like grease or oil. It’s the best thing to use for foam because it fills the bubbles so the silicone doesn’t grip into them too much.
Thanks David!
I am a stage scenery and props maker and use Foam products a lot, a far cry from the wood frames, hessian and plaster we used to use. My hobby though is R/C model boats and I am a proponent of carving the hulls from Blue Foam then skinning them with fibreglass tissue or even ladies stockings and brushing epoxies or PVA based varnishes. This method imparts the strength some of your readers are looking for and can be painted with acrylic spray paints for a good finish. On the old plaster jobs scenery work we used plain white Dulux Matt Emulsion for a primer, cheap and works a dream. PS My full time job is actually a craft teacher and I would like to say what a great collection of tutorials, well done.
Many thanks Ron for the great additional info!
Pingback: 2020 Transition – poradora
Hi..
I appreciate your Informative post and thanks for sharing.
Hot Wire Bottle Cutter
Great article and blog. Will come here for more ideas and tips! Very happy I found your site for a more compact overview – So far I have to put it all together by visiting message boards or youtube channels.
PS: BASF also produces XPS plates under the name “Styrodur” So maybe some people can find them in their local stores if the Dow Corning stuff isn’t offered there.
Thanks Simon! That’s useful .. it might just be an option in the US, rather than Europe ..I don’t know. Recent EU regulations (completely justifiable ones!) have limited the options here.
Nice work. But here in the US everyone who uses the white styrofoam or the pink insulation foam all know the difference between all the different kinds of foam and if they dont specifically say, which they usually do, we know just by the color what they are using.
Thank you so much for posting your process, its gold!!!
Pingback: Tips for Shaping XPS Extruded Polystyrene - HudsonWerks
Pingback: Tips for Shaping XPS Extruded Polystyrene « Adafruit Industries – Makers, hackers, artists, designers and engineers!
Pingback: Styrofoam: Build forms that you never thought possible in any other material | Sculpture
Thanks so much, brilliant info here. I’m having an interview with Glasgow Conservatoire and need to make props for a play. I am probably going to make it for “Fences”. Would Styrofoam be a good basis for trees and a house?
I’m afraid you lost me after ‘props’. Do you mean ‘model’ of trees and house?
Sorry David, I meant, what do you think would be the best material to make a house and a garden? It would be 1:25 scale, I’ve ordered a ruler, as suggested in your other great blog. The front of the house will either be “bricks” or “wooden shigles”This is for my interview in 6 weeks.
Ok .. not styrofoam, too chunky for those! You’d be better with house mainly cardboard and balsa wood for the shingles. Trees at 1:25 better with wire thickened up with modelling material. There’s more in ‘Making realistic models’ in Methods section.
Brilliant, thanks so much David. I’ll let you know how I get on, Nikcy
Hi,
Thanks for the post. Very informative. I have done a bit of Styro modelling over the years as a teacher but never needed to paint before. This time I am making props for our schools upcoming Christmas production. I am looking to model 4 identical sewing machines!
Thanks for the tip of using Gorilla glue to join pieces together. I looked at the Tomps resin for coating but think I will stick to the Polycell suggestion. Could I achieve a good finish if I painted on neat PVA then spray painted once dry? I appreciate the quickest solution is not necessarily the best and would value your experienced suggestion 🙂
Thanks
Hi Jon,
Yes, go with the Fine Surface filler from Polycell. It may be better to thin the Pva with a touch of water. It will probably fix the paint better but it won’t add any more strength. The props need to be handled with care .. they won’t take any accidental knocks!
Thanks for your great tutorials, they are extremely helpful!
Hi folks! Love the tutorial, i just wanted to mention that I run a business called bluefoam.co.uk. I sell sheets and blocks of Dow Styrofoam LB-H that i have cut to convenient sizes. If you have any questions you can get in touch via the forms on the site. Thank you 🙂
Awesome tutorial … I am complete beginner at this and I am currently working on building aTiki statue … so this helped me alot
That’s a kind of totem isn’t it? If you’re using styrofoam, once you’ve got the main shapes it’s much easier to do the fine details by scraping/sanding than carving.
Hi David –
Can Styrofoam be sculpted into non regular shapes, like a bike seat, – similar to the way you might use clay to come up with a model? I can see that regular shapes can be made with tools cut to size, but I’m wondering how you would approach something completely irregular…and concave!
Very helpful website – thanks for the start-up info…
Hi Peter,
Styrofoam is perfect for something like a saddle shape .. surely?! I’ve shown how one could tackle concaves in the article .. again, surely?!
I ended up getting the stryofoam free from a company that builds barges for houses – So far the styrofoam worked great now I just have some sanding of the details and then painting – they look great
Hi David
Styrofoam for craft and other purposes can be ordered online in the UK from Panel Systems in Sheffield. It appears to be the genuine Dow product. Have just ordered a box of twelve 600x600x25mm green panels for a model railway project for £66 including VAT and delivery.
Thanks for all the information!
Regards
Matthew Bartle
Yes, I’ve got it in my ‘Suppliers’ section .. I usually get mine from there, preferring the green version.
Hi David,
I came across this page while researching how to make an antiquated well from styrofoam for a horror film that my brother and I are shooting. This has been by far the most helpful and instructive information I’ve encountered on the web.
Thank you so much for posting this, and for sharing your knowledge in general. You are greatly appreciated. I plan to dig into your other tutorials as need be.
Best,
PeterPaul Shaker
Thanks .. good to hear!
Thanks so much for your great tutorials! I was struggling to figure out how to hollow out a perfectly round indentation in styrofoam. I found the answer here, and much more. Very clear directions, extremely high quality work shown, and many inspiring ideas for future projects. Thank you again!
Thanks Eric! Very glad that it helped
awesome
Pingback: Ilustracje do modeli przytorowych kolejki ogrodowej | Piotr Bein's blog = blog Piotra Beina
‘Nice’ .. I like that!
FYI. Lowes has a white foam now that appears to be their own brand. On the home Depot link it shows Loctite PL300 10 fl. oz. Foamboard VOC Adhesive in a caulking gun configuration. The foam is pink in the US because of the Pink Panther Mascot for Owens Corning. No matter teh style of foam from them it is all pink.
Can you please share your easy way to carve out clean holes in styrofoam?
Have done so .. see my post ‘Cutting smooth holes in foam’ Jan 17
Excellent informative article, especially as I have been cajoled into making a Brittania sculpture for the Cowes (Isle of Wight) carnival float!
Good luck with that! If you get the chance let me know which aspects you find useful.
I will be happy to, with any lessons I learn on the way!
I’ve been a modeler for years, mainly for tabletop games terrain, and this blog has been a revelation. Absolutely phenomenal step-by-step instruction for terrific techniques, materials and methodology. I cannot thank you enough, this has easily become my new favorite resource for teaching and learning new techniques for working with my favorite media. Great work!
Many thanks Matt! Spread the word as you see fit!
Fantastic and informative article. Thank you kindly for sharing your knowledge with us. Classy and great of you!
David, You have written one of the best tutorials I have ever read, period. I know it takes time to create such a detail document and I very appreciate the work you have put into this. Bravo. Thank you.
Thanks for saying! The info has been added to/modified over time .. one of the main advantages of this form of writing over printed books. Books were fine when change was relatively slow!
Im a carpenter/joiner and i use the blue “poly foam” sheets for ground insulation. we buy them in 8’x 2′ slabs between 25mm – 150mm
“Dow”
UK Suppliers:
FGF insulation ( Trafford park manchester )
Shefield insulation ( Trafford park manchester )
possibly both nation wide suupliers.
Thanks for the info!
Hi David,
First of all, THANK YOU for such a well written and informative article. I will be reading it again a few times to learn as much as I can. I found it while searching for ways to sand and fill voids in Styrofoam.
I make things with polymer modified concrete and often use Styrofoam for the cavities. I was looking for better ways to cut foam and ended up building a hot wire cutter. Works very well but some sanding will still be required and sometimes filling in small indents (concrete translates the tiniest of indents).
As part of an ongoing series called Concrete Creations, I just posted about the wire cutter at Life As A Human (my online magazine) and mentioned you at the end of it with a link to this piece. Here is a link to it if you would like to see it. http://lifeasahuman.com/2015/arts-culture/creativity/concrete-creations-making-styrofoam-cavities/
2 quick questions!
I read about the glues you use and recommend. I just tried using a wood glue (Weldbond) and it worked well. Like you mentioned with Gorilla glue, I also had to correct the alignment of the blocks a few times. Have you tried Weldbond?
You mention polyfilla. I wonder, could this be used to fill in small imperfections in the foam and then sanded out or would you suggest some other way?
Again thank you for such a great post! It is content like this that makes the internet a tremendous asset to us all.
Cheers,
Gil
Hello Gil,
Thanks! It’s always good to know that my efforts are appreciated, and of help! In answer .. yes, I’ve tried Weldbond white Pva type glue in the past .. good, but just a regular form of strong Pva as far as I could tell. I don’t usually consider Pva for bonding styrofoam because although it works it needs to be left for ages and the parts need strong clamping. Perhaps Weldbond does other glues now? Yes, I would strongly recommend one particular polyfilla for small filling .. Fine Surface Polyfilla from Polycell! No other I’ve tried works as well as this .. sticks well to anything, fairly quick drying, not too tough to sand etc.
best,
David
Hi David,
Thanks for the Polyfilla info. I will see if I can source some in BC Canada.
As for the glue, I had some in my workshop and it listed foam as something it would work with. I did not clamp the pieces. I did have to move them around a bit.
I used a small brush and painted one surface lightly with it then just fiddled with them till they lined up. Only took 3 or 4 hours to set. I did however leave them overnight before using them in a mold for a pour. That said, the gap did translate into the concrete so I suspect clamping them might get rid of that! I will try that.
I also tried Elmers spray adhesive. Not great. But it works well to temporarily glue a template onto the foam that I could cut using the hot wire cutter.
Hope you have a great weekend and thanks again!
Cheers,
Gil
Hello Gil,
Thanks also for the info. For bonding styrofoam which one wants to sand ‘through’ afterwards and eliminate the join, I still find the Gorilla glue method the most successful and reliable. Using spray glue (here we generally only use the 3M products, for this case either Photo Mount or Craft Mount) is a fairly close second, and it’s quicker! .. but because the glue itself doesn’t completely ‘dry out’ there’s still some visible join line and of course it’s no good for gap filling.
best,
David
I forgot to add though .. I think, from what I’ve been told in the past, that Polycell products .. or specifically the ‘Fine Surface’ Polyfilla .. are hard to get in Canada and the US, though I don’t know why this should be. If you find it please let me know.
Hi David,
Thank for the 3M spray suggestions. Will try those as well and will get Gorilla glue today. You are right, the Fine Surface Polyfilla is not available in my neck of the woods. I purchased a small container of Lepages Extra Fine polyfilla and gave it a go. I ‘think’ the results are OK for me.
That said, I have been reading more and more of your site. I am thinking that for my purposes, a modeling wax or clay might be a better solution for filling in small imperfections. It only needs to survive for one hour for the Kast Krete polymer-modified concrete to cure (amazing product BTW … I think you would find many applications for it) and I think either one would release easily.
Just want to say David that I am humbled by the breadth of your knowledge and the quality of your work and again very grateful that you choose to share it with all of us!
Cheers,
Gil
I build RC planes/cars and mix Gorilla glue and carpenter’s glue in small batches when I’m ready to glue foam. It provides the moisture and causes even expansion. I use a small 4×6 piece of glass from a picture frame and mix with a wooden spatula made from a popsicle stick, sanded to look like a screwdriver but with a finer edge. I use foam board, xps and polyurethane foam. Local job sites toss excess foam in the dumpster. Craft shop also sell dense fine xps in floral department called ‘Desert Foam’, On planes I use clear packing tape as a lightweight strong coating and cars get epoxy resin/fiberglass screen layers, then finishing/casting epoxy topcoats then paint.
Thanks for the info Tom! That sounds a really useful tip re. mixing Gorilla glue with Pva .. I’ll give it a go next time! Interesting, your mention of what they call ‘Desert foam’ .. it almost sounds like they’re mimicking ‘Oasis’ which is a brand name for a rigid foam marketed as basis for floral arrangements .. but Oasis is not polystyrene I believe, instead it’s apparently made with ‘phenolic resin’.
Pingback: LIFE AS A HUMAN – A hot wire Styrofoam cutter
I found your article too late! After many weeks of sanding and shaping the blue foam board, I had a beautiful classic car prop for a school play. After priming and painting it with what was supposed to be foam safe spray paint, I’m left with a cratered mess. Any tips on what I can cover the foam with to fill in the craters and create a smooth, paintable surface to salvage my work? This is a large project, approximately 5 feet across, so cost is an issue.
A real shame! I’m not sure what to add different from what I’ve already written though. Maybe in this instance the two best options are .. either to get hold of some 2-part expanding polyurethane foam (rigid, not flexible); coat it quickly into the damaged areas and stretch sheet plastic (maybe tough clingfilm) over the surface to contain the expansion; once set, sand flat .. or fill the damaged areas with one of those very light, sandable fillers (i.e. ‘Red Devil’ I’ve seen here, but also very cheap versions) because it won’t be too different from the Styrofoam surface. Actually, now that I’m thinking more about it .. whatever you use, stretching plastic film over to contain the material could help a lot and save a lot of sanding!
Problem is that these materials melt with reducers and thinners. Try using 4 to 1 primers first. This should create a solvent barrier so you can sand and paint.
Thanks, yes.. I warn about the previous problem in the article. But .. are you certain about using Mipa ‘4+1 primers or fillers? Judging by the MSDS info they contain quite a concoction of solvents themselves!
Now that I think about it .. the ‘4+1’ primers are mixed in the ratio 4:1, hence the name of course, which relates to the standard mix for epoxy coatings. So ‘4+1’ may be an epoxy formulation, although I can’t find any reference to the word ‘epoxy’? In which case you would be right, because epoxies don’t attack polystyrene.
what a awesome tutorial, many thanks! Nathan xxx
why? .. what the hell is wrong with it? .. oh, sorry I misread x
David,
Brilliant tutorial!
I’ve been asked by a friend to do a large scale (9′ x 16′) model of a sandstone formation for an interior wall. I’m in the States and looking for a recommendation for a hardener/filler. Polycell doesn’t appear to be sold here.
Are there any products you’d recommend for XPS here in the US?
Thanks so much!
I don’t know what fillers are available in the US. An idea might be to use Paverpol as a coating though .. perhaps with fine sand added ..or mixing with a powder filler such as talc will give it good filler properties?
Here in the states Lowe’s Home Improvement carries the blue foam on a regular basis, at least in the South East. I have heard that availability does vary by region due to differing insulating needs though. The Price is usually between $9 -$20 US depending on size and thickness. It is listed on their site (www.lowes.com) as foam board insulation and can be found through their search engine.
Many thanks for this info Nathan!
Hi. I saw your tutorial on Pintrest and I found it very informative. I did some XPS sculpting for an art class. I found that a Dremel tool and some of the sanding tips allowed for quite a bit of detail. Also you might look to a beauty supply store for Emery boards for acrylic nails. They come in different grits and are easy to cut into sizes you might need. Thank you for the glue info.
Thanks Margery! Yes, I mention and show the ‘nail parlour sanding block’ but I’ve found that fine-grit rigid boards don’t do that much.
Finally found Some ! (a bit more expensive than in UK, around 20€ for approx indicated size) happy me :)) thans for your help
Very interesting ! thank you . Do you know by any chance where can i find Extruded polystyrene abbreviated in France ???
I don’t. But I’ve always assumed it’s ‘universally’ used for roof insulation and if that’s the case you’ll recognise the distinctive blue if you see it in building materials suppliers. It’s also commonly stocked by fibreglassing/polyester resin suppliers so you could also look on those sites.
Thanks for your answer, indeed it’s also used fo insulation and building materials suppliers but i was hoping you would have some tips or ‘good plans’ as the price they sale it is just too expensive !!
The most it should be is around £12-13 for a 25x600x1250mm sheet. Here in the UK I’ve noticed that it’s sometimes cheaper from specialist fibreglassing or resin suppliers than it is from builders’ suppliers .. and ‘customer service’ often a great deal friendlier!
Great article! Been looking for something like this for ages, great detail and you managed to address ALL of my queries relating to this foam.
That’s good to know Nik! If you discover anything not mentioned, please let me know.
Truly excellent, I have featured your blog.
Thanks for your good words!
Awesome work! Reading through I kept wondering if power tools would speed things up, or if they just move too fast. Thinking in terms of a drum sander or even a drill with a disk of sand paper edged foam. Would that melt the foam.
Yes I think it would be too fast for styrofoam unless you have a variable-speed drill.
Pingback: Good Friday Links | Prop Agenda
great inspiration and many useful infos thanks a lot David
Mind. Blown.
Great tutorial. I’ve found that ordinary white carpenter’s glue (LePages’) works very well. It is cheap and gives a strong bond.
Great information…
A great tutorial. Thanks, David…
Pingback: Model Making Materials | anyakordecki
Execellent !! Awesome tutorial !! Thank you