I’ve been slowly adding to my page on Shaping styrofoam in the Materials section, partly because I saw that it was one of the most visited pages. I wanted to consolidate the scraps of knowledge I’ve gained over the years on gluing styrofoam and the range of options for finishing or reinforcing the surface. I also wanted to look into a more satisfactory method of making repairs which I found, as you’ll see from the photos .. well, very satisfying!
More on gluing styrofoam
I’ve bonded pieces of styrofoam together with a strong, double-sided carpet tape for years and they’re actually much more permanent than I’d first imagined. I have composite forms made many years ago which have been well-used as teaching examples and show no signs of coming apart! A few observations are necessary though! .. the two surfaces have to be smooth and flat against each other; if these surfaces have been sanded to make them fit, all dust should be removed, ideally vacuumed using a brush attachment. For the same reason the best bond occurs between the slightly ‘skinned’ surfaces of the sheet as it comes. When using the tape it’s particularly important to avoid placing it too near to where the styrofoam will be carved or sanded if one wants a seamless join .. but this applies almost equally when using most glues. But if it’s impossible to predict, or avoid, gluing in an area which will later be carved through or sanded, I’ve found some of the following options most suitable because they offer the least resistance.
For example what works surprisingly well as a bond between flat styrofoam sheets is spraymount, by which I mean the permanent spray-glue types from 3M. 3M’s ‘Craft Mount’, which is the strongest of their range, is particularly suited because it has a little more body. It should be sprayed on both sides to be joined (different to how it’s normally used), and it’s best to wait a little i.e. half a minute, before the two pieces are firmly pressed together. As with all contact glues, even the ‘instant’ ones, the bond will hold straight away but needs a day or two to get stronger. But the same applies with this as with double-sided tape .. the surfaces must be completely flat against each other and dust-free to bond strongly enough! Spraymount never sets completely hard, even though it’s grip is strong. When cutting through a glued edge the glue may catch the blade a bit but one can get used to this. It will sand reasonably well, especially if the tackiness gets mixed with styrofoam dust. For the same reason, I’ve found that it can help to dust the piece with talc while sanding.
If you want to glue pieces of styrofoam together which do not lie completely flat against each other .. you will need something ‘gap-filling’. There’s hardly anything more gap-filling and instant that hot-melt glue! Contrary to what you might have read elsewhere, hot-melt glue will work reasonably well with styrofoam .. as long as it’s not too hot! One just has to know how to manipulate it. Polystyrene foam is much more heat-sensitive than polyurethane foam .. it softens already at 90°C (193°F), while the temperature of hot-melt glue is around 180°C or more. So there is bound to be some melting of the styrofoam surface, but if you experiment and are careful you can find just the right number of seconds to wait before pressing the surfaces together, cooling the glue down a little but not so much that it fails to stick. Obviously it’s not possible to cover a whole surface, even a small one, with hot glue before most of it hardens. Think of this more like ‘riveting’ .. applying very quick spots of hot glue which will secure the pieces at those points once the glue has cooled. This method is definitely not for carving into or sanding though.
Another option is provided by the ever multi-tasking polyurethane! It’s common practice in scenic work and prop-building to use a rigid-setting, 2-part polyurethane foam to bond other foams such as styrofoam together. A small amount of the two parts must be mixed together in the directed ratio and then brushed quickly onto the joint before the foam pieces are pressed together. The resulting foam will expand to fill any gaps in the joint but the pieces must be held firmly in position while this is happening, otherwise they’ll be forced apart. Often this is easier said than done because the expanding foam exerts quite a force, but generally with these polyurethane foams and glues the less gap there is the stronger the joint will be. Prop-makers and sculptors are more likely to use the foams which are supplied in two separate parts and which need to be manually mixed .. a good source is a sculptor’s supplier such as Tiranti .. but the ‘instant foam’ tube cartridges sold for wall repairs or insulation are similar.
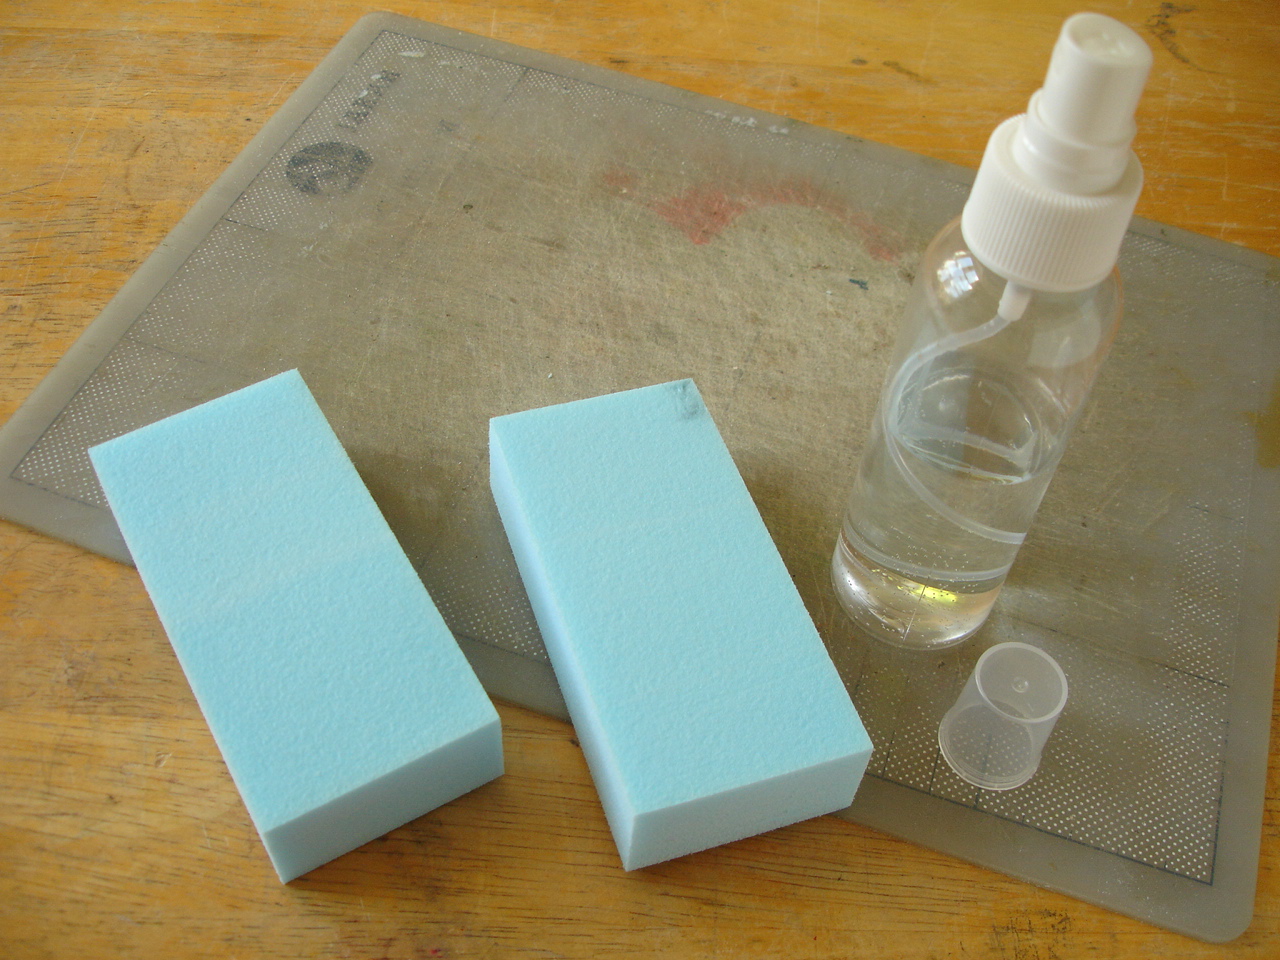
Gorilla glue is yet another option .. a polyurethane glue that comes as one part, so no mixing is necessary, and which foams while curing on contact with moisture. What this means is that both surfaces to be glued need a light misting first .. best with a small pump spray. The glue needs to be applied thinly to just one of the surfaces before the two pieces are pressed together. Below are two blocks of styrofoam already sprayed .. just enough to dampen the surface, certainly not dripping wet!
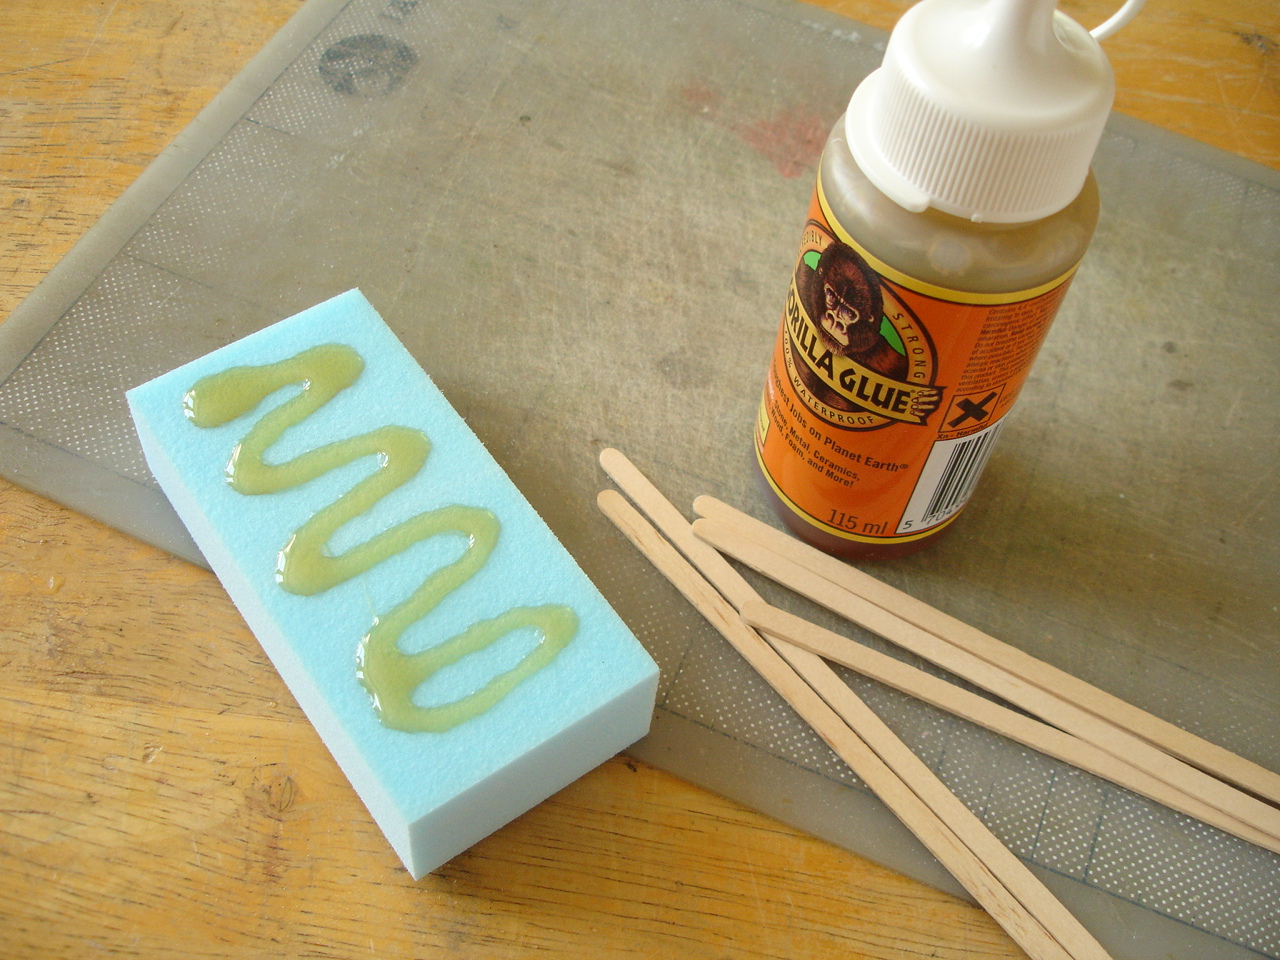
Gorilla Glue can be deposited in spots if preferred, and these will spread once the pieces are squeezed together. It is not necessary to spread the glue beforehand over the whole surface but here I used a coffee stirrer just to distribute it better. What is very important to note (and not included in the manufacturer’s directions!) is that the glue should be dropped from the nozzle without letting it touch the wet surface! If it does moisture will contaminate the bottle and some of the glue will set inside .. as I found out when I tested it for the first time!
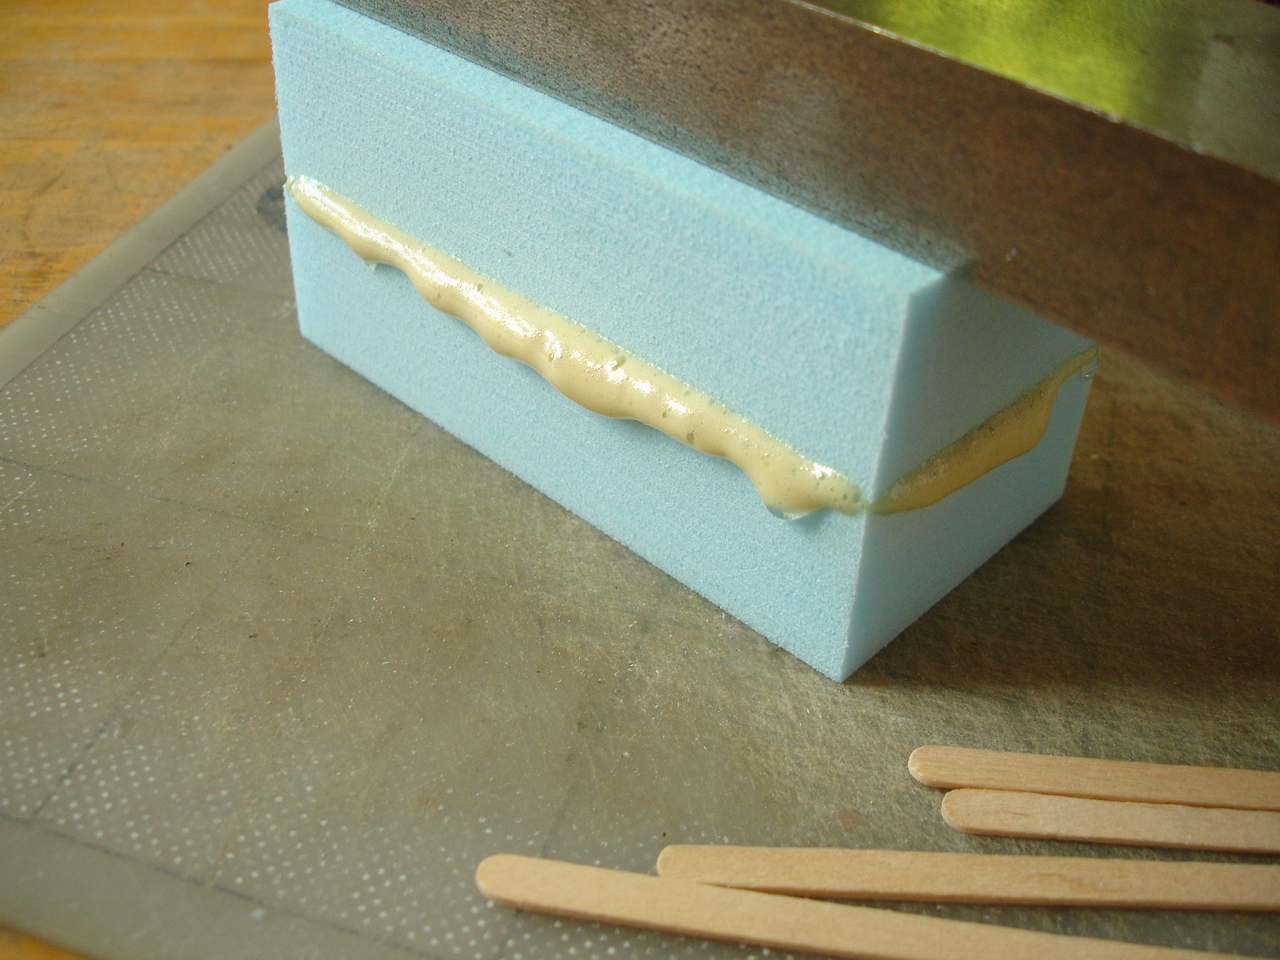
Below, I have weighted down the two pieces with a solid metal block. This was sufficient, although where possible it is always better to clamp the pieces together (sandwiched between flat pieces of wood to protect the styrofoam). The expansion occurs after a minute or so, 3-4 times in volume according to the manufacturer, and if the pieces are properly clamped the excess is forced outwards rather than upwards. If, because of the shape of the pieces, it is difficult to clamp without damaging the surface, masking tape or cling-film could be used to bind them together but these could give way a little and there may well some shifting as the foam expands. I had to correct the alignment of these blocks a few times before the foam stopped moving them.
A couple of hours are needed for the glue to cure. Here below is a section through the seam line, cut with a knife then sanded. If it is properly cured the glue sands through well …. although it is different to the styrofoam it is much more alike than other glues. Also the bond is as strong as they say it is! I think polyurethane grabs on the styrofoam particularly well .. at least, I couldn’t pull the blocks apart.

More on surface treatments
If the surface is going to be reasonably protected .. I mean, if it’s not going to be handled and if it’s shielded from knocks etc. .. a good coat of acrylic paint may suffice. Acrylic paint will toughen the surface slightly, but by no means protect it from any handling, even if careful. Coating first with non-waterproof Pva glue and then painting will do a little more, and the same applies if coated with Pva or a water-based varnish afterwards. But the surface will still be very susceptible to scratches or dents.
If Paverpol is added to the paint mix .. more than half by volume .. greater surface strength can be achieved. Paverpol is a Pva-type medium manufactured in the US mainly for the hobby market and is intended for painting on fabrics or foams to give them a much tougher surface. For example fabric will become rigid and almost ‘resin-hard’ if soaked with it and the manufacturer recommends it for outdoor sculpture. It will not impart the same degree of toughness when painted on styrofoam because it doesn’t infiltrate far into the surface, but a couple of coats using Paverpol will be stronger than either regular Pva or acrylic alone. On its own Paverpol is quite viscous (a little more so than straight Pva glue usually is) but with careful brushing can be worked into a detailed surface without clogging it noticeably. In fact, whether applied straight or mixed with either powder pigment or acrylic paint for an opaque colour, the first coat will emphasise much of the porous foam surface and appear matt with an even roughness. If this is allowed to dry completely (needing a good few hours or preferably a whole day) and then painted again, the pores will start to be filled. Especially if combined with careful sanding between each coat using a medium grit sandpaper (for example 120-200 grit) a fairly smooth finish can be achieved. This must be applied as evenly as possible because raised streaks in the Paverpol will be tough to sand down!

The next option is either painting or coating with a ‘polyfilla’. I make this distinction between ‘painting or coating’ because certain polyfillas can be thinned with water to a gesso-like consistency without losing too much of their strength and can be smoothly painted on. Polycell Fine Surface Polyfilla is in my experience the best of these. It is bought ready-made in tubs; it’s particularly smooth; thins evenly with water; sticks very well to sanded styrofoam and is far less subject to shrinking and cracking than other types. It also retains a little flexibility when dry. To get an even, lump-free cream with water it’s best to ‘condition’ some of it first either in a bowl with a spoon or on a clean glass plate with a spatula or palette knife. As you work it around it will become more liquid and if this is continued while adding water a few drops at a time you will gradually get something like the consistency of gesso, without any lumps.
The forms below were carved/sanded in styrofoam; the sanding stage finished with a flexible foam-backed sanding pad (see below) to achieve the smoothest surface. They were then painted with a thin coat of Polycell’s Fine Surface and left to dry for a day. After this a second coat was applied and then a third, which was left as before. The final treatment before painting was a careful sanding with a very coarse (60 grit) sandpaper which imparted a visible grain, softened with an overall rub using finer (240-300 grit) sanding cloth. The surface achieved with this polyfilla is not any tougher than the Paverpol, but it is much easier to sand, making it more ideal if the aim is an even, glass-smooth one. I painted these with Humbrol matt enamel, which is thin enough not to clog surface detail or add any additional texture but opaque enough for a rich and streak-free coverage.

I waited a few days for the paint to reach maximum hardness (although thin, the enamel dries very hard and durable) then rubbed carefully with a fine sanding sponge (these look similar to kitchen washing pads) to bring out some of the grain.
But an equally smooth and even harder surface can be achieved using a more specialized material. Casting resin is not usually considered as a medium for thin coating, mainly because it’s thought that it will fail to cure properly under a certain thickness. This may be true of some, but I’ve used both general-purpose (GP) polyester resin and special types of polyurethane resin many times for this, mixing in very small amounts and applied like a varnish .. with consistently good results! Polyester resin cannot be used to coat styrofoam because the styrene part of it will eat into the surface. However, polyester resin will work perfectly on polyurethane foam and, with predictable logic, polyurethane resin works perfectly on polystyrene foams such as styrofoam!

The ‘head’ on the right above was painted with a small amount of Tomps Fast Cast polyurethane resin, first mixed together quickly and then worked with a soft brush into the styrofoam surface. I chose this brand because of its low viscosity, designed to cure even in very thin sections. After about an hour this cured enough to be sanded, just to even out the surface a little, before being coated again. More careful sanding followed, and finally one more coat. The overall coating is now akin to eggshell in thickness and hardness .. but in important respects stronger because it is supported uniformly by the rigid foam underneath. An ‘industrial’ ceramic-look smoothness can be achieved using a mixture of careful rubbing with special sanding ‘cloth’ (blue/green below) or thin layers cut from the surface of a nail parlour sanding block. These will flex with the shape, unlike sandpaper. Polyurethane resin sands surprisingly well for something so hard .. even easier to sand than some fillers!

Below I’ve included the stages in the shaping of these ‘heads’ .. starting with a block shaped on a template, then sanding away from a centre line.

The concaves for the eyes were started with a curved sanding tool, similar to the one used on the form at the beginning of Shaping styrofoam. These are easy to make, involving only a thin strip of sandpaper glued to a former.

Major repairs or alterations to styrofoam forms
It is a long-established practice amongst carpenters and, in more recent times, restorers to neatly excise a damaged area .. i.e. to cut it neatly out .., glue a new block of the same material in its place, and then reshape this rather than ‘bodging’ with something else like a filler. Most fillers tend to shrink, to varying extent .. inevitable if they rely for hardening on the evaporation of a solvent. They usually can’t be laid on too thickly otherwise they can take an age to harden, and it may take a few goes to fill a deep repair properly. The other disadvantage of using fillers, especially to repair or alter styrofoam is that when set the filler material reacts very differently to sanding than the surrounding foam. It is usually much harder and inflexible, making a seamless transition difficult. The much better way to do it .. patching in with the same material .. is illustrated below.
This test form was made in the same way as one of the components described above .. first rough sanded and then finished with a 120 grit sanding block.

Below is some stylised ‘damage’ ..

I sanded away a broad channel, making sure that the bottom of it was flat and smooth. The side edges are not parallel but a little tapered, so that a wedge-shaped block can be slid into position. This means that the block doesn’t need to be perfectly accurate in width.

In this case I secured the block with double-sided carpet tape. I’ve found Ultratape ‘Rhino’ very reliable so far. The block needs to be slid into position, as I’ve said, but not pressed down until it’s tight against the channel edges. I also slanted the edges of the block a little i.e. making the top surface a little bigger than the bottom, so that when pressed down it squeezes even more tightly into place. Styrofoam will compress a little to make this possible.

Then it was just a matter of re-attaching the semi-circular templates either end of the form (see earlier) to protect the undamaged surface and sanding the block down to the same point.

Just out of interest I tried similar repairs using Gorilla Glue as a filler ..thinking that, since the glue takes so well to the styrofoam and cures with a similar composition it might be an ideal solution. Unfortunately not!

I made some notches with the scalpel, spray-moistened the styrofoam surface, then laid the glue into them making sure to spread it completely over the edges of the cuts. I also spray-moistened the topside of the glue after this was done.

I waited a little more than two hours, during which the glue had expanded .. as the manufacturer says .. 3-4 times in volume. The first few millimetres of the cured foam was fine-pored and sandable, ideal in fact, but deeper down the bubbles were much bigger and the consistency soft and fibrous. It was like trying to sand bread! The foam had become weaker and more irregular because it was allowed to expand too much and I’m guessing that it would work better as a sandable filler if it were more confined i.e. by wrapping a non-stick covering over the form before the expansion starts.

